Sand Loop Level 224 Solution Walkthrough | Sand Loop 224
How to solve Sand Loop level 224? Get instant solution for Sand Loop 224 with our step by step solution & video walkthrough.

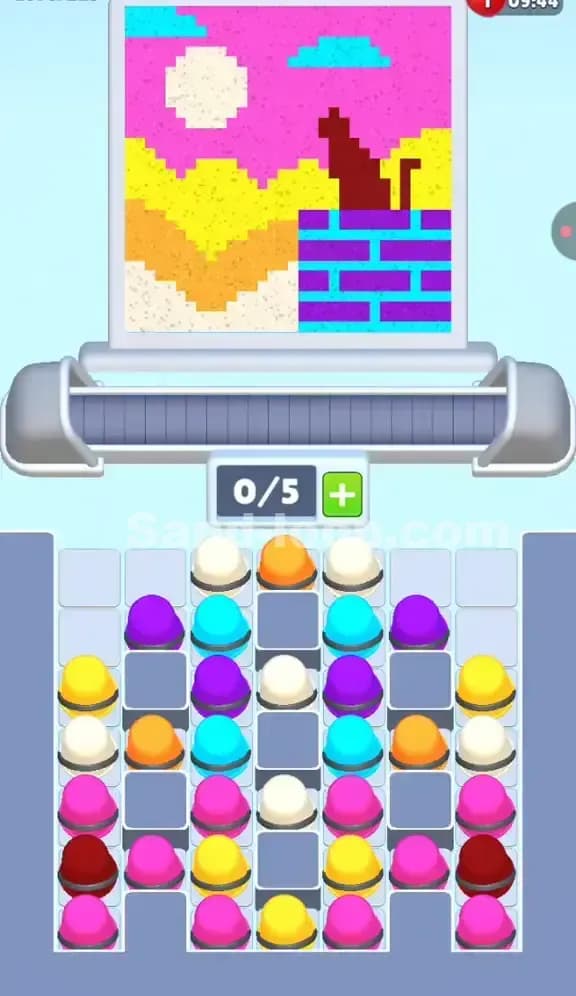
Sand Loop Level 224 Guide: The Abstract Sunset Puzzle
This isn't a speed level, nor is it a frantic ice-breaking challenge. Sand Loop Level 224 is a classic logic puzzle disguised as a peaceful landscape. The pixel art depicts a vibrant, abstract sunset with a yellow sun, white clouds, and rolling waves of purple, pink, and orange.
The hook here is the Slot Economy. You have a standard 0/5 capacity on your conveyor belt, but the supply tray is densely packed with multiple colors that need to be poured in a very specific sequence. The tricky part isn't the speed; it's the fact that the Pink and Purple cups are blocking access to almost everything else you actually need to paint first. If you just spam the pink cups because they are available, you'll clog your belt and fail the level before the sun even rises.
Sand Loop Level 224 Solution: The Sunset Layers
Let's break down the canvas on the top screen. It's built in layers, which dictates your pour order.
- Color Palette Deep Dive: You are dealing with six distinct colors: Dark Red (top sky), White (clouds), Bright Yellow (sun and reflection), Orange (middle hills), Hot Pink (bottom water), and Purple (the wave line).
- The "Danger Zones": The biggest danger here is the Purple Wave. It cuts right through the bottom half of the image. It is narrow and specific. If you pour Purple too early, or too late, it will bleed into the Pink or Orange sections. The white clouds are also small targets; missing them wastes a white cup, and white cups are scarce in the tray.
- Fill Order Prediction: Looking at the image, the background (Sky/Red) and the large foreground blocks (Pink water) usually fill fastest. However, the logic of the supply tray forces a different hand. You often have to clear the "blockers" (the top row of cups) just to reach the colors needed for the background. In this level, Pink is the primary blocker.
Tackling the "T-Shape" Obstacle in Sand Loop Level 224
The defining feature of the supply tray in Level 224 is the massive Grey T-Shape structure right in the middle.
This isn't just a visual spacer; it is a rigid barrier. It splits your supply into left and right columns, with a small "island" of cups trapped in the center bottom and center middle.
- The Left/Right Flanks: These columns are accessible immediately. They contain a mix of Pink, Purple, Orange, Yellow, and Red.
- The Central Trap: Notice the Dark Red cup isolated in the very center, stuck between the grey blocks. And the White cups below it. You cannot reach these central reserves until you clear the side columns significantly. This is a problem because you need Red for the sky early on.
This structure forces you to play from the outside in. You have to strip away the left and right columns to "unlock" access to the center, meaning you will likely have to paint the bottom of the picture (Pink/Purple) before you can finish the top (Red sky).
Sand Loop Level 224 Step-by-Step Walkthrough
Success here depends entirely on the Dependency Chain. You can't reach the sun (Yellow) or the sky (Red) without dealing with the water (Pink) first.
Clearing the Pink Blocker
Your first move is dictated by the top row. The tray is capped with a row of Pink Cups. You have no choice but to use them.
- Tap 3-4 Pink Cups immediately to load the belt.
- Watch the canvas. The pink sand will fill the very bottom section and the area just below the purple wave.
- Do not fill all 5 slots with Pink. Leave at least 1-2 slots empty. If you overfill now, you won't have space to correct a mistake if a Purple cup slides down unexpectedly.
Navigating the Purple Wave
Once the top layer of Pink is gone, Purple Cups become accessible on the second row.
- The Purple wave on the canvas is a thin, zig-zag line. It requires precision.
- Mix your pours. You likely need to alternate Pink and Purple briefly to get the edges of the wave defined.
- Critical Timing: Ensure no Orange or Yellow cups are accidentally tapped while trying to grab the Purple ones. The Orange layer sits above the Purple wave. If you pour Orange now, it might contaminate the Purple zone. Focus strictly on clearing the Purple/Pink rows until the bottom half of the painting is solid.
Filling the Sky and Sun
Now the "T-Shape" obstacle becomes relevant. You've cleared the top rows, exposing the Orange, Yellow, and Red cups.
- The Orange Layer: With the bottom cleared, tap the Orange cups on the left and right flanks. These will fill the middle "hills" of the image.
- The Sun (Yellow): As the Orange clears, the Yellow cups are freed. Pour them to fill the large sun circle at the top and the reflection at the bottom.
- The Center Red/White: Finally, you have access to the center column trapped by the grey blocks. This is where your Red (Sky) and White (Cloud) cups are hiding.
- Tap the White cups carefully. Wait for the dispenser to align with the cloud gaps in the Red sky. Do not waste these; they are limited.
- Finish by dumping the remaining Red cups to fill the rest of the sky background.
By playing outside-in and bottom-up, you circumvent the T-blocker and keep your conveyor belt flowing smoothly.