Sand Loop Level 252 Solution Walkthrough | Sand Loop 252
How to solve Sand Loop level 252? Get instant solution for Sand Loop 252 with our step by step solution & video walkthrough.

Sand Loop Level 252 Guide: The Yellow Bear Puzzle
Welcome to the deceptively simple "Yellow Bear" stage. You're looking at a large, pixelated animal face—likely a bear or hamster—dominated by a massive field of yellow sand. Unlike the frantic speed runs of the 240s, Level 252 is a pure logic puzzle centered on slot management. You have a 5-slot capacity on the conveyor belt, but the sheer volume of yellow cups required to fill that face can lull you into a false sense of security.
The hook here isn't speed; it's color contamination. The red snout and pink cheeks are embedded directly inside the yellow field. If you get lazy and just spam yellow cups, you will accidentally overwrite the red details or miss the pink cheeks entirely, forcing a restart. The pastel pink background also looks dangerously similar to the pink cheek cups at a glance, so watch your contrast.
Sand Loop Level 252 Solution: The Bear Face
Take a hard look at the canvas before tapping a single cup. The image is structured in layers, and understanding this hierarchy saves you from wasted moves.
-
Color Palette Deep Dive:
- Primary: Golden Yellow (The bear's fur). This is about 60% of the total sand volume.
- Secondary: Bright Red (The large circular snout).
- ** accents:** Hot Pink (Cheeks and top background) and Deep Purple (Middle background).
- Details: Dark Brown/Maroon (Eyes and nose line).
-
The "Danger Zones": The eyes are the killer here. They are tiny, horizontal slits of dark color. Because the conveyor belt moves continuously, timing a single dark cup to hit exactly those eyes without bleeding into the yellow fur is tough. The other danger zone is the Red Snout. It's a large block, but it's surrounded by yellow. If you fill the yellow first, you might find it hard to "punch through" to fill the red later without overfilling the canvas.
-
Fill Order Prediction: You generally want to paint the background first (Purple/Pink strips) to get them out of the way, then the massive Yellow block, saving the detailed Red snout and Dark eyes for precision strikes. However, looking at the tray setup, the game forces a specific hand.
Tackling the "Checkerboard" Tray in Sand Loop Level 252
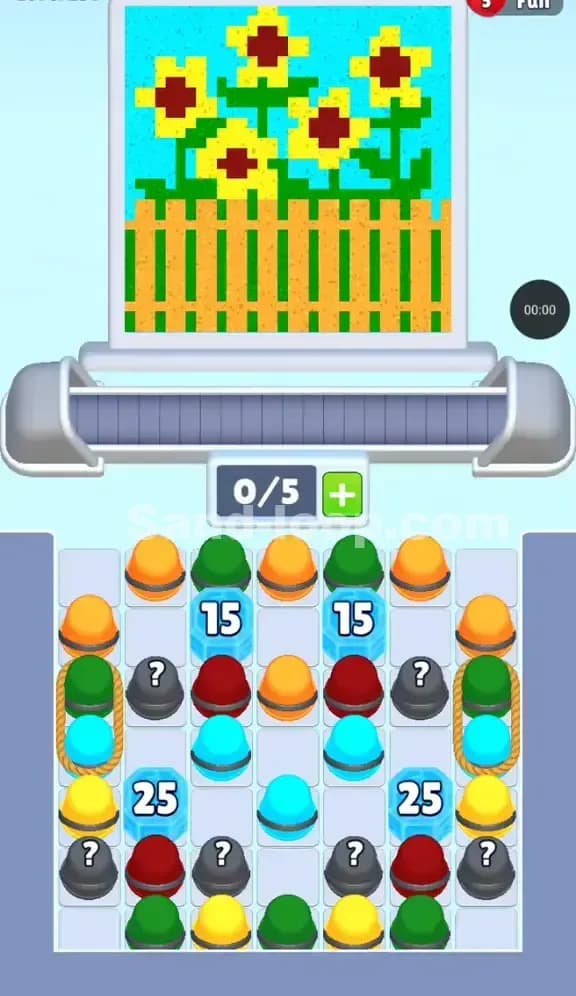
The specific obstacle in Level 252 is the Interwoven Tray Layout. Look at the bottom half of your screen. There are no locks, no ice blocks, and no keys. Instead, you have a messy checkerboard of Yellow, Red, Pink, and Purple cups all mixed together.
This is a dependency hell.
- The top row is almost entirely Yellow and Dark Red.
- The middle rows are a mix of Pink and Purple.
- The bottom is clogged with more Yellow.
The trap is that the colors you need for the background (Pink/Purple) are buried under the colors you need for the foreground (Yellow/Red). If you clear the top row of Yellow cups just to get them out of the way, you risk filling the bear's face prematurely before you've established the background.
Sand Loop Level 252 Step-by-Step Walkthrough
Follow this rhythm to clear the tray without jamming your 5-slot limit.
1. The Initial Red & Yellow Clear
Start by tapping the top row. You have Dark Red cups sitting right next to Yellow cups.
- Tap the Dark Red cups first. These are for the eyes and the dark line on the snout. Get them onto the belt immediately. The logic is that dark details are often the "bottom layer" of the pixel grid.
- Next, tap the Yellow cups in the top row. Don't go crazy. Just clear enough to expose the second row. Watch the canvas fill—the yellow will start forming the top of the head.
2. Digging for Background Colors
Once the top layer is thinned out, you will see Pink and Purple cups in the second and third rows.
- Stop pumping Yellow. Even if you have free Yellow cups, hold off.
- Prioritize the Purple cups first. The purple band is in the middle-left of the background. It needs to be filled before the main yellow face covers it up.
- Next, target the Pink cups. Some are for the background (top), some are for the cheeks. It doesn't matter which is which right now; just get the pink sand flowing. If you wait too long, you'll have to squeeze pink cups in between massive yellow pours, which usually leads to errors.
3. The "Snout" Sequence
Now you should have a partially filled face and a messy tray. The biggest distinct feature left is the bright Red Snout.
- Locate the cluster of Bright Red cups in the middle-right columns.
- Tap them in a burst. You want them to hit the conveyor belt back-to-back. This ensures a solid, continuous pour of red that creates the clean circle of the nose. If you alternate Red-Yellow-Red-Yellow, the snout will look pixelated and messy.
- Constraint Check: Keep an eye on your 0/5 counter. Because you are digging for specific colors, you might have left "garbage" cups on the belt that haven't poured yet. Wait for the belt to clear (0/5 or 1/5) before launching the Red burst.
4. The Final Yellow Flood
At this stage, the eyes, snout, cheeks, and background should be set. The rest of the tray is likely just Yellow cups at the bottom.
- Unload everything. Tap every remaining Yellow cup.
- Since Yellow is the dominant fill color, these cups will wash over the remaining empty pixels, filling in the ears and chin. Any slight gaps in the Red or Pink areas will be cleaned up by this final flood.
- If the level doesn't end immediately, check for a stray Dark pixel (usually an eye) that got missed. You might have one dark cup hiding in a corner of the tray. Find it, clear a slot, and send it home.