Sand Loop Level 285 Solution Walkthrough | Sand Loop 285
How to solve Sand Loop level 285? Get instant solution for Sand Loop 285 with our step by step solution & video walkthrough.

Sand Loop Level 285 Guide: The Red Car Puzzle
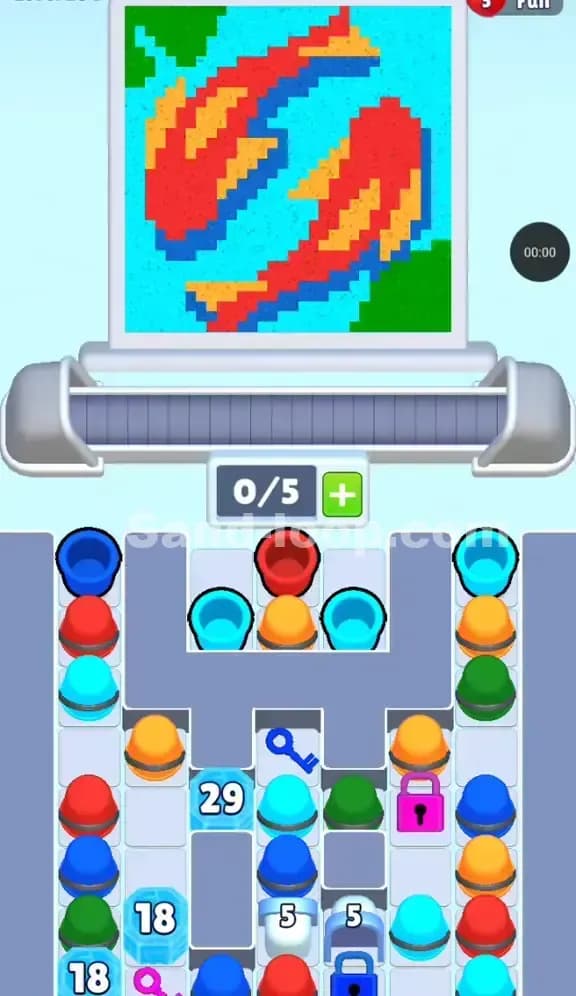
Sand Loop Level 285 hits you with a nostalgic piece of pixel art: a bright red car cruising on a green field under a cloud-filled sky. While the image is cute, the puzzle mechanics underneath are nasty. This is a classic "Ice Block Logic" level. You aren't just matching colors; you are fighting against two specific frozen obstacles that choke your supply lines.
The palette is standard primary colors but requires strict separation:
- Bright Red: The main body of the car.
- Dark Red/Maroon: The tires and the ground beneath the grass.
- Green: The large grassy field.
- Blue: The sky background.
- White/Cream: The clouds and the car windows.
This isn't a speed level. It's a deadlock puzzle. Your tray is shaped like a weird, disjointed "H," and the key to winning is figuring out which side of the H to drain first.
Sand Loop Level 285 Solution: Deconstructing the Car
Look closely at the canvas before you tap a single cup. The pixel art dictates your rhythm.
Color Palette Deep Dive: The visual dominance of Blue and Green is misleading. While they take up the most space, the Red and Cream pixels are the structural skeleton of the image. The car sits right in the middle, overlapping the horizon line. This means you'll be switching between Green (bottom half) and Blue (top half) constantly, with Red interspersed throughout.
The "Danger Zones": The tires. Those dark red/maroon tires are tiny, maybe 6-8 pixels total. If you accidentally pour your Dark Red cups during a "Bright Red" phase (the car body), you will ruin the detail. The game loves to put similar colors next to each other in the supply tray to trick you into a mis-tap.
Fill Order Prediction: You typically want to secure the bottom layer first—the Dark Red ground strip and the Green grass. However, because the clouds (Cream) and sky (Blue) are huge, you'll need to clear those cups from your tray just to make room. Don't obsess over finishing the car first; usually, clearing the sky clears the tray.
Tackling the Ice Blocks in Sand Loop Level 285
The specific obstacle defining Level 285 is the dual Ice Block setup. You have two frozen cups blocking crucial supply lines:
- A Blue Ice Block (8) in the bottom left corner.
- A Blue Ice Block (6) in the middle right section.
These aren't just frozen cups; they are plugs. The Ice Block (6) is the bigger threat. It sits right in the middle of the right-hand cluster, physically separating the top cups from the bottom cups in that column. Until you break it, you cannot access the Red and Dark Red cups sitting beneath it.
The Ice Block (8) on the left is less critical immediately but blocks the bottom-most column. The real headache is that to break these blocks, you need to make matches near them. Since they are Blue cups frozen in ice, you usually need to clear adjacent cups or create specific color chains to chip them away or simply wait for the game logic to activate them once the cups above are gone. In this specific layout, they act as "counts"—you likely need to clear 6 and 8 cups respectively (or specific trigger cups) to shatter them.
Sand Loop Level 285 Step-by-Step Walkthrough
You only have 5 slots on your conveyor belt. This is tight. If you spam cups onto the belt, you will jam the exit and fail. Play slow.
1. Breaking the Right-Side Seal
Ignore the left side for a moment. Your eyes should be on the right cluster. You have a stack of Red, Blue, and Cream cups sitting on top of that Ice Block (6).
- Start by tapping the Blue and Red cups immediately above the Ice Block (6).
- Your goal is to feed the car body (Red) and sky (Blue) just enough to clear the physical space above the ice.
- Once those top 3-4 cups are gone, the Ice Block (6) should shatter or become accessible. This is the most important move. If you don't clear this vertical column, you will run out of Red cups for the car later.
2. The Left-Side Cascade
While the right side is processing, look at the left column. It’s a tall stack starting with Dark Red, Green, Dark Red.
- The bottom of the canvas is a Dark Red strip. Send those top Dark Red cups immediately.
- Follow up with the Green cups to start filling the grass.
- Crucial Warning: Do not clog the belt. Only tap a cup if you see the matching color nozzle active or about to be active. If you send a Green cup while the nozzle is painting the Red car, it will just loop around and occupy one of your precious 5 slots.
3. Managing the Cream/White Clouds
The White/Cream cups are scattered everywhere—some on the left, some in the middle, some on the right.
- These are your "filler" moves. When the nozzle moves to the clouds (top of the screen), you need to act fast.
- The clouds are massive. You will need to unleash a barrage of Cream cups. Use this opportunity to clear the Cream cups sitting in the middle "bridge" section of the tray (the horizontal bar connecting left and right).
- Clearing these middle cups often unblocks the flow for the cups underneath.
4. The Final Tire Trap
Towards the end of the level, you will likely be left with the Dark Red cups for the tires and the remaining Blue for the sky.
- The nozzle moves quickly between the tires. It’s a small target.
- Ensure you have at least 2 empty slots on the conveyor belt before the nozzle reaches the tire section. You need precise timing here. If the belt is full of Blue cups for the sky, you'll miss the tire window, and the cycle will reset, wasting time.
- Send the Dark Red cups in isolation if possible. Let them hit the tires, then flood the belt with the remaining Blue/Cream cups to finish the sky and clouds.
Summary: Break the right-side Ice Block (6) first. Prioritize the Dark Red ground layer. Don't spam the conveyor belt when the car detail (windows/tires) is being painted. Keep it clean.