Sand Loop Level 305 Solution Walkthrough | Sand Loop 305
How to solve Sand Loop level 305? Get instant solution for Sand Loop 305 with our step by step solution & video walkthrough.

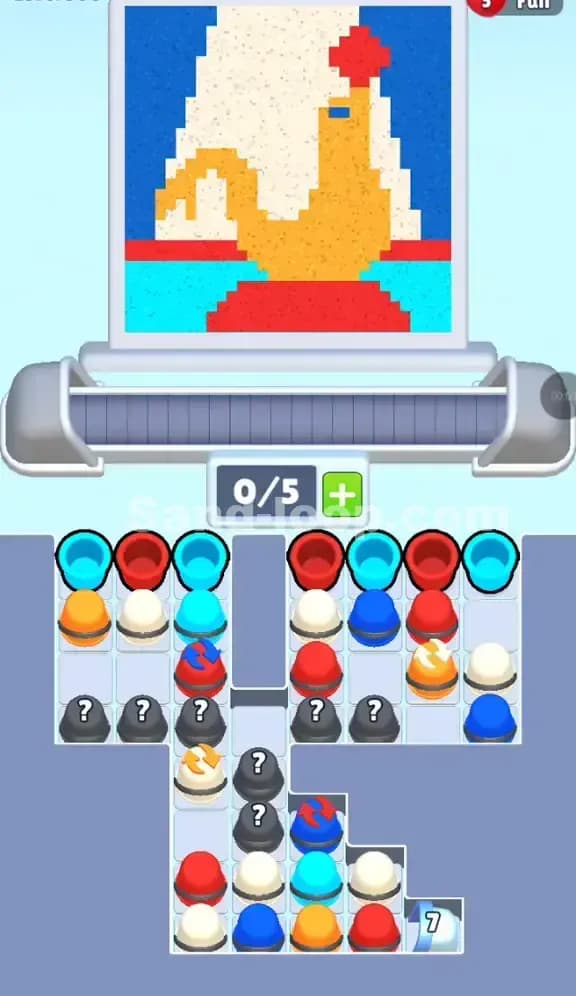
Sand Loop Level 305 Guide: The Firework Rocket Puzzle
This isn't a speed level, it’s a pure sequencing challenge. Sand Loop Level 305 presents a "Firework Rocket" design—a diagonal red and white rocket shooting upwards against a solid blue sky. While it looks festive, the layout of the supply tray is messy. You have a mix of visible colored cups and a massive chunk of Mystery Cups (the grey cups with question marks) buried deep in the stack.
This is a classic "digging" level. You cannot see what colors you need later until you clear the garbage on top. If you burn your blue cups too early on the background, you might starve the rocket’s detailed stripes later.
Sand Loop Level 305 Solution: Analyzing the Pixel Art
Look at the top canvas. This is a diagonal composition, which is always tricky in Sand Loop because diagonal lines require rapid color switching. You can't just pour one color for five seconds straight.
Color Palette Deep Dive:
- Solid Blue: This is the background. It takes up the most surface area, especially the top left and bottom right corners.
- Red: The primary color of the rocket (fins, nose cone, and body stripes).
- White: The alternating stripes on the rocket body.
- Yellow/Gold: The sparks and the fuse at the tail of the rocket.
The "Danger Zones": The striped body of the rocket is the killer here. It requires alternating Red-White-Red-White in short bursts. If you load three Red cups in a row onto the conveyor belt while the nozzle is over the striped section, you will ruin the white stripes. The background blue is safer, but be careful near the yellow sparks—it's easy to accidentally paint over a small yellow pixel with a flood of blue.
Fill Order Prediction: You generally want to secure the detailed center first. Focus on the rocket body. The blue background is forgiving and can be filled in large chunks later, but if you mess up the Red/White striping, the level is over.
Tackling the "Mystery Stack" in Sand Loop 305
The specific obstacle here isn't a lock or a key; it's the Mystery Cup Grid. Look at the bottom half of the tray. It is heavily populated with grey "?" cups.
This works differently than standard colored cups. You don't know what's inside until you clear the cup above it. This creates a "blind dependency." You might need a Red cup right now to finish a stripe, but the only available Red cup is blocked by a Blue one, and clearing that Blue one might reveal a Yellow you don't need yet.
You have a 0/5 Slot Capacity on the conveyor belt. This is tight. You cannot just spam cups onto the belt to see what's underneath. If you fill the belt with 5 cups that don't match the current pour zone, you deadlock immediately. You must only pull cups from the stack if you are 100% sure they will empty out within the next few seconds.
Sand Loop Level 305 Step-by-Step Walkthrough
The strategy here is controlled excavation. You need to dig down to the mystery layer without clogging your 5 slots.
Clearing the Top Layer Chaos
Your initial tray has a scattered mix of Blue, Red, Yellow, and White.
- Start with Red and White: The rocket body is diagonal. Wait for the nozzle to align with the rocket's path. Tap a Red cup, followed immediately by a White cup. Do not batch them. Alternate them.
- Ignore the Blue Corners initially: You might be tempted to dump all the Blue cups immediately to clear space. Don't. The nozzle spends more time over the center (rocket) than the corners. If you fill your 5 slots with Blue cups, they will just ride the belt in circles, blocking you from adding the Reds and Whites you actually need.
Navigating the Mystery Transition
Once you clear the top 3 visible rows, you hit the "?" cups.
- One in, One out: When you start pulling from columns blocking the mystery cups, do it slowly. Tap one cup, let it hit the belt, and see what color is revealed underneath.
- Prioritize the "Switch" Cups: You will see a couple of Switch Cups (Blue cups with refresh arrows) buried in the mix. These are vital. Often, the mystery cups reveal a color balance that is totally wrong (e.g., too many Yellows). Using the Switch cup rerolls/refreshes the visible options or converts a useless color. Save these for when you are stuck with 4/5 slots filled and no valid moves.
Filling the Yellow Sparks
The yellow sparks at the bottom left are small and easy to miss.
- Watch the Nozzle Tail: As the nozzle moves left-to-right, it hits the tail of the rocket last. This is where the yellow spark pixel art is.
- The Yellow Trap: You likely have very few Yellow cups compared to Blue or Red. Do not waste them. If the nozzle is over a blue section, do not release a yellow cup hoping it "waits" for the right spot. It won't. Time it so the Yellow cup hits the pour zone exactly as the nozzle crosses the rocket tail.
Final Blue Flood
Once the rocket stripes and sparks are set, you can get sloppy.
- Now is the time to unload your Blue cups. The corners of the canvas are large solid blocks.
- You can safely fill the conveyor belt to 5/5 capacity with Blue cups now. Even if the nozzle passes over the finished rocket, the game usually prevents overwriting correct pixels if the stream is fast enough. Just flood the blue to finish the sky and trigger the "Full" completion state.