Sand Loop Level 422 Solution Walkthrough | Sand Loop 422
How to solve Sand Loop level 422? Get instant solution for Sand Loop 422 with our step by step solution & video walkthrough.

Sand Loop Level 422 Guide: The Mushroom Patch Puzzle
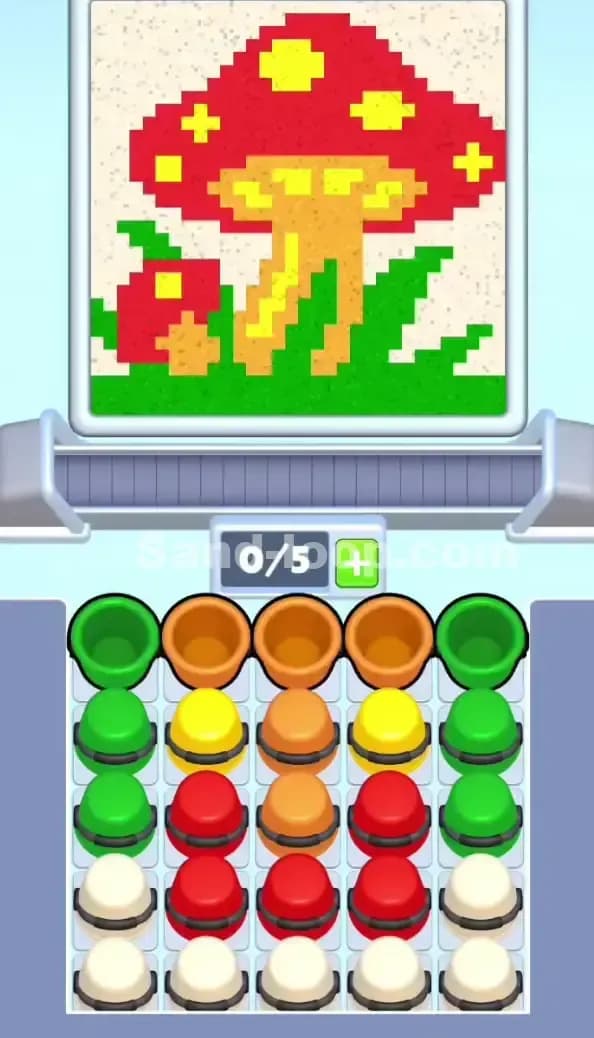
You load up the stage. A giant red and yellow mushroom stares back at you. Sand Loop Level 422 is a pure logic and sequencing level. No rapid-fire ice breaking here. Just a brutal dependency chain sitting in your supply tray. The art features a large spotted toadstool, a tiny baby mushroom to the left, green grass, and a massive white background. You need strict discipline with your cup pulls to beat this one.
Sand Loop Level 422 Solution: Analyzing the Toadstool
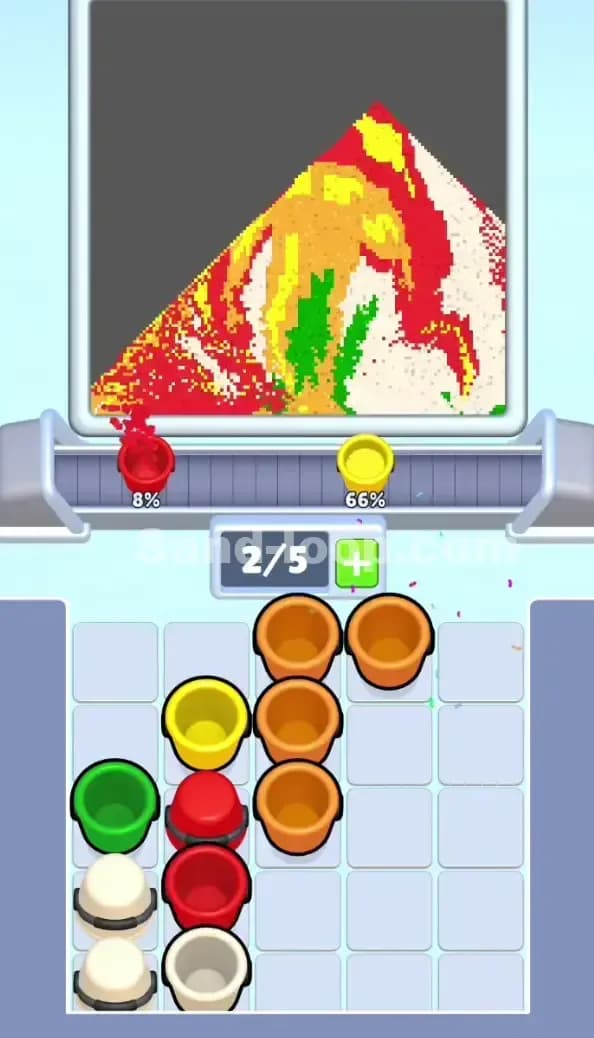
Take a hard look at the canvas. The color palette requires Green for the grass, Orange for the stems, Red for the caps, Yellow for the spots, and White for the sky.
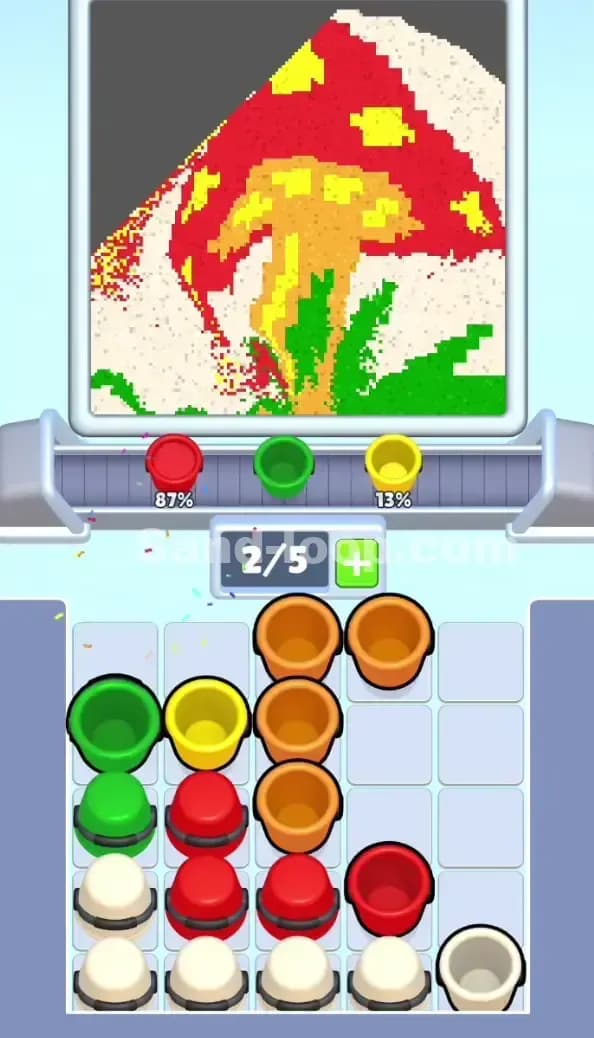
This level is a trap for greedy players. The "Danger Zones" are the yellow spots on the main mushroom cap and the tiny secondary mushroom on the left. You cannot just dump Red sand endlessly. If you flood the canvas with Red before establishing the Yellow spots, the physics engine will bury the yellow target zones. You will ruin the pattern. The sand forms a pyramid as it drops.
Fill order prediction is straightforward but punishing. You must build from the ground up. Green grass and Orange stems must drop first. They form the physical foundation at the bottom of the canvas. Red and Yellow follow. The massive White background comes last. Look at the supply tray. The game knows this order and actively fights you. The White cups sit dead last, burying the bottom row. You have to peel the board layer by layer.
Tackling the Supply Tray Deadlock in Sand Loop Level 422
The main threat in Sand Loop Level 422 is the initial cup layout combined with your strict 0/5 Slot Economy.
Look at the starting grid. It is a 5x5 nightmare. The outer columns are stacked with Green. The center column features a vertical spine of Orange. The bottom row is entirely White. This is a deliberate choke point. You need Green and Orange early. The game puts them on top, which seems helpful. But there is a catch.
To get to the Red and Yellow cups needed for the mushroom cap, you have to clear the Green and Orange. If you tap all the Green and Orange cups at once, you instantly hit your 5/5 slot cap. The conveyor will jam. You will have cups riding the belt, missing their pour timings, and you will have no empty slots to pull the critical Yellow cups when you actually need them. You must treat the top three rows like a surgical extraction.
Sand Loop Level 422 Step-by-Step Walkthrough
Execution matters. A single misclick in the tray means starting over. Here is the exact dependency chain you need to follow.
Clearing the Top Layer and Center Spine
Start with the top corners. Tap the top-left Green cup and top-right Green cup. Send them to the conveyor. Wait a beat. Now tap the top-center Orange cup. You are at 3/5 slots used. Let the Green grass fill. Let the Orange stem start pouring.
Do not touch the second row of Green cups yet. Look at Row 2. You just exposed a Yellow cup on the left and a Yellow cup on the right, flanking a second Orange cup. Your instinct is to grab the Orange. Stop. The yellow spots need to drop into the red cap mid-pour.
Tap the second Orange cup in the center column to continue building the stem. Your tray is opening up. You now have access to the middle Red cups. Keep an eye on the slot tracker. Never let it hit 5/5. Always leave one slot empty to bail yourself out.
Navigating the Red and Yellow Timing Trap
This is where Sand Loop Level 422 breaks most runs. You have cleared the top layer. The middle of the board exposes two Yellow cups and a block of Red.
You need to alternate your taps. Send one Red cup. Let it ride the belt. Immediately send one Yellow cup right behind it. The Red sand will drop, creating the base of the mushroom cap. The Yellow sand will drop seconds later, landing perfectly to form the spots. Repeat this for the other side. Send a Red cup, then a Yellow cup.
If you send two Red cups back-to-back, the cap will overfill. The yellow sand will slide off the side of the red pyramid and contaminate the white background space. Pace your taps. The delay between tapping the tray and the cup reaching the pour point is your best friend here. Use that lead time. Watch the pyramid build. Drop the yellow exactly when the red flattens out.
Filling the White Background Space
You survived the mushroom cap. Now you face the final grind. The entire bottom row of the supply tray consists of five White cups.
By this point, the center of the board is hollowed out. You should have cleared the central Red cups, giving you direct access to the middle White cup. The canvas is mostly full, but the entire top triangle is empty.
This is the easy part, provided you didn't trigger a deadlock earlier. Start from the center White cup and work outward. Tap the middle White, then the left-middle White, then the right-middle White. Fill the conveyor. Because you are only pouring one color now, contamination is impossible. Just dump the white sand.
Keep cycling the White cups as they return empty on the belt. The sand will cascade down the sides of the completed red mushroom, filling the remaining negative space perfectly. Watch the percentages tick up to 100%. Level complete. Clean out the remaining trapped Green cups if needed for that final 1% corner fill.