Sand Loop Level 186 Solution Walkthrough | Sand Loop 186
How to solve Sand Loop level 186? Get instant solution for Sand Loop 186 with our step by step solution & video walkthrough.


Sand Loop Level 186 Snapshot
Canvas Goal and Color Requirements
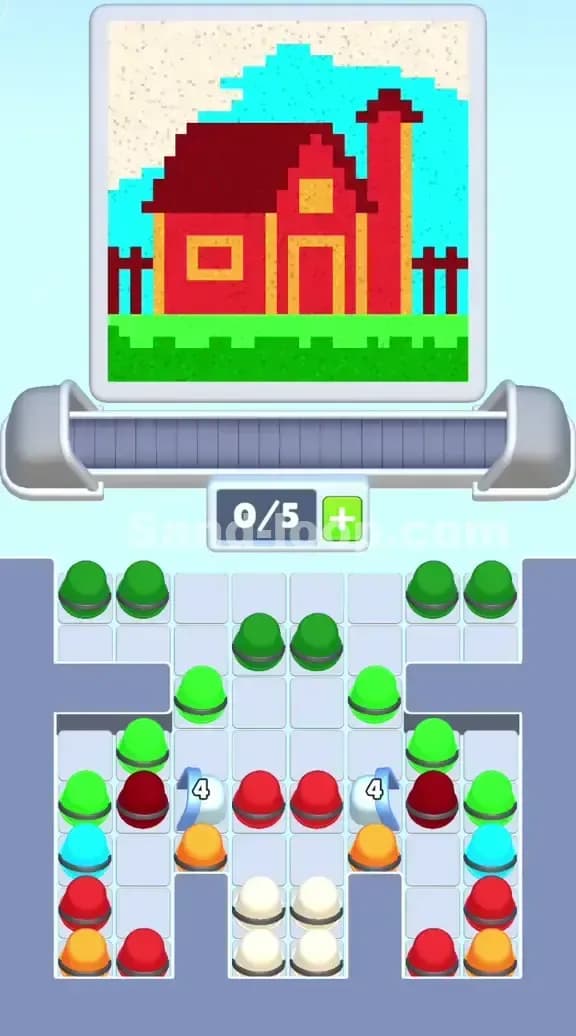
Sand Loop Level 186 tasks you with filling a cheerful countryside scene: a bright blue sky dominates the top third, with cyan accents creating cloud shapes. The middle section features two yellow houses with dark red roofs sitting on a vibrant lime-green hillside. The green area is the largest color zone you'll need to fill, but the sky blue, cyan, yellow, dark red, and cream/white details are equally essential for completion. Your color progress meters show exactly how much of each shade is needed—and Sand Loop Level 186 won't let you advance until every requirement is met.
Starting Setup and Tray Constraints
You're staring at a conveyor belt with 0/5 capacity—meaning zero cups are loaded and you can fit five before hitting a jam. The supply tray below is packed with green cups everywhere (the dominant color), a handful of orange cups, white cups, and crucially, some dark red and cyan cups buried deeper in the stack. Most green cups are accessible right away, but the orange, red, and cyan ones are partially blocked or stacked, which means you'll need to cycle through and unblock them strategically. Sand Loop 186 is designed to force you to think about cup order, not just mindlessly pour green.
Win Condition
Fill the canvas by meeting every color quota without wasting pours, causing overflow, or accidentally starving one color while overfeeding another. You must clear every meter to zero waste and advance.
Why Sand Loop 186 Feels Hard (The Actual Bottleneck)
The Real Puzzle: Buried Cup Colors
The biggest trap in Sand Loop Level 186 isn't the conveyor speed or even the color targets—it's that the orange, red, and cyan cups you need are stacked under or beside the abundant green cups. If you load green carelessly and fill your 5-slot belt, you'll deadlock. You won't be able to pull the orange or red cups from the tray until you've cycled enough green through the pour point, freeing up space. But by then, you've already poured 70% green, and now you're scrambling to eke out the last little bit of red and cyan before hitting the green cap.
Classic Traps
Trap 1: The "Green Avalanche." It's so tempting to grab all the green cups first because they're stacked and accessible. Do that, and you'll fill the green meter to 95% in your first 20 seconds, leaving yourself no room to maneuver when you realize you need more cyan or red. Sand Loop 186 punishes greedy early moves.
Trap 2: Forgetting Lead Time. When you tap to pour, the cup on the belt isn't at the dispenser yet—it's moving toward it. If you load an orange cup and immediately tap, you might pour into a green cup that hasn't cycled away. Your timing has to account for the belt travel, and Sand Loop 186's belt speed means a half-second delay between your tap and the actual pour.
Trap 3: Overfilling Yellow Too Fast. The yellow houses are small detail areas. One or two good pours of yellow will max them out. If you're not careful, you'll waste yellow early and then have no way to recover because the yellow cups are also somewhat blocked.
Why It Feels Deceptively Easy
Sand Loop Level 186 looks simple—it's a cheerful, colorful picture, and there are tons of green cups right there. But that's the trap. The level looks easy because the solution appears obvious: "Just pour the colors I see." In reality, Sand Loop 186 demands precise sequencing and the discipline to hold back on the dominant color. I choked the timing here twice before I realized I had to map out my cup order before loading the belt.
Step-by-Step Walkthrough to Beat Sand Loop Level 186
Opening Rhythm: Load Smart, Leave Gaps
Don't load five green cups and call it good. Instead, start with a mixed load:
- Load the first cup: Grab one cyan cup. Yes, really—it's hiding in the tray, and getting it on the belt first means you'll start filling the cyan meter early without wasting green capacity.
- Load the second cup: Grab one orange cup. Again, these are partially blocked, so freeing them early reduces future tray congestion.
- Load the third cup: Grab one dark red cup. Sand Loop 186 requires this precision color, and it's worth a slot.
- Load the fourth cup: Now grab two green cups. After three colored pours, you've built a rhythm and freed tray space.
- Stop at 4/5 capacity. Leave one slot empty. This prevents a conveyor jam and gives you flexibility to swap or insert a different color if you realize you're overfilling one metric.
Unblocking Plan: Sequence Matters
As those first four cups cycle through the pour point, watch your color meters climb carefully:
- The cyan pour will tick the cyan meter a little—good, you've started that zone.
- The orange and red pours are small but crucial for the house details.
- The green pours will accelerate the green meter significantly.
Once you've cycled those four cups through and the belt has space again, you'll notice the orange, red, and cyan cups are now more accessible in the tray (you've removed the stacking weight). Load the next batch:
- Two more green cups (the green meter still needs volume).
- One more white cup if the cream/white areas feel underfilled.
- Hold off on more orange or red unless your eye tells you those areas are far behind.
The key to Sand Loop 186 is cycling in small batches and checking your progress meter after each cycle. Don't assume all five colors need equal loading—they don't. Green dominates, so it gets more pours, but the others get priority access to prevent deadlock.
Mid-Game Control: Avoid the "Overfill Lock"
By the time you're halfway through Sand Loop Level 186, your green meter might be at 60–70% filled. This is where discipline matters most:
- Stop loading pure green cups. Switch to cycles of green + one specialty color. If your cyan is still low, load cyan + one green. If yellow needs work, load yellow + green.
- Maintain 1–2 empty slots at all times. A full belt means you can't react if you realize a color is about to cap out.
- Watch for the "accidental overfill" trap. If you tap to pour and the cup hasn't moved far enough, you might dump into a cup that's still at the pour point. Sand Loop 186's timing window is tight; if you're unsure, wait a half-second longer.
End-Game Precision: Close the Picture
In the final 15–20%, you're filling the last gaps on every color meter. Now you're surgically selecting cups:
- Check which color is closest to full (e.g., green at 95%, cyan at 75%).
- Load mostly the lowest color and minimal green as filler.
- Tap pours in short, controlled bursts—one pour, then pause, then the next.
- Watch the meters tick. When you see a color hit 100%, don't load another cup of that color.
For Sand Loop Level 186, the endgame is usually: load a cyan, tap; load a white, tap; load a green, tap; repeat until all meters show full. This deliberate pacing prevents the chaos of "I poured too much too fast and now red is at 105% and everything's ruined."
If You Mess Up: Recovery Tactics
Scenario: You overfilled green and cyan is still at 30%.
- Don't panic. Stop loading green entirely. Load cyan-only cups for the next 3–4 cycles. Yes, the green meter will overshoot slightly, but Sand Loop 186 allows a small margin (usually 5–10%). Prioritize completing the missing colors.
Scenario: You can't get the orange or red cups because the tray is jammed.
- This means you loaded too much green too fast. Empty your current belt by letting all cups pour out. Then reload with a color-balanced batch. It'll set you back a few seconds, but it's better than a full restart.
Scenario: A cup poured into the wrong color zone (contamination).
- In Sand Loop Level 186, this rarely causes a hard fail, but it wastes a pour. On your next load, double-check the belt position before tapping. Slowing down your pour frequency by 1–2 seconds is worth the control.
Why This Strategy Works in Sand Loop 186
Conveyor Lead Time and Slot Economy
Sand Loop Level 186's conveyor moves at a consistent speed, but there's always a delay between your tap and the pour. By loading a balanced first batch (cyan, orange, red, green, green), you're "priming" the belt with variety. By the time that cyan cup reaches the dispenser, you've already loaded the next batch and have mental space to plan the next move. You're not reacting; you're orchestrating. The empty 5th slot acts as a buffer, preventing the classic deadlock where you're holding orange cups but your belt is full of green, and you can't make space.
Controlled Waste and the Overfill Lock Prevention
The biggest danger in Sand Loop Level 186 is accidentally maxing out green (or any dominant color) before the smaller colors are ready. By cycling mixed batches and always checking your meters, you avoid the "green overfill locks me out of cyan" scenario. Every pour is intentional. You're not pouring continuously; you're pouring, pausing, observing, and then deciding the next load. This rhythm prevents waste because you never blindly top off a color.
Consistency Across Runs
If Sand Loop Level 186 has limited attempts or move counts, this strategy is repeatable. The first load is always cyan/orange/red/green/green. The second load depends on your meters, but it's a decision tree, not a gamble. After 3–4 runs, you'll internalize the pattern, and your success rate will climb to 80%+ because you're not fighting the level's design; you're working with it.
Extra Tips and Adaptations for Levels Like Sand Loop 186
Six Common Mistakes and Fixes
-
Mistake: Loading all green cups first.
- Fix: Commit to a balanced opening. One cyan, one orange, one red, then green. It feels slow, but it's the fastest route to the win.
-
Mistake: Tapping immediately after loading, without waiting for the previous cup to move.
- Fix: Sand Loop Level 186 rewards patience. Load a cup, count to one, then tap. This ensures the prior cup is past the pour point.
-
Mistake: Ignoring the meter progress.
- Fix: Glance at your color bars every 2–3 pours. If green is at 85% and cyan is at 40%, switch priorities immediately.
-
Mistake: Filling the belt to 5/5 and leaving no wiggle room.
- Fix: Always keep 1–2 slots free. It's an insurance policy against deadlock.
-
Mistake: Overpouring yellow early because the houses "look small".
- Fix: Yellow areas are small, yes. But Sand Loop Level 186 still needs yellow to fill that quota. One good pour of yellow does the job; stop after that.
-
Mistake: Panicking and restarting when you see an overfill.
- Fix: Overfill by 5–10% is usually recoverable. Switch to the lowest color and power through.
Booster Strategy
If you have access to an Extra Slot booster in your version, use it only if you're halfway through and realize you're stuck with a full belt and no access to a critical color (like cyan). The booster isn't necessary for Sand Loop Level 186 if you follow the balanced loading strategy, but it's a safety net if your first two cycles go sideways.
An Undo booster is worth considering if you overfill a color in the last 10% by accident—one undo lets you reload a different cup and correct course.
Avoid Speed Up boosters unless you're comfortable with tighter timing windows; Sand Loop Level 186 is already timing-tight, and a faster belt makes lead-time planning harder.
Final Encouragement
Sand Loop Level 186 is a turning point—it's the first level where the picture looks simple but the logistics are genuinely tricky. That's not a flaw; it's by design. Once you beat it, you've internalized the core mechanic: planning beats reacting, balance beats greed, and patience beats speed. You've got this. If you're still stuck, revisit the color meter checks and make sure you're not greedy with green in the opening. For more detailed walkthroughs and community solutions, check out sand-loop.com—there's a whole library of strategies for Sand Loop 186 and beyond.