
Sand Loop Level 187 Solution Walkthrough | Sand Loop 187
How to solve Sand Loop level 187? Get instant solution for Sand Loop 187 with our step by step solution & video walkthrough.
Sand Loop Level 187 Snapshot
The Canvas: A Cottage Scene with Color Demands
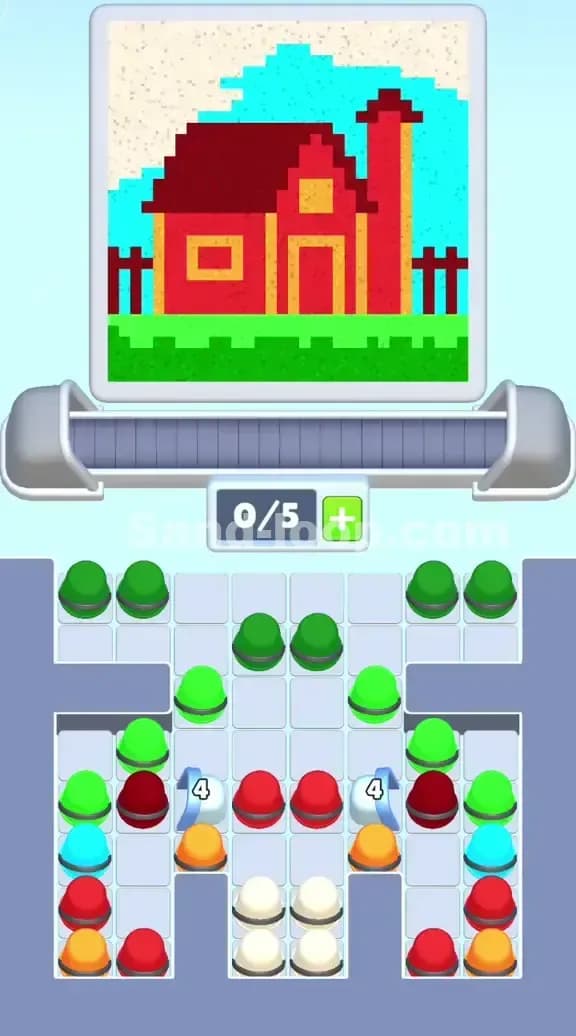
Sand Loop Level 187 asks you to paint a charming pixel-art cottage with a cyan sky, a dark red roof, a bright red house body, yellow door and window details, and a green grass base. The color targets are spread across the canvas in distinct zones—the background is dominated by cyan and beige, the cottage structure demands precise red and dark red placement, and the grass needs solid green coverage. You're looking at a level where one careless pour can lock you out of finishing because you've overfed cyan or red too early and can't reach the fine details.
Starting Setup: Conveyor Capacity and Tray Layout
You begin with a conveyor belt running at 5/7 capacity—that means five cups are already loaded, and you have two free slots to work with. The supply tray below is a puzzle unto itself: you've got stacks of green cups (the workhorse color), several red cups in the lower zones, cyan cups on the outer edges, orange cups tucked away, and cream/white cups buried in the center. The darker red cups are partially blocked, and the cyan cups are split between left and right stacks. This isn't random; it's designed to force you to think about unblocking order.
Win Condition: Precision Without Waste
To beat Sand Loop Level 187, you need to fill all four color zones on the canvas while keeping your cup slots from jamming and avoiding overflow on any single color. You'll win when the progress meters hit 100% across cyan, red, dark red, yellow (via gold details), and green—but waste even two pours on the wrong color or double-dip a region, and you'll find yourself one or two cups short at the end.
Why Sand Loop 187 Feels Hard (The Actual Bottleneck)
The Real Problem: Cyan Overfill Risk
I choked this level twice trying to fill the sky first. The cyan color is so visually dominant on the canvas that it's tempting to load cyan cups early and rack up progress fast. Here's the trap: Sand Loop 187's cyan target is actually moderate—the sky takes up space, yes, but it's not bottomless. If you pour cyan carelessly in the first ten cups, you'll overshoot the target by 15–20%, and then you're stuck with green and red still needing coverage but no room to maneuver without contaminating already-filled zones.
Classic Traps in This Level
Trap 1: Blocking the Center Stack. The cream and white cups sit in the center of the supply tray, and they're blocked by red and orange cups on top. If you greedily load red cups without clearing the whites first, you lock yourself out of white pours when you actually need them for highlights. Worse, you'll burn slots cycling reds you didn't plan for.
Trap 2: Dark Red Confusion. Sand Loop 187 has both red and dark red on the canvas, but the supply tray doesn't label them clearly when stacked. Load the wrong shade too early, and you either overfill the roof (dark red zone) or underfill it because you burned dark red cups on the house body. The timing window to switch between these colors is tight.
Trap 3: The Green Glut. You have eight green cups available, which seems like plenty for the grass base—and it is—but only if you load them in a controlled rhythm. Load three green cups in rapid succession early, and they'll pile up on the belt waiting for the pour point. When the belt fills, you're forced to leave other colors on the tray, and suddenly you can't get a red or cyan cup onto the belt when you need it.
Why It Looks Easy But Isn't
Sand Loop Level 187 looks straightforward: big green area, big cyan area, small red areas. In reality, it's a sequencing puzzle disguised as a color-filling game. You're not just deciding which color to pour; you're deciding when to pour it so that the belt rhythm doesn't jam, the color meters climb in the right order, and you don't lock yourself out of the small, precise zones (like the yellow door details) because you've already committed all your cups to the background.
Step-by-Step Walkthrough to Beat Sand Loop Level 187
Opening Rhythm: The First Eight Cups
Start by loading one green cup immediately—not three, just one. This gives the grass base a head start without clogging the belt. Next, load one cyan cup to begin filling the sky; cyan's a big color, but you need to dose it carefully. Then alternate: one red, one green, one red, one more cyan.
Your belt should now show: Green, Cyan, Red, Green, Red, Cyan (and one free slot). This staggered pattern prevents the belt from jamming on any single color and gives you rhythm feedback. As the first green cup reaches the pour point and fills in the grass, you're simultaneously loading the next color onto the back of the belt. The lead time between your tap and the cup reaching the pour means you're essentially planning two moves ahead—this is where timing becomes a skill.
Unblocking Plan: Free the Whites and Darks First
Once your first six cups are loaded and cycling, immediately tap a white cup from the center stack. Even though you won't pour white until the 75% mark, unblocking the center now keeps your slot flexibility alive. The white cup goes onto the belt at position 7/7 (you're now at full capacity, which is fine for one cycle).
While the white cup rides to the pour point (where it'll sit waiting because you don't want to pour it yet), focus on clearing the dark red cups from their stack. Pull out one dark red cup and queue it as the next load. You're not pouring it yet—just having it ready. This prevents the "blocked cup panic" where you suddenly need dark red for the roof and can't access it because red cups are sitting on top of it.
Mid-Game Control: Cycles 7–15, Maintaining Gaps
By cycle seven, you should have emptied roughly two slots on the belt (the first two cups have been poured). Now you load strategically: green, dark red, green, cyan, green. Notice the green spacing—you're spreading greens across the cycle so the belt never gets clogged with three greens waiting to pour.
Watch your color meters on the canvas. Cyan should be climbing steadily (around 30–40% by now), green should be at 25–30%, and red shades should be at 15–20%. If cyan is already at 45%, stop loading cyan and load only green and red for the next two cycles. This is active correction—you're reading the meters and adjusting, not blindly following a preset list.
Keep at least one free slot visible at all times. A full 7/7 belt is a danger zone in Sand Loop Level 187 because you lose the ability to react if you realize you've loaded the wrong color. That free slot is your "undo insurance."
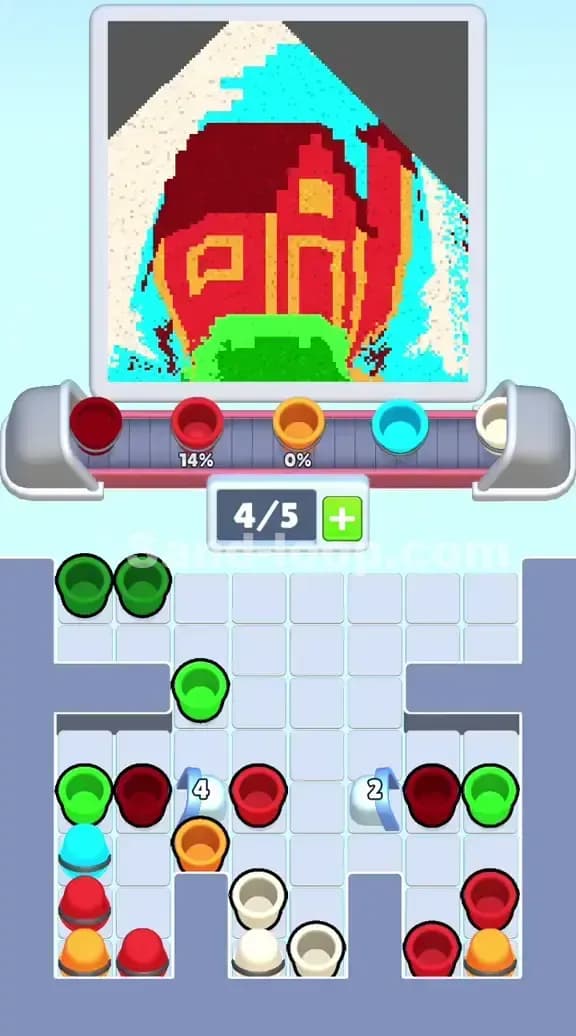
End-Game Precision: The Final 20%
By 80% completion, your canvas should show cyan nearly full (90%+), green nearly full (85%+), and red/dark red at 70–80%. Now comes the delicate part: you need to finish the reds and add the yellow details without overshooting any color.
Load a dark red cup and let it pour onto the roof zone specifically—tap it when the belt is positioned so the cup's pour aligns with the darker section at the top of the cottage. This is where you use the belt position visually; you're not just pouring blind. Immediately after, load a red cup for the main house body. Then load one more cyan if the sky is still under 95%, followed by green to finalize the grass.
The final two cups should be cream/white for any last highlights. Since whites are hard to see and easy to waste, pour them last when everything else is nearly done. If you're at 98% on all colors and still have two cups left, white pours are safe because they'll mostly be invisible on a full canvas.
If You Mess Up: Quick Recovery Tactics
Scenario: You overfilled cyan at 60% and now the sky is at 98%. Don't panic. Immediately stop loading cyan cups (even if some are queued). Purge cyan from the belt by loading non-cyan cups ahead of any remaining cyan. Focus on red, green, and white for the final 20 cups. You'll likely finish with cyan slightly oversaturated, but the level doesn't fail you for that—it fails you only if you can't reach 100% on a required color, not if you exceed it.
Scenario: Dark red cups are still on the tray, and you're at 80% completion. You've locked yourself out by not unblocking them early. Load a dark red cup now and pour it immediately on the next cycle, even if it's slightly wasteful. Recover by loading greens and cyan for the remaining cycles. You may not hit 100% on dark red, so restart this attempt—the lesson is to unblock early next time.
Scenario: The belt is at 7/7 and you're not sure what to pour next. Stop. Wait for the current cup to reach the pour point and let it go. Don't load anything new until you have at least one free slot. This is slower, but it prevents deadlocks. In Sand Loop Level 187, patience beats panic.
Why This Strategy Works in Sand Loop 187
Conveyor Lead Time + Slot Economy = No Jams
The staggered loading pattern (green, cyan, red, green, red, cyan) exploits the belt's lead time. By the time your fourth cup reaches the pour point, your seventh cup is already queued and ready. You're never waiting for the belt to "catch up," and you're never forcing a color onto the belt that you didn't intend. The one free slot you maintain acts as a buffer—if you misread the meters and load the wrong color, you can wait one cycle and correct without breaking the rhythm.
Controlled Color Dosing Prevents the Overfill Lock
Sand Loop Level 187's canvas has finite zones for each color. By spacing pours across multiple cycles and checking the meters frequently, you dose colors incrementally rather than dumping them all at once. Cyan at 30%, then pause. Cyan at 50%, then pause. This granular approach lets you stop before you overshoot, whereas dumping five cyan cups in a row means you won't know you've overfilled until it's too late.
Early Unblocking Keeps Decisions Alive
Clearing the white and dark red cups from the supply tray early (even before you pour them) ensures you're never forced into a bad decision late game. When you reach 75% completion and finally need white, it's already on the belt waiting—you don't have to scramble to unblock it from under three other cups. This shifts the puzzle from "react to bad tray layouts" to "execute your plan smoothly."
Extra Tips and Adaptations for Levels Like Sand Loop 187
Mistake 1: Loading All One Color at the Start
Fix: Alternate colors on the first seven loads. Monotonous loading feels safe but clogs the belt and kills your flexibility mid-game.
Mistake 2: Ignoring the Meters Until the End
Fix: Glance at the progress bars every two to three cups. Sand Loop Level 187 requires active meter-reading, not passive pouring. If cyan hits 85% and your green is at 40%, you've overweighted cyan—correct immediately.
Mistake 3: Treating the Free Slot as "Infinite Loading Space"
Fix: Use the free slot as a safety margin, not a dumping ground. Keep it intentionally empty so you can pause and think. A full belt with nowhere to load is a failed belt.
Mistake 4: Pouring the Moment a Cup Reaches the Pour Point
Fix: Let cups sit on the belt waiting if you're not sure you want to pour that color yet. In Sand Loop Level 187, the belt is a queue, not an automatic dispenser. You have control over when to tap the pour button.
Mistake 5: Not Planning for Color Precision
Fix: The yellow door details are small. You'll need cream or white cups to finish them cleanly. If you burn all your whites on the sky, you'll fail. Unblock whites early and reserve at least two for the very end.
Mistake 6: Assuming Red and Dark Red Are Interchangeable
Fix: They're not. Check the tray carefully. Dark red is usually one shade darker or sits in a different stack position. Load and pour them separately, with dark red reserved for the roof and red for the main house body.
Booster Strategy (If Available)
If your version of Sand Loop 187 includes boosters, an extra slot booster is your friend if you're worried about belt jams mid-game—it buys you one more cycle of flexibility. A slow belt booster is useful for the opening, giving you more time to load precise colors without rushing. Skip undo boosters; the strategy above makes them unnecessary. Never use swap order unless you've already made an irreversible mistake—it's a last-resort tool, not a planning tool.
The Encouragement
Sand Loop Level 187 is tough, but it's fair. You have exactly enough cups of each color to win if you pour them in the right order. Treat it like a rhythm game: load, observe, adjust, load again. The first attempt might fail, but now you know the bottlenecks. Next run, you'll unblock the whites early, dose cyan carefully, and watch the cottage come to life on the canvas. You've got this—and if you're stuck, swing by sand-loop.com for video guides and community solutions. Happy pouring!

