Sand Loop Level 215 Solution Walkthrough | Sand Loop 215
How to solve Sand Loop level 215? Get instant solution for Sand Loop 215 with our step by step solution & video walkthrough.

Sand Loop Level 215 Guide: The Pixel Bird Puzzle
The Art: "Blue Jay on a Branch"
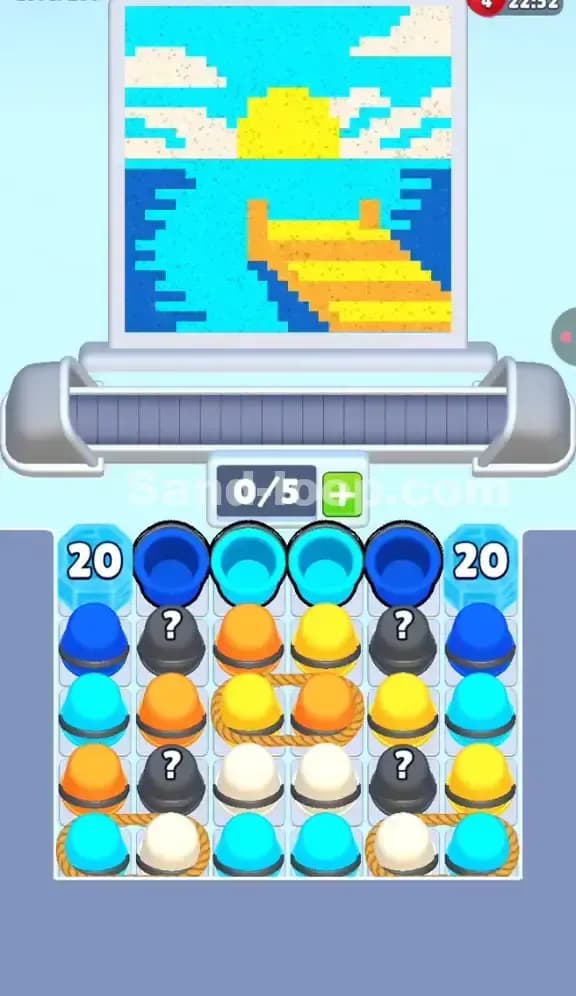
This isn't a speed level, but it mimics one. The art for Sand Loop Level 215 features a stylized bird—looks like a Blue Jay or similar passerine—perched on a dark blue branch system.
The Hook: The color palette is deceptive. You have a massive amount of Cyan sky, but it’s interrupted by White clouds that look identical in volume to the bird's white chest. The real killer here isn't the painting itself; it's the Rope mechanic tying up your supply at the bottom of the tray. You have limited slots (5 total), and these roped pairs force you to take two cups at once, which creates instant bottlenecks if you aren't counting.
Sand Loop Level 215 Solution: The Sky and The Branch
The canvas is your roadmap. Before you tap a single cup, look at the fill order required by the image.
- Cyan (Sky): This is the dominant background layer. It fills the majority of the upper canvas.
- Dark Blue (Branches & Wing): This connects the bottom of the image to the bird.
- Red (Berries): Tiny, annoying dots scattered on the branches. These are "waste" traps. If you pour Red too early while the nozzle is over a Blue section, you ruin the pixel perfection.
- Orange/Yellow (Bird Belly): Located centrally.
- White (Clouds & Chest): Split between the very top and the center.
The "Danger Zones": The Red berries are the primary hazard. They are single-pixel details. If you load a Red cup and let it run while the nozzle is passing over a long stretch of branch (Blue), you will contaminate the branch. You need precise, short bursts for the berries.
Tackling the Ropes and Ice in Sand Loop Level 215
The screenshot reveals two distinct blockers that dictate your pace.
1. The "20" Ice Blocks: Right at the top of your supply tray, flanking the center column, are two Ice Blocks with the number 20. These aren't just walls; they are counters. You need to process cups adjacent to them or clear the path below to shatter them. Until they break, columns 2 and 4 are effectively dead zones. You cannot pull cups from under them.
2. The Roped Pairs: Look at the bottom rows. You have Dark Blue + Red tied together, and further down, Orange + Cyan tied together. This is a math problem. Your conveyor belt holds 5 cups.
- If you have 4 cups on the belt and tap a Roped Pair, you need 2 slots.
- Game logic dictates you cannot pull them.
- Or worse, if you have 3 cups and pull a pair, your belt is now 100% full. If the nozzle isn't ready to pour those specific colors, you deadlock the game.
Sand Loop Level 215 Step-by-Step Walkthrough
1. The Cyan Opener
Your first move in Sand Loop Level 215 is scripted. You have three accessible Cyan cups at the very top (Left, Center, Right). Tap them. These cups are safe because the background Sky requires a massive amount of Cyan sand. Get them onto the belt immediately. This does two things: it starts painting the large background areas, and critically, it clears the top layer of the tray so you can start chipping away at the Ice Block counters.
2. Managing Mystery Cup Risk
Once the top Cyan layer is gone, you are exposed to a row of Mystery (?) Cups and the Ice Blocks. Do not spam-tap the Mystery cups. Since the bird has specific small details (Red berries, White chest), pulling a Mystery cup that turns out to be Red when the nozzle is over the Cyan sky is a disaster. Rule of Thumb: Only pull a Mystery cup if you currently have a "safe" color on the belt (like Cyan or White) that is currently pouring. This gives you a buffer time to react if the Mystery cup reveals a color you don't need yet.
3. The Rope Trap (Blue & Red)
Eventually, you will expose the first Roped Pair: Dark Blue and Red. Check your capacity meter (the 0/5 number). Do not touch this rope unless you have 0, 1, or 2 cups currently on the belt.
- The Red is for the berries.
- The Dark Blue is for the branches. Because these usually paint different parts of the canvas (branches are lower, berries are scattered), you will likely need to let one cup ride the loop without pouring while the other pours. If your belt is full, you can't cycle them. Keep the belt empty before pulling this pair.
4. Finishing with Orange and White
The bottom of the tray holds the Orange (Bird Belly) and White (Clouds/Chest). By the time you reach these, the Ice Blocks should be shattered. The Orange cups are tied to Cyan cups. This is actually helpful. As you finish the level, you'll likely have missed a few spots of Cyan sky. The Roped Orange/Cyan pair allows you to fill the bird's belly (Orange) while doing touch-up work on the sky (Cyan) simultaneously.
Summary: Clear top Cyan first. Keep 2 slots open for Ropes. Don't trust the Mystery cups until you see where the nozzle is pointing.


