Sand Loop Level 245 Solution Walkthrough | Sand Loop 245
How to solve Sand Loop level 245? Get instant solution for Sand Loop 245 with our step by step solution & video walkthrough.

Sand Loop Level 245 Guide: The River Valley Puzzle
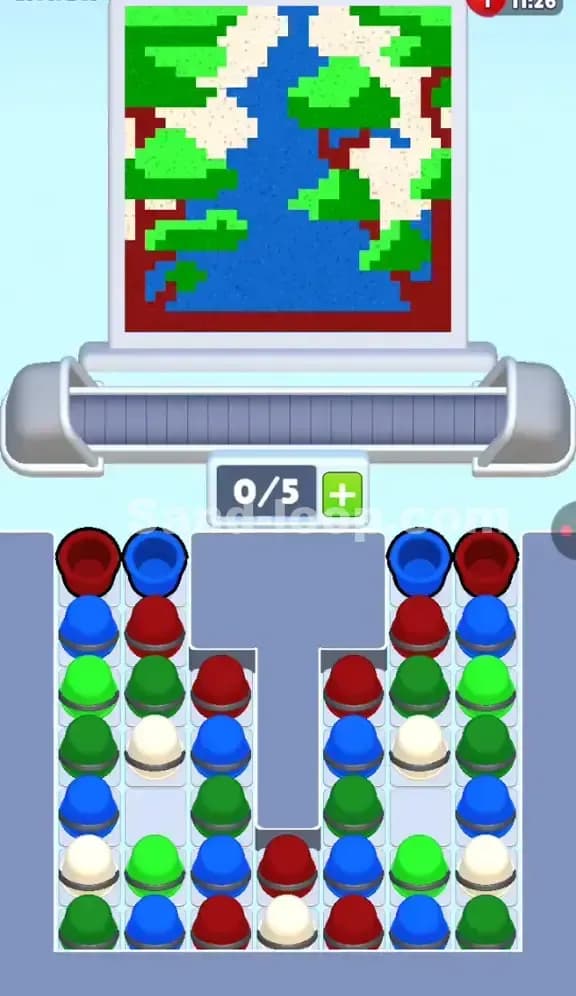
This isn't just another abstract pattern. Sand Loop 245 tasks you with painting a fairly detailed landscape: a blue river cutting through a valley, flanked by green foliage, cream-colored sandy banks, and dark red earth borders. It's a classic logic level masquerading as a pretty picture. There are no countdown timers or ice blocks to smash here. Instead, the challenge is purely about flow management and color stratification.
The puzzle sits heavily on the "Symmetry Trap." The board layout below is perfectly mirrored, which often tricks players into tapping both sides simultaneously. Don't do that. You need rhythm, not symmetry.
Sand Loop Level 245 Solution: The Landscape
Looking at the top canvas, we have four distinct colors competing for space. The complexity here comes from the verticality of the river.
- Deep Blue: This is the central spine of the image. It's a continuous vertical stripe. If you interrupt the blue flow, you get gaps in the water.
- Vibrant Green: These are the treetops. They are chunky and irregular, meaning they require bursts of green sand rather than a steady stream.
- Dark Red/Maroon: These form the outer edges and the deep earth beneath the trees. They act as the "frame" for the picture.
- Cream/Beige: The sandy banks between the water and the trees.
The Danger Zones: The trickiest part of Sand Loop 245 is the interface between the Blue river and the Cream banks. The river isn't a straight line; it has jagged pixels that jut into the banks. If you pour Cream too early while Blue is still dispensing, you'll muddy the water. If you pour Blue too late, it spills over the banks. The fill order is generally: Blue center first (or simultaneously with edges) -> Green/Cream mid-ground -> Red borders.
Tackling the Supply Tray in Sand Loop Level 245
The supply tray is the real enemy. You have a 0/5 Slot Capacity, which is generous, but look at the arrangement. It's a dense grid of cups blocked by a massive T-shaped divider in the middle.
- The T-Shape Divider: This gray block effectively splits your supply into a Left Wing and a Right Wing, with a small "central pocket" at the very bottom.
- The "Pocket" Problem: Notice the bottom center? There are cups trapped directly under the T-shape stem (a Red cup, a White cup). These are the hardest to reach. You cannot access them until you clear the side columns adjacent to them.
- Color Clumping: The tray is stacked in alternating layers. You have rows of Blue and Red at the top, followed by a heavy band of Green, then more mixed layers. This is dangerous. You need Blue for the river constantly, but the Blue cups are often buried under Green ones. You have to "dig" for Blue without filling your conveyor belt with trash.
Sand Loop Level 245 Step-by-Step Walkthrough
This level punishes hesitation. Because the river is long, you need to keep a steady supply of Blue going while pecking at the other colors.
1. The Initial Blue-Red Split
Your first move must address the top corners. You have Red and Blue cups available immediately on the far left and right.
- Tap the top inner Blue cups first. Get that river flowing immediately. The river runs from top to bottom, so starting the Blue flow early ensures the top of the canvas fills correctly.
- Crucial spacing: Do not flood the belt. Tap a Blue, wait half a second, then tap the corresponding Red on the outer edge. This creates a stagger. The Blue hits the center sensor, the Red hits the edge sensor.
2. Digging Through the Green Layer
Once the top layer is clear, you hit a wall of Green cups.
- The canvas needs a lot of Green, but mostly for the mid-section.
- The Trap: If you just spam all the Green cups now, you will clog the belt and run out of slots (hitting that 5/5 limit).
- Tap two Green cups from the left side, then stop. Watch the canvas. As the Green fills the trees, check if you need more Blue for the river. If the river stops, the painting halts. You likely need to clear Green cups solely to access the Blue cups sitting underneath them in the third row. Treat Green as "waste" you need to process to get to the "gold" (Blue).
3. Unlocking the Center Pocket
By mid-level, you will have cleared the side columns significantly. Now you must address the cups trapped under the T-divider stem.
- There is usually a White/Cream cup and a Red cup buried deep in the center.
- You need these for the bottom of the canvas (the river delta and banks).
- If you haven't cleared the side columns (specifically the 3rd and 4th columns from the outside), these center cups remain grayed out. Prioritize clearing the cups adjacent to the center stem.
- Don't be afraid to send a cup up even if the current color sensor isn't active yet—sometimes you just need to cycle the conveyor to free up a slot.
4. The Final River Pour
The bottom of the image is the trickiest. The river widens slightly or interacts with the Red earth borders.
- Save at least two Blue cups for the very end.
- A common fail state in Level 245 is finishing the trees (Green) and banks (Cream) but running out of Blue flow for the final few pixels of the river at the bottom edge.
- Ensure your final sequence on the belt is a mix of Red (for the bottom corners) and Blue (for the bottom center). Keep the Cream cups spaced out in between them to fill the final gaps without overwriting the Red borders.


