Sand Loop Level 250 Solution Walkthrough | Sand Loop 250
How to solve Sand Loop level 250? Get instant solution for Sand Loop 250 with our step by step solution & video walkthrough.

Sand Loop Level 250 Guide: The Neon Snail Puzzle
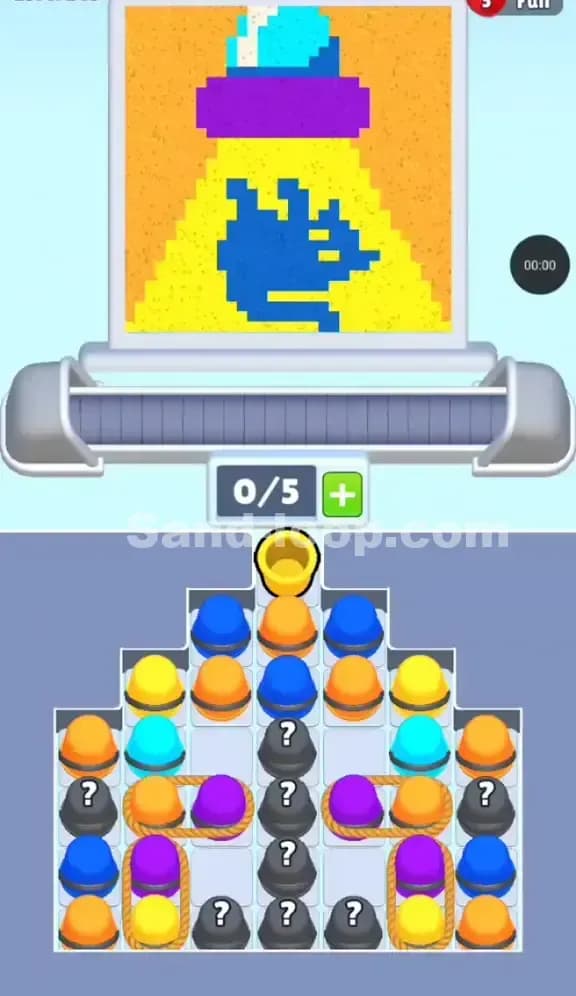
This stage is a classic "Ice Breaker" challenge masquerading as a simple painting task. The artwork here is a Neon Snail, characterized by a vibrant, retro-wave color palette. You aren't just pouring sand; you are dismantling a locked supply chain.
Sand Loop Level 250 is deceptive because the supply tray looks full, but most of it is trapped behind two massive Number Gates (often called Ice Blocks or Count Blocks). The hook here is resource starvation. You have plenty of cups on screen, but only a handful are actually playable in the first ten seconds. If you pull the wrong colors initially, you will fill your 5-slot conveyor belt with useless sand and deadlock the game before you even paint the snail’s shell.
Sand Loop Level 250 Solution: The Neon Snail
Before tapping a single cup, look at the canvas on the top half of the screen. Understanding the pixel layers is the only way to prioritize which locks to break first.
Color Palette Deep Dive
The Neon Snail uses five distinct colors. Confusing the two pinks is the most common reason for failure on this level.
- Dark Purple: This covers the bottom corners of the image. This is your foundation.
- Magenta (Hot Pink): Used for the snail’s shell swirl and parts of the abstract background.
- Light Pink: Used for the lighter parts of the shell. Do not confuse this with Magenta.
- Cream/White: This is the snail’s body. It is a critical, central element.
- Cyan/Dark Blue: These make up the upper background leaves and sky.
The "Danger Zones"
The biggest trap in the artwork is the Snail's Body (Cream). It sits right in the middle-bottom of the canvas. However, if you look at your tray, the Cream cups are completely inaccessible at the start. They are buried behind the number gates. If you try to paint the background (Cyan) before digging out the Cream cups, you will run out of space on your belt. You must prioritize digging for Cream.
Fill Order Prediction
Sand Loop physics dictate that sand settles at the lowest open point.
- Bottom Corners: The Dark Purple fills first.
- Snail Body: The Cream fills the center horizontal strip.
- Shell & Mid-ground: Magenta and Light Pink fill the middle.
- Top Background: Cyan and Dark Blue are the final layers.
Your cup selection must mirror this vertical hierarchy. Dark Purple is priority one. Cyan is priority zero—ignore it until the end.
Tackling the Number Gates in Sand Loop Level 250
The specific obstacle in Level 250 is the Dual-Gate Layout. You have two numbered blocks protecting the lower reserves of cups.
The "4" Gate (Right Side)
Located on the mid-right, this block has a "4" on it. This means you must clear 4 adjacent cups (or sometimes just 4 cups from the stack above it, depending on the specific patch version) to shatter the ice. This gate is protecting a crucial stack of White/Cream cups and some Deep Purples. This is your primary target. You cannot paint the snail without the cups hiding behind this block.
The "6" Gate (Bottom Left)
This block has a "6" on it. It protects the largest cache of sand in the level—a massive reservoir of Cyan, Blue, and Magenta. It is tempting to try and break this first because it looks bigger, but it is a trap. The count is too high. If you focus on the "6" gate first, you will likely clog your belt with colors you can't use yet (like Cyan). Ignore this gate until the "4" gate is destroyed.
Sand Loop Level 250 Step-by-Step Walkthrough
This level requires a strict "Dependency Chain" approach. You cannot just tap colors that match. You must tap colors that physically unblock the Number Gates.
1. Breaking the Surface (The First 5 Moves)
Your conveyor belt has a strict 5-slot limit. The top row of the tray is the only thing accessible. You will see a mix of Dark Purple, Cyan, Light Pink, and Magenta.
Do not tap the Cyan cups yet. Even though they are available, the top of the canvas is not ready to be painted. If you put Cyan on the belt, it will just loop endlessly, taking up one of your precious 5 slots.
Instead, tap the Dark Purple cups on the far left and far right. These cups correspond to the very bottom pixels of the canvas. They will pour immediately, freeing up their slots on the belt. More importantly, clearing the top-right Purple and Pink cups will drop sand adjacent to the "4" Gate, lowering its counter.
2. Cracking the "4" Gate
Once you have cleared the initial Dark Purples, focus entirely on the right side of the tray. You need to reduce that "4" counter to zero.
- Look for Light Pink or Magenta cups stacked directly above or next to the "4" block.
- Load them onto the belt. Since the middle of the painting (the shell) needs pinks, these will likely pour successfully.
- Keep an eye on your slot capacity. Hover around 3/5 or 4/5 full. Never hit 5/5 unless you are sure the next cup will pour instantly.
- Once the "4" block shatters, the Cream/White cups will tumble out.
3. The Cream Rush
This is the pivot point of Sand Loop Level 250. As soon as the "4" gate breaks, you must immediately prioritize every Cream/White cup you see.
- Tap them rapidly. Get them onto the belt.
- The snail’s body is a large, solid block of color at the bottom-center of the image. These cups will pour very fast.
- Clearing these Cream cups serves a dual purpose: it paints the main subject and it clears physical space in the tray to help you reach the "6" gate on the left.
4. Demolishing the "6" Gate
Now that the right side is flowing and the snail body is forming, shift your attention to the left. The "6" gate is likely still standing.
- You need to clear the cups sitting on top of it. By now, you should have exposed more Magenta and Light Pink cups in the center columns.
- Start feeding these pinks into the machine. They will fill the snail’s shell.
- As the shell fills, the "6" block counter will tick down.
- Warning: Be careful with the Dark Blue cups here. There are a few scattered in the mix. The background isn't ready for them yet. If you have to take a Blue to clear the block, do it, but be aware it might sit on your belt for a while.
5. Filling the Background (The Cyan Flood)
Once the "6" gate shatters, a massive amount of Cyan and Dark Blue cups will be released from the bottom-left corner.
- At this stage, the snail and the bottom purples should be finished. The canvas is ready for the background.
- You can now tap freely. Flood the belt with Cyan cups. Since they are the only color left needed for the top of the image, they will pour continuously.
- Watch out for the final few pixels in the snail's eye stalks. They are small and detail-heavy. Ensure you don't accidentally leave a straggler White or Pink cup buried under a pile of Cyans. If you bury a necessary color, you'll have to churn through the whole stack to find it.
Summary Checklist for Success
- Ignore Cyan at the start. It's a belt-clogger.
- Target Dark Purple first to clear the bottom row.
- Break the Right Side ("4" Block) immediately to get the White cups.
- Paint the Snail Body before worrying about the shell swirl.
- Open the Left Side ("6" Block) only after the snail body is partially done.
Follow this order, and the Neon Snail will be complete with moves to spare. Good luck with the timing on those Cream cups!