Sand Loop Level 249 Solution Walkthrough | Sand Loop 249
How to solve Sand Loop level 249? Get instant solution for Sand Loop 249 with our step by step solution & video walkthrough.

Sand Loop Level 249 Guide: The Alien Abduction Puzzle
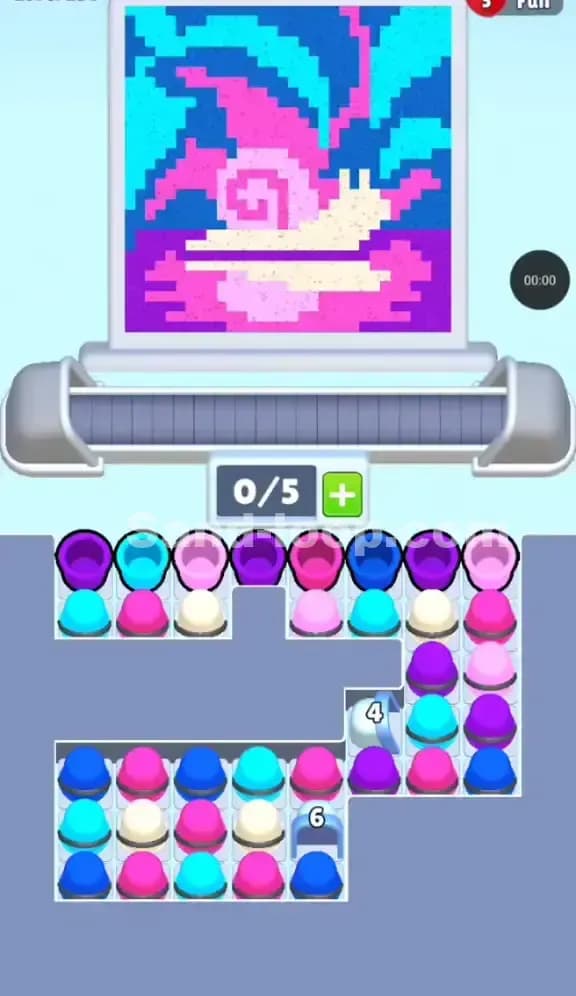
This isn't just another abstract pattern; you're painting a classic sci-fi scene. The artwork depicts a UFO Abduction: a purple saucer with a cyan dome, beaming down a yellow tractor beam to capture a small blue creature.
Sand Loop Level 249 is a pure logic puzzle disguised as a color-fill challenge. It's not about speed or breaking ice; it's about untangling a nasty Rope Knot dependency in the lower tray. The hook here is the deceptive simplicity of the yellow beam. That massive block of yellow demands a lot of sand, but the yellow cups you need are largely trapped behind ropes or buried under blue layers. Mismanaging your 5-slot conveyor belt capacity early on will leave you deadlocked with a half-painted alien and no way to reach the purple saucer.
Sand Loop Level 249 Solution: The UFO
Let's break down the pixel art target on the top screen. It dictates your entire strategy.
- Color Palette: You are working with four distinct colors: Yellow (the tractor beam), Purple (the saucer body), Cyan (the saucer dome), and Blue (the creature being abducted). The background is the standard orange sand, which usually fills last or automatically.
- The "Danger Zones": The blue creature is the biggest risk. It's an irregular shape right in the middle of the yellow beam. If you pour yellow too aggressively without precise timing, you might paint over the creature's silhouette or waste yellow sand where blue is needed. The transition from the wide purple saucer base to the narrow cyan dome is another choke point; mistiming a purple cup here can ruin the dome's definition.
- Fill Order Prediction: The geometry forces a bottom-up approach. You need to establish the yellow beam first to give the blue creature a context. However, the tray setup often forces you to grab accessible colors first. Ideally, you want to clear the Blue creature elements early so they don't get buried, then flood the Yellow, and cap it off with the Purple and Cyan top.
Tackling the Rope Constraints in Sand Loop Level 249
The screenshot reveals the true enemy: Roped Pairs.
Look at the bottom half of the supply tray. You have four specific rope bindings connecting Orange (background) cups to Purple cups. Specifically, the purple cups needed for the UFO body are literally tied to orange cups you don't need until the very end.
This creates a serious slot economy problem. To get a Purple cup onto the belt, you must also take its Orange partner. Since your conveyor capacity is capped at 5 slots, pulling a single rope pair eats up 2 slots instantly. If you pull two pairs, you have 4/5 slots filled with mostly useless orange sand, leaving no room to maneuver the essential Yellow or Blue cups. You have to break these ropes intelligently, usually by finding a moment where you can dump the orange sand into the background harmlessly just to free up the purple cup for the saucer.
Sand Loop Level 249 Step-by-Step Walkthrough
The supply tray is a pyramid. The top is accessible, the bottom is locked behind Mystery Boxes (gray cups with question marks) and ropes.
Clearing the Top Pyramid
Your first moves are scripted by gravity. You have a single Yellow cup at the peak, flanked by Blue and Orange.
- Tap the top Yellow cup immediately. This starts the tractor beam.
- Tap the two Blue cups in the second row. These are crucial for the creature inside the beam. Do not delay these; get them on the belt so the dispenser can paint the creature while the beam is still forming.
- Ignore the Orange cups for a second. If you fill the belt with orange now, you'll clog the flow.
Cracking the Mystery Row
The third and fourth rows are blocked by a central column of Gray Mystery Cups.
- You cannot predict what color is inside, but you have no choice. Clear the visible Blue and Yellow cups on the flanks of the mystery column.
- Once you expose the first Mystery Cup, tap it. It will likely reveal a color needed for the current layer (usually Blue or Yellow).
- Stop and count. Check your capacity (e.g., 3/5). Do not tap blindly. Ensure the mystery cup has passed the pour zone before adding more.
Handling the Roped Purples
This is the endgame transition. You've painted the beam and the creature. Now you need the UFO.
- The Purple cups are tied to Orange cups. You need the purple for the saucer base.
- Wait until the painting nozzle is near the top of the canvas (above the yellow beam).
- Tap a Roped Pair. Both the Purple and Orange cup will jump to the belt.
- The risk here is the Orange cup pouring before the background is ready, or the Purple cup pouring too late. Watch the order. If the Orange cup is in front, let it pass or ensure it pours into an empty background spot. The priority is getting that Purple sand onto the saucer shape.
- Repeat for the second rope pair on the other side. This finishes the UFO body.
The Final Cyan Cap
Once the ropes are gone, the bottom of the tray opens up. You will find the Cyan cups needed for the dome, likely hiding near the bottom corners or under the last mystery boxes.
- With the heavy lifting done, clear any remaining Orange cups to fill the background edges.
- Send the Cyan cups last to top off the UFO dome. The level ends once that tiny blue-green semicircle is filled.