Sand Loop Level 309 Solution Walkthrough | Sand Loop 309
How to solve Sand Loop level 309? Get instant solution for Sand Loop 309 with our step by step solution & video walkthrough.
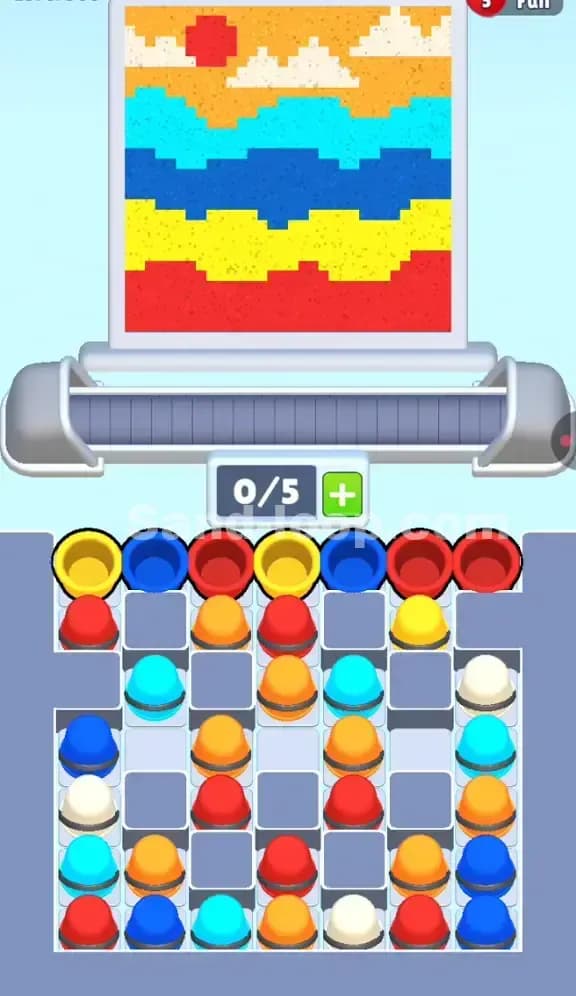
Sand Loop Level 309 Guide: The Sunset Landscape Puzzle
This level features a clean, stacked landscape that looks deceivingly simple. You’re painting a pixel art sunset scene: white clouds, a red sun, rolling blue hills (or water), and layers of yellow and red earth. There are no keys to hunt and no ice blocks to shatter here. It's a pure logic puzzle about color layering.
The challenge is the sheer volume of color bands and the chaotic arrangement of the supply tray. You have five distinct colors fighting for space on a conveyor belt with a strict 5-slot capacity (0/5). This is a bottleneck level. If you flood the belt with the wrong sequence, you'll deadlock immediately because you can't clear the cups fast enough.
Sand Loop Level 309 Solution: The Layered Horizon
Look closely at the canvas. It's structured in horizontal stripes, which dictates your entire strategy.
Color Palette Deep Dive:
- Red: Used for the sun at the top left and the large solid band at the very bottom.
- White/Cream: Exclusively for the clouds at the very top.
- Orange: Fills the sky background behind the clouds and sun.
- Cyan (Light Blue): The upper wave/hill.
- Dark Blue: The middle wave.
- Yellow: The strip of land above the bottom red layer.
The "Danger Zones": The biggest risk here is the sky. The top section is a mix of White, Red (sun), and Orange (sky). These three colors are intertwined. If you send a fleet of orange cups before placing the white clouds, the sand will just spill over the cloud pixels and ruin the crisp edges, or worse, fill spots meant for the red sun.
Fill Order Prediction: Because gravity rules Sand Loop, you generally fill from bottom to top visually, but the game logic often processes layers differently. Here, the distinct bands suggest you can tackle the bottom layers (Red/Yellow) fairly safely, but the top sky needs precise interleaving. However, looking at the tray, you are forced to deal with what's accessible first.
Tackling the Supply Tray Jam in Sand Loop Level 309
The supply tray is the real enemy. It's a dense grid of cups with almost no empty space.
- Top Row: Alternating Yellow, Dark Blue, Red. These are the only cups you can grab initially.
- The Problem: The cups you need for the bottom of the picture (Red) are mixed in with cups you need for the middle (Dark Blue, Yellow).
- The Trap: Notice the Cyan and White cups are buried deep in the lower layers. You cannot paint the sky or the top water until you clear the top three rows of the tray. This forces you to paint the bottom of the canvas first, whether you want to or not.
The Specific Obstacle here is the "Checkerboard Lock." The cups are staggered. You can't just clear all red cups at once because they are blocked by blues and yellows. You have to peel the tray layer by layer, top to bottom.
Sand Loop Level 309 Step-by-Step Walkthrough
This walkthrough focuses on managing your 0/5 Slot Count. Never have more than 3 cups on the belt unless you are 100% sure they will empty immediately.
1. The Bottom Red Foundation
Your first moves are dictated by the top row of the tray. You have accessible Red cups on the far edges and in the center.
- Tap the Red cups available in the top row. The conveyor will take them to the dispenser.
- Watch the bottom of the canvas. The sand will start filling that solid red base layer.
- Do not touch the blue or yellow cups yet if you can avoid it. You want to clear that bottom red stripe to create a "safe zone" for mistakes.
2. Clearing the Yellow and Dark Blue Mid-Section
Once the top-row Reds are gone, you'll expose more Yellows and Dark Blues.
- The layer directly above the bottom red is Yellow. Start tapping the Yellow cups.
- Critical Timing: Don't alternate Red-Yellow-Red-Yellow. The dispenser takes time to switch colors. Group your taps. Send 2-3 Yellows in a burst.
- After the Yellow band is solid, move to the Dark Blue cups. This fills the middle wave.
- Warning: If you send Dark Blue before Yellow is finished, the blue sand might catch on the jagged edges of the yellow pixel line. Finish the yellow band first.
3. Digging for Cyan and White
By now, you should have cleared the top half of the supply tray. You have finally exposed the Cyan (Light Blue) and White cups sitting in the lower rows.
- Now you can fill the upper wave with Cyan.
- Be careful with the White cups. These are for the clouds. If you look at the canvas, the clouds are "islands" in the orange sky.
- Do not spam White cups. Send them one by one. Watch where the dispenser nozzle is. You need the white sand to hit the specific cloud coordinates. If you miss, you waste a cup and have to wait for the cycle to loop, clogging your 5 slots.
4. The Final Sky Assembly (Orange + Red Sun)
You are down to the last few rows of the tray.
- You need Orange for the sky background.
- You need that one specific Red burst for the sun in the top left.
- The Sun Trick: Don't fill the entire orange sky and hope to squeeze the sun in later. Try to spot when the dispenser is over the top-left corner. Send a Red cup then.
- Once the clouds and sun are placed, you can unload every remaining Orange cup to fill the gaps in the sky. Since Orange is the background filler for the top, it's safe to use last to patch up any holes.