Sand Loop Level 259 Solution Walkthrough | Sand Loop 259
How to solve Sand Loop level 259? Get instant solution for Sand Loop 259 with our step by step solution & video walkthrough.
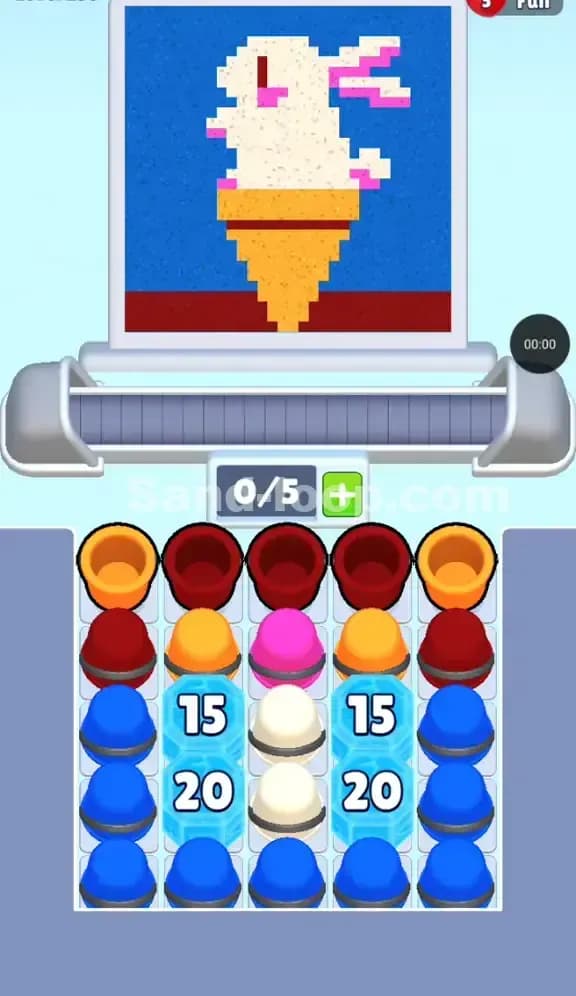
Sand Loop Level 259 Guide: The Ice Cream Bunny Puzzle
Sand Loop Level 259 presents a deceptively cute pixel art challenge: a white rabbit perched inside an ice cream cone. While the image itself is adorable, the layout of the supply tray is hostile. This is a Grind Level disguised as a painting challenge. You aren't just matching colors; you are working against high-HP ice blocks that wall off nearly 50% of your supply.
The hook here is the Vertical Segregation. The tray is split into three narrow chimneys by the ice. If you don't manage your 5 conveyor slots perfectly, you will jam the belt with cups that can't reach the painting because the ice is still standing.
Sand Loop Level 259 Solution: The Bunny Cone
The pixel art target consists of distinct zones that dictate your playstyle:
- The Cone (Orange & Yellow): This is the mid-section foundation. It requires a mix of the top-row Orange cups and the second-row Yellows.
- The Ground (Dark Red): A solid strip across the bottom. This is your "dump" color early on.
- The Bunny (White & Pink): The central figure. The White cups are critically trapped in the middle column. The Pink pixels are details (ears, cheeks) that come from the single Pink cup in the second row.
- The Sky (Blue): The dominant background. The supply for this is massive but locked at the very bottom of the tray and behind the ice walls.
The Danger Zone: The Center Column is your lifeline. It contains the Pink cup and the White cups needed for the main character. However, it is sandwiched between two columns of Ice Blocks with 15 and 20 HP. If you ignore this column, you cannot finish the bunny, and you cannot clear the ice fast enough.
Tackling the "Ice Walls" in Sand Loop Level 259
The specific obstacle in Sand Loop Level 259 is the pair of dual Ice Blocks (labeled 15 and 20) sitting in columns 2 and 4.
These aren't standard barriers; they are high-health durability tests. You decrement their numbers by clearing cups adjacent to them. Because they are vertical pillars, you have to work the Left (Blue/Red), Center (White/Pink), and Right (Blue/Red) columns simultaneously to chip them down.
The trap is the Slot Economy. You have a 0/5 capacity on the belt. If you pull too many Blue cups from the sides before the painting is ready for the sky, your belt jams. But if you don't pull them, the ice never breaks. You must balance "useless" pulls that break ice with valid pulls that paint the canvas.
Sand Loop Level 259 Step-by-Step Walkthrough
1. Clearing the "Cone and Ground" Layer
Your first moves must be aggressive on the top two rows. The painting needs Dark Red for the bottom strip and Orange for the cone rim immediately.
- Tap the Dark Red cups in the top row. These will flow straight to the bottom of the canvas.
- Tap the Orange cups on the far corners. This clears the top row entirely.
- Why this matters: This exposes the Yellow cups for the cone body and, more importantly, exposes the top of the Ice Blocks so subsequent matches start counting damage.
2. The "Pink Pin" Manuever
Once the top row is gone, you'll see a single Pink Cup sitting dead center in the second row.
- This Pink cup is a bottleneck. The White cups (bunny body) are stuck underneath it.
- Even if the painting isn't perfectly ready for pink details, get this cup onto the belt as soon as you have a slot. It often paints the cheek or ear tip early.
- Clearing this Pink cup unlocks the White Cup generator in the center. You need those White cups flowing to damage the 15 HP ice blocks from the inside.
3. Grinding the 15/20 Ice Blocks
Now the grind begins. You have Blue cups on the far left/right and White cups in the center.
- Alternate your taps: Left Column, Center Column, Right Column.
- Do not just spam Blue cups. The painting paints from the bottom up. It will likely finish the Red ground and Orange/Yellow cone first.
- If the belt fills up (5/5) and stops moving, check which color is closest to the nozzle. Usually, you need to let a few White cups through to build the bunny body before the massive amount of Blue sky can be painted.
- Focus on the 15s: The top ice blocks have 15 HP. They will break first. Once they shatter, the flow becomes much easier because the upper supply tray merges.
4. The Blue Sky Flood
Once the ice walls shatter (both the 15s and the 20s), the bottom half of the tray becomes a sea of Blue cups.
- At this point, the bunny (White) should be mostly finished.
- You can now rapidly tap the Blue cups to fill the remaining background.
- Caution: Watch out for any lingering Dark Red cups that might have been hiding in the side columns. Sometimes a pixel of the bunny's eye or mouth requires a specific color timing. Don't drown the belt in Blue until you are sure the small details are done.