Sand Loop Level 300 Solution Walkthrough | Sand Loop 300
How to solve Sand Loop level 300? Get instant solution for Sand Loop 300 with our step by step solution & video walkthrough.

Sand Loop Level 300 Guide: The Orange Tree Puzzle
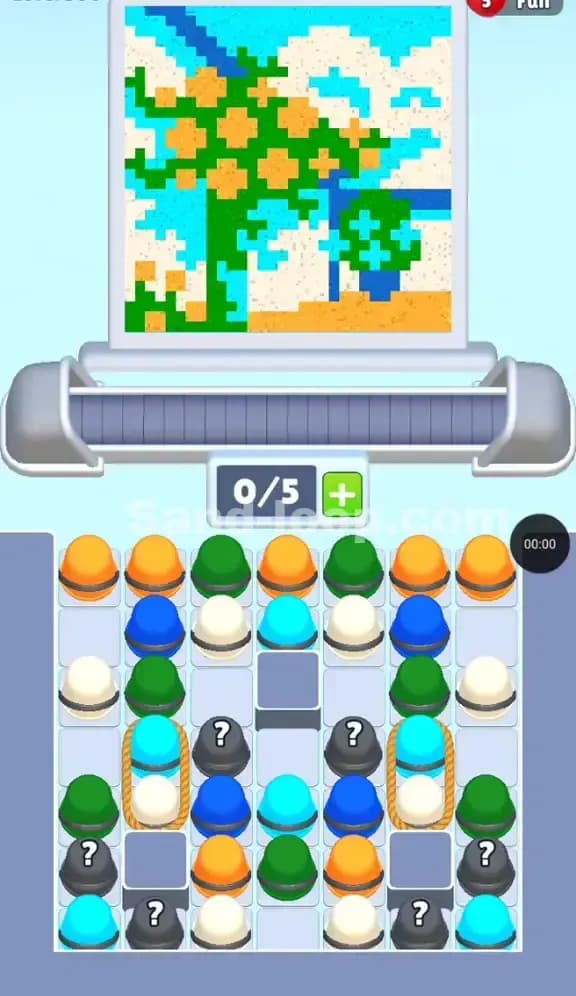
You have hit the big 3-0-0. This isn't a speed bump level; it is a logic wall. The pixel art for this milestone is a sprawling Orange Tree Landscape. You aren't just filling a simple bucket here. You are painting a chaotic mix of foliage, fruit, and sky.
This level changes the pace from previous speed challenges. It forces you to deal with a crowded supply tray where almost every useful cup is buried under something else. The primary challenge isn't just the colors; it's the Roped Dependencies and the Mystery Cups hiding at the bottom. You have a generous 5-slot conveyor belt, but don't let that fool you. If you get sloppy with the roped pairs, you will deadlock that belt in seconds.
Sand Loop Level 300 Solution: Deconstructing the Tree
Take a hard look at the canvas on the top screen. You need to understand the layers before you start tapping, or you’ll end up with a conveyor belt full of sand you can't pour.
Color Palette Breakdown
- Forest Green: This is the dominant color. It forms the massive, irregular shape of the tree canopy.
- Bright Orange: These are the fruits (or flowers) scattered inside the green blocks. They are isolated pixels, not big chunks.
- Cyan (Light Blue): This is the sky background. It fills the gaps around the tree.
- Beige/White: Used for the clouds in the sky and the sandy ground at the bottom.
- Dark Blue: There is a tricky vertical line (possibly a waterfall or trunk shadow) cutting through the image.
The "Danger Zones"
The biggest trap in the Sand Loop Level 300 artwork is the Green/Orange interleaving. The orange pixels are surrounded by green. If you pour a continuous stream of Green, you might accidentally fill spots meant for Orange, or vice versa. The game’s physics engine can be unforgiving here. You need short, controlled bursts for the tree canopy. Do not just hold the button down.
Fill Order Prediction
Logic dictates you build the structure first.
- The Canopy: Tackle the Green/Orange mix first. These cups are sitting right at the top of your supply tray.
- The Sky: The Cyan and Beige cups are in the middle layers. You’ll need them to shape the edges of the tree.
- The Ground: The bottom sandy layer is usually the last thing to fill, as those cups are buried deep in the tray.
Tackling the Roped Pairs in Sand Loop Level 300
The defining headache of Level 300 is the Roped Cup mechanism. Look at the middle rows of the supply tray. You will see two specific pairs: a Cyan cup tied to a White cup.
Here is specifically how they wreck your game: These cups are physically tethered. You cannot move the top Cyan cup without dealing with the White cup immediately after (or simultaneously, depending on the specific physics patch you are on).
If you tap the Cyan cup while your conveyor belt has 4/5 slots filled, you will jam the system. The tether requires two open slots to process cleanly. If you try to squeeze them into a single slot gap, the second cup will hang off the edge or fail to load, blocking the cups behind it.
You must treat these pairs as "Heavy Load" items. Never touch a roped pair unless your conveyor counter reads 0/5 or 1/5. Anything higher is a risk.
Sand Loop Level 300 Step-by-Step Walkthrough
This board is symmetrical but dense. We need to peel it like an onion, layer by layer, starting from the top.
1. Clearing the Canopy (Top Row Rush)
Your first few moves are obvious but critical. The top row of the supply tray is alternating Orange and Green cups.
- Tap the Green cups first. The tree needs a massive amount of green base. Get them onto the belt and start filling the main body of the tree.
- Weave in the Orange cups immediately after. Since the orange pixels are inside the green mass, you want these colors available on the belt back-to-back.
- Goal: Clear the entire top row (5-6 cups) quickly to expose the blue layer underneath. Do not touch the Mystery Cups yet.
2. The Mid-Game Choke (Blue & Beige)
Once the top row is gone, you expose the second row: Dark Blue and Beige/White, flanking the central Cyan cups.
- The Dark Blue cups are rare. There are only two visible near the top sides. Use them to draw the dark vertical line in the tree trunk/waterfall area. Be precise. If you miss this pixel line, you waste the cup, and you might not get another Dark Blue until you crack a Mystery Cup.
- Start feeding the Cyan cups for the sky. The sky is safer to fill because it's a large, connected block. You can afford a longer pour here.
3. Navigating the Roped Trap
Now you are staring at the Roped Cyan/White pairs.
- Check your capacity. Ensure the belt is empty.
- Tap the Roped pair. This will dump both Cyan (Sky) and White (Cloud/Ground) onto the belt.
- Timing: This is where players lose. The Cyan will reach the dispenser first. Pour the sky. As soon as the White cup arrives, snap your finger off the screen if you are over the tree, and wait until the nozzle is over a cloud or the ground.
- Do this for both left and right roped pairs. Getting rid of these opens up the bottom corners.
4. The Mystery Cup Roulette
The bottom of the board is cluttered with Stone Blocks and gray '?' Mystery Cups.
- You have cleared the predictable colors. Now you have to gamble.
- Tap a Mystery Cup. It will reveal its color after it hits the belt (or right before loading).
- Reaction Time: You have about 2 seconds between the reveal and the pour point.
- If it turns Green or Orange, check the tree for any missed spots.
- If it turns Beige, dump it on the bottom ground layer.
- Stone Block Warning: The gray square blocks at the bottom don't move. They force the cups to slide diagonally. This delays the feed rate. Account for this lag. When you tap a bottom corner cup, it takes an extra half-second to slide around the stone block before hitting the belt. Don't tap frantically or you'll misjudge the gap.
5. Final Cleanup
By now, the supply tray should be nearly empty. You likely have 1-2 Mystery Cups left in the bottom center. These are your "Safety Net." Use them to patch up any single pixels you missed in the canopy or the sky. If you played clean with the ropes earlier, you should have plenty of space on the belt to cycle these last cups without panic.