Sand Loop Level 356 Solution Walkthrough | Sand Loop 356
How to solve Sand Loop level 356? Get instant solution for Sand Loop 356 with our step by step solution & video walkthrough.
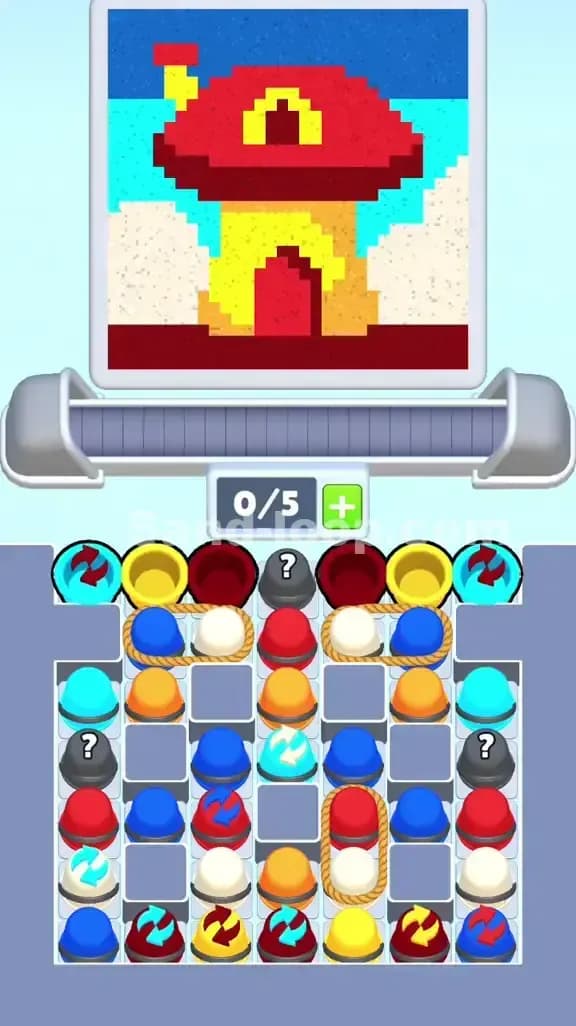
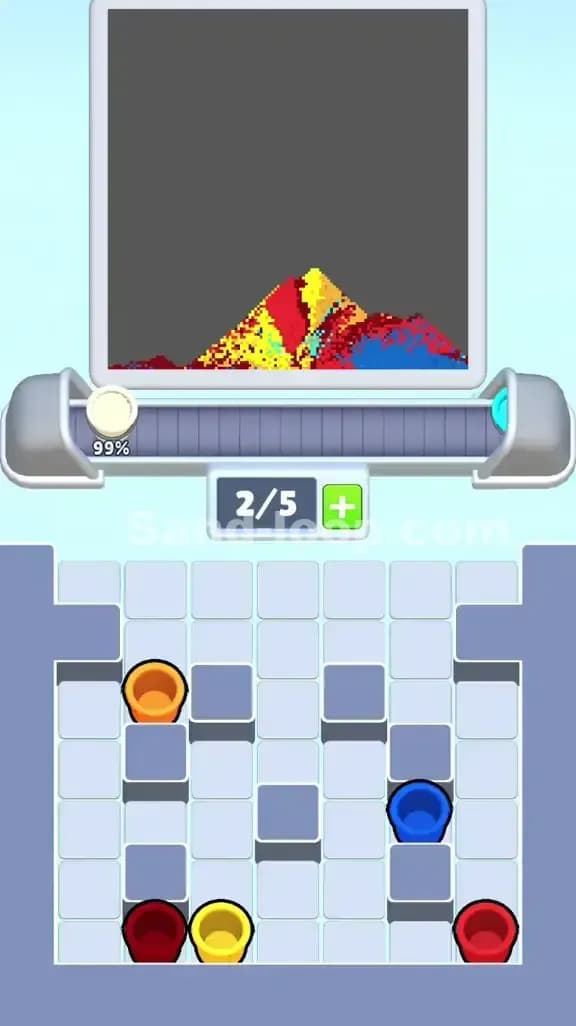
Sand Loop Level 356 Guide: The Mushroom House Puzzle
This is Sand Loop Level 356, featuring the Mushroom House. It’s a whimsical little cottage with a bright red roof and yellow walls, set against a classic cyan sky. Don't let the cute pixel art fool you; this is a logic-heavy level masquerading as a simple coloring job. The color palette is tight: Red, Dark Red (Maroon), Yellow, Cyan, Blue, and Cream (White).
The primary challenge here isn't speed. It's the complex web of ropes and swap cups in the tray below. You start with 0/5 capacity, meaning you have to act fast to clear space, but moving the wrong cup first will rope-lock you instantly.
Sand Loop Level 356 Solution: Deconstructing the Mushroom House
The top screen reveals the blueprint. You are building from the bottom up, but the color layering is tricky.
-
Color Palette Deep Dive:
- Dark Red (Maroon): Used for the ground base and the door archway.
- Yellow: The main walls of the house and the chimney.
- Red: The massive mushroom cap roof.
- Cyan: The upper sky background.
- Cream/White: The lower background (clouds or hills) on the left and right.
- Blue: The darker stripe of sky at the very top.
-
The "Danger Zones": The biggest risk is the Doorway. It requires Dark Red right in the middle of a Yellow fill. If you pour Yellow too aggressively for the walls, you will bury the door. Conversely, if you pour the Red roof too early, you'll block the Yellow chimney.
-
Fill Order Prediction:
- Dark Red Base: Establish the ground immediately.
- Yellow Walls + Cream Sides: The house body and the lower background need to happen almost simultaneously.
- Dark Red Door: A quick burst in the center.
- Red Roof: The big fill.
- Cyan/Blue Sky: Finishing touches.
Tackling the Rope & Swap Trap in Sand Loop Level 356
The specific obstacle here is the Dual-Layered Rope System. Look at the tray.
- You have a rope linking a Blue cup and a White cup on the left.
- Another rope links a Red cup and a White cup on the right.
- A vertical rope on the bottom right links a Red cup to a White cup.
These ropes prevent you from just tapping whatever color you need. If you need White for the background, but it's roped to a Red cup buried three rows deep, you're stuck. You have to clear the "parent" cup to free the "child" cup.
Additionally, the Swap Cups (arrows icon) are positioned on the far edges. These are often bait. Using a swap cup too early can shuffle your carefully planned ropes into positions where they are permanently blocked by grey dividers.
Sand Loop Level 356 Step-by-Step Walkthrough
Follow this dependency chain to avoid deadlocks.
1. Breaking the Top Seal (Dark Red & Yellow)
Your tray capacity is 0/5. You must clear cups immediately.
- Tap the Dark Red cups in the top row. These are perfect for the ground layer of the pixel art.
- Tap the Yellow cups in the top row next. This starts the house walls.
- Why? This clears the top layer of the tray, exposing the crucial roped cups underneath. Do not touch the Cyan swap cups on the far edges yet; they waste slots.
2. Managing the Roped White Cups
Once the top row is gone, you'll see White cups tied to Blue/Red ones.
- The pixel art needs Cream/White for the lower sides now.
- Identify which White cups are free (unroped) or lightly roped. Prioritize freeing these.
- If a White cup is roped to a Blue cup, and you don't need Blue yet, you have a problem. You might need to burn a slot holding that Blue cup just to pour the White sand.
- Gap Strategy: Pour the White sand on the sides of the canvas, leaving the center clear for the Yellow house.
3. The Doorway Precision (Dark Red)
You need to pour the door before the walls get too high.
- Look for a Dark Red cup in the middle columns.
- Time your release so it hits dead center. If you miss and hit the Yellow wall area, you’ll ruin the door arch shape.
- Stop pouring Yellow while the Dark Red door is filling.
4. Releasing the Roof (Red vs. Blue)
Now you need a massive amount of Red for the mushroom cap.
- You likely have Red cups tied to ropes. By now, you should have cleared the blockers.
- Unload all Red cups. Be careful not to overflow into the sky area.
- The Blue Trap: You will have leftover Blue cups from the rope pairs earlier. Do not pour them until the Red roof is totally finished. The Blue belongs at the very top (the dark sky strip). If you pour Blue now, it will contaminate the Cyan sky or the Red roof.
5. The Sky Gradient (Cyan & Blue)
- Finish with Cyan for the main sky.
- Finally, use those hoarded Blue cups for the top strip.
- If you have Mystery cups (?) left, save them for this final phase. They often turn into the color you are most deficient in, which is usually the specific shade of Blue needed for the top edge.
Summary: The key to Sand Loop 356 is ignoring the "Swap" cups initially and focusing on the ropes. Free the White cups early for the background, or you'll be stuck with a Red roof and no way to fill the bottom corners.