Sand Loop Level 39 Solution Walkthrough | Sand Loop 39

How to solve Sand Loop level 39? Get instant solution for Sand Loop 39 with our step by step solution & video walkthrough.

Share Sand Loop Level 39 Guide:
Sand Loop Level 39 Gameplay
Sand Loop Level 39 Solution 1
Sand Loop Level 39 Solution 2
Sand Loop Level 39 Solution 3

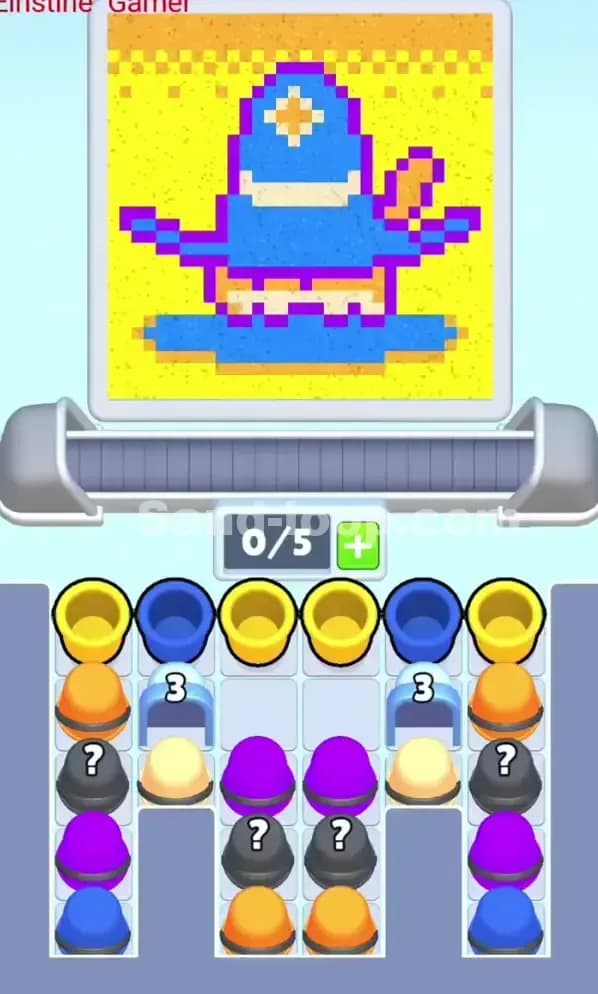
Sand Loop Level 39 Snapshot

The Canvas and Color Targets

Sand Loop Level 39 asks you to fill a desert landscape dominated by a bright blue sky. The centerpiece is a stylized sun (cream/white circle) sitting high in the upper half of the canvas, with a dramatic desert scene below featuring bold red, dark maroon, and golden yellow mountains layered in a pixelated style. The color requirements are clear: you need to balance blues, reds, dark reds (maroons), yellows, and whites to complete this scenic composition without overshooting any single hue. The canvas demands precision—this isn't a "dump all one color" level.

Starting Setup and Slot Economy

You're launching Sand Loop 39 with a conveyor belt capacity of 0/5, meaning you've got five slots available and zero cups currently loaded. That's wide open, but it's also deceptive—you'll fill those slots fast if you're not careful. The supply tray below shows a dense stack of cups in multiple colors: blues dominate the left side, reds and dark reds fill the center and right, and there's a golden yellow cup buried in the middle-lower area. Some cups are stacked two-high, which means loading one cup may unblock another underneath it. You'll need to plan your unblocking order carefully to avoid getting a cup you don't want yet.

The Win Condition

Complete the painting by filling the canvas to match the color layout shown: adequate coverage of blue for the sky, layers of red and maroon for the mountains, golden yellow for highlights, and cream/white for the sun. You cannot overfill any single color or you'll lock yourself out of finishing the others. Avoid contamination (wrong colors landing on precision zones) and waste (pouring into a full cup or an empty spot on the canvas that doesn't belong). The level is won when the entire image matches the target and your color progress bars reach 100%.


Why Sand Loop 39 Feels Hard (The Actual Bottleneck)

The Real Puzzle: Unblocking Without Jamming

Sand Loop Level 39 isn't hard because the pour timing is tricky—it's hard because the tray is a locked-up puzzle box. That golden yellow cup you need? It's wedged under a blue cup, which is under another blue cup. If you load all the blue cups first to get to the yellow, you've now got five blues on the conveyor and zero slots left. You can't pause the belt, so one of those blues is about to pour whether you like it or not, and you haven't even touched your red or maroon quotas yet. That's the bottleneck: knowing which cup to pull first.

Three Classic Traps

Trap One: The Blues Avalanche. The left column is packed with blue cups stacked 2–3 high. You think you need a lot of blue for the sky, but pull three blues off the tray and suddenly your belt is 60% full of one color. You pour one, waste one, and now you're behind on reds and yellows.

Trap Two: Red vs. Dark Red Confusion. The canvas shows both bright red and dark maroon mountains. They're visually similar, but they're different colors in Sand Loop 39. If you keep grabbing the wrong shade, you'll overfill one and starve the other, leaving your mountains incomplete and lopsided.

Trap Three: The Yellow Drought. Golden yellow is buried so deep that most players either ignore it until the end (panic mode) or dig for it too early (clogging the belt with unwanted cups). Either way, you end up with a mostly-finished painting and a blank yellow spot because you're out of moves or slots.

The Frustration

I choked Sand Loop 39 twice because I loaded the belt greedily in the opening. I pulled four cups from the tray (two blues, one red, one dark red) and forgot that I only had five slots. The fifth spot filled instantly, the conveyor started rolling, and I couldn't load the yellow cup without dropping something. By the time I'd cycled through and made room, I'd wasted three pours on over-filling the sky. Sand Loop 39 looks easy—the goal is clear, the colors are distinct—but it punishes impatience. You have to actually think about the tray stack and the belt rhythm, not just tap and hope.


Step-by-Step Walkthrough to Beat Sand Loop Level 39

Opening Rhythm: The First Five Cups

Start by surveying the tray. Identify the golden yellow cup—it's your canary in the coal mine. Before you load anything, mentally trace the stack: what's on top of it, and how many moves will it take to free it?

Load your first two cups strategically: grab one blue (for the sky) and one bright red (for the mountain peaks). This gives you a balanced opening and keeps your sky and main landscape colors flowing. Place them on the belt—don't fill all five slots yet. You now have 2/5. Stop.

Why stop? Because your next move is to unblock the yellow. Push a second blue cup onto the belt (3/5). This is your clearing cup—it may not all land on the canvas perfectly, but it clears the stack underneath. Now you can see what's next to the yellow.

Pull one dark maroon cup (4/5). This is your shadow color for the mountain valleys. Hold here at 4/5 with one empty slot. This is critical: keeping one free slot prevents deadlock. If your belt is full and a cup finishes pouring before you can load the next one, you're stuck watching a delay and wasting pours.

Unblocking Plan: Freeing the Yellow

Once you've got those four cups rolling (blue, red, blue, dark maroon), watch the first blue and red pour onto the canvas. You're not done timing yet—this is where lead time matters. Your tap happens now, but the cup reaches the sand dispenser about 1–2 conveyor ticks later. Anticipate this delay.

As soon as you have a visual gap on the belt (one of your first cups has cleared the pour zone), load the golden yellow cup. Do not load it earlier or you'll jam. The second blue you loaded will help push yellow toward the dispenser, so by the time you're halfway through your opening cycle, yellow is in queue.

If the yellow cup is still too buried (blocked by more than one cup), load a second dark maroon instead and come back to yellow after one more cycle through. It's not ideal, but it's safer than forcing it and creating a traffic jam.

Mid-Game Control: Cycling and Maintaining Gaps

Sand Loop 39 now enters the rhythm phase. Your first four cups are cycling, and you're watching the color meters climb. Do not let any meter hit 100% until the others are close behind. If blue hits 80% while red is at 30%, you've got a problem: you'll have to stop pouring blue, but you can only do that if you stop loading blue cups. That means pulling more reds and yellows, which can unblock the wrong cups.

Establish a pattern: load blue, watch it pour, load red or maroon, let it pour, and so on. After every 2–3 cups, pause and check your meter progress. If you're 10% ahead on one color, skip that color for the next cycle and load a different one.

Golden Rule for Sand Loop Level 39: Always keep one empty slot on the belt. This prevents the dreaded "full belt choke" where a cup finishes pouring but there's nowhere to move because all five slots are occupied. That delay costs you time and pours.

As you approach mid-game (50% completion), you should have touched every color at least once. Yellow should be queued or actively pouring. Reds and dark reds should be climbing in tandem. Blues should be advancing steadily but not racing ahead.

End-Game Precision: The Last 10–20%

This is where Sand Loop 39 separates the casual players from the focused ones. You're at 80%+ completion, and your meters are lopsided. Maybe you've got blue at 95%, red at 90%, maroon at 75%, and yellow at 60%. You're close, but one mistake—one extra blue pour—and you're permanently locked out of the red/yellow finish.

Slow down. Load only the colors you need. If blue is maxed, do not touch blue cups. Navigate your tray and pull only red, dark maroon, and yellow cups. If a red cup is on top of a blue cup in a stack, you've got a choice: either dig deeper to find a red below it, or accept that pulling the red will shift the blue and plan accordingly.

For the very last 2–3% (the tight zone), micro-manage each pour. Pour one cup, check the meters, pour the next. At this stage, Sand Loop 39 is less about timing and more about patience. You've won if you reach 100% on all colors without overshoot. Inch it out.

If You Mess Up: Quick Recovery

You've overfilled blue by 5%, and now the blue meter is maxed while red is still at 80%. You're panicking, but it's not over.

Recovery tactic: Completely stop loading blue cups. Load only red and maroon for the next 3–4 cycles. The blue cups left on the belt will still pour (you can't prevent that), but after they've cleared, you'll have full access to red and maroon in the tray. Yes, you've wasted pours on blue, but you can still finish red and maroon within the remaining pours.

Alternatively, if you've got a spare booster (undo/extra slot), use the undo to rewind one or two pours and reload the correct color. An extra slot booster at the start of Sand Loop 39 would let you load six cups instead of five, which gives you way more flexibility on the unblocking phase.


Why This Strategy Works in Sand Loop 39

Conveyor Lead Time and Slot Economy

The strategy respects the delayed timing of the pour. You're not just loading cups randomly; you're predicting where each cup will land by the time it reaches the dispenser. By spacing out your loads and always keeping one empty slot, you're buying yourself control. The empty slot acts like a pressure valve—it lets you pause without jamming, and it gives you real-time flexibility to react if a meter is climbing too fast.

Sand Loop Level 39 is 60% about the belt rhythm and 40% about the tray puzzle. The strategy addresses both. You unblock yellow early (solving the tray puzzle) and then cycle colors evenly (managing the belt rhythm). This prevents the two most common failures: getting stuck with the wrong cups available in the tray, or painting yourself into a corner where one color is maxed and you can't stop pouring it.

Waste Prevention and the Background Overfill Problem

The biggest trap in Sand Loop 39 is overfilling the blue sky. It's huge, it's obvious, and it's easy to load three blue cups in a row without thinking. Then you pour all three, and suddenly you're at 100% blue while red is at 60%. That's not a "close call"—that's a failed run because you can never fill red now; the level is geometrically locked.

The strategy prevents this by forcing you to plan ahead. You load blue, red, blue, maroon, then re-evaluate. This creates natural breaks where you check your meters and adjust. If blue is climbing too fast, you skip blue for the next cycle. It's a simple feedback loop, but it works because it's conscious, not reactive.

Consistency and Booster Efficiency

If the level has move or attempt limits, this strategy minimizes wasted moves. You're not trying things randomly; you're executing a deliberate sequence. Most players beat Sand Loop 39 without boosters if they follow this plan. If you do hit a wall, you know exactly where (usually the mid-game color balance or the yellow unblocking phase), so a booster targets the real problem instead of guessing.


Extra Tips and Adaptations for Levels Like Sand Loop 39

Six Mistakes and Their Fixes

Mistake One: Loading all blues at the start. You think you need 5+ blue pours for the sky, so you load multiple blues upfront. Fix: Load one blue, one red, then reevaluate. Trust that blue pours will keep coming as you cycle.

Mistake Two: Ignoring yellow until it's too late. You finally pull the yellow cup when you're already at 85% completion and you've got zero slots left. Fix: Identify yellow's location in the tray before you start. Load it by the 30% mark.

Mistake Three: Confusing red and dark maroon. You grab what you think is red, it's actually dark maroon, and you overfill maroon while starving red. Fix: Look at the cup colors in the tray carefully. Dark maroon is noticeably darker and almost burgundy. Red is brighter. Make a mental note of which stack each color is in.

Mistake Four: Filling the belt to 5/5 and holding it. You load five cups and then wait, thinking you're building momentum. But the belt is full, and your next cup has nowhere to go when you tap it. Fix: Always keep one empty slot. Tap "load" only when you see a slot open up.

Mistake Five: Not watching lead time. You tap a cup, assume it pours immediately, and load the next cup based on that assumption. But it hasn't poured yet, and now you're out of sync. Fix: Watch the first cup's full journey—from load to pour. Count the belt ticks (usually 1–2 delays). Use that rhythm for all future loads.

Mistake Six: Panicking when one color hits 90%. You see blue at 90% and assume you're failing, so you stop loading any blue. But you've also stopped all progress because you're alternating to red/maroon only. Fix: Hitting 90% is normal if you're in the endgame. Keep cycling other colors and let blue finish naturally. If blue is truly maxed, skip it and focus on the laggards.

Boosters and Their Moments

If your version of Sand Loop 39 includes extra slot boosters, consider using one at the start if you find the tray unblocking phase overwhelming. Six slots instead of five gives you one more free slot to play with, reducing the risk of jamming.

A slow belt booster (which slows the conveyor) is useful if you're struggling with lead time prediction. It gives you more ticks between loads, making it easier to visually confirm a cup has poured before loading the next one.

An undo booster is best saved for the end-game precision phase. If you overfill a color in the last 20%, one undo can rewind that pour and let you reload the correct color instead.

A cup swap booster (if available) could help unlock a deeply buried color in the tray, but it's less essential than the others for Sand Loop 39 since the stack is only 4–5 cups deep.

Final Encouragement

Sand Loop 39 is a turning point in difficulty. It's the first level where you really have to think instead of just react. That's what makes it satisfying when you beat it. You're not just pouring sand—you're solving a puzzle in real time, balancing timing, color theory, and logistics. The first attempt might feel chaotic, but once you understand the tray layout and the conveyor rhythm, you'll crush it.

If you're still stuck, head over to sand-loop.com for video walkthroughs and community tips. And remember: keeping one slot empty and cycling colors deliberately isn't boring—it's mastery. Good luck!