Sand Loop Level 195 Solution Walkthrough | Sand Loop 195
How to solve Sand Loop level 195? Get instant solution for Sand Loop 195 with our step by step solution & video walkthrough.


Sand Loop Level 195 Snapshot
The Canvas Goal
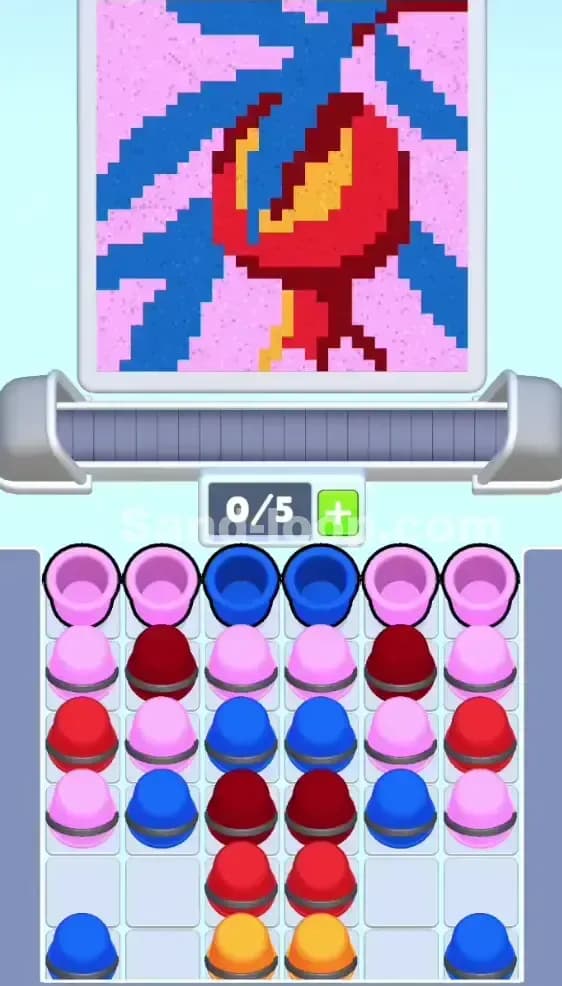
Sand Loop Level 195 presents a colorful pixel-art scene dominated by a beige/tan background with a striking floral or decorative pattern. The top half features bright red and yellow flower-like shapes arranged symmetrically, while the lower section displays bold green foliage and rustic red-brown wooden boxes or planters. The color distribution is fairly balanced—you'll need solid amounts of red, yellow, green, and orange to complete the picture. The beige background will fill in naturally as you work, so don't feel pressured to force background pours early on.
Starting Setup
You're working with a conveyor capacity of 5/7 slots, meaning you can hold only 5 cups at a time before the belt locks up. In your supply tray below, you've got a mix of colored cups stacked in columns: red, orange, green, and cream/white cups are visible and accessible. The three orange cups are immediately usable at the top of the belt, but they're partially blocked by stacked reds and greens underneath. Your initial challenge is deciding which colors to load first without creating a jam that wastes your limited slots.
Win Condition
Fill the canvas by meeting the exact color requirements for red, yellow, green, orange, and the background beige. You win when all progress meters hit 100% without overflow or waste. The key is balancing your pours so that no single color overshoots while others fall short.
Why Sand Loop 195 Feels Hard (The Actual Bottleneck)
The Real Problem: Stacked Cup Access
Sand Loop Level 195 isn't about the colors themselves—it's about the order in which cups reach your conveyor. The tray shows cups stacked tightly, and pulling the wrong color too early means burying the one you actually need under a useless cup that's now riding the belt. With only 5 slots available, you can't afford to load three orange cups and then realize you desperately need green but it's still trapped two layers deep.
Three Classic Traps
First, don't load all three orange cups right away just because they're sitting there. You'll burn through orange too fast and won't have room for the color balancing you need mid-game. Second, the cream/white cups look harmless, but loading them when you're near capacity will lock your belt and prevent you from accessing the greens you need. Third, if you overfill red early (it's a big chunk of the picture), you'll find yourself with nothing but orange cups left, forcing you to either waste moves or accept a failed run.
Why It Feels Deceptive
I choked the timing here twice because I thought "just keep the belt moving." But Sand Loop Level 195 isn't about speed—it's about restraint. The tricky part is watching the progress bars climb and resisting the urge to top off one color when you should be saving your conveyor slots for the colors that are still buried. It looks like a straightforward fill, but the stacked tray adds a real puzzle layer.
Step-by-Step Walkthrough to Beat Sand Loop Level 195
Opening Rhythm: First 5–6 Pours
Start by loading one orange cup and two green cups onto the belt. This gets your fastest-moving colors flowing without overcommitting. Don't load all three oranges—leave one for later. Wait for these cups to pass under the pour point and cycle off. Your first pours should be one light orange burst, then one green burst. Watch your progress bars: red and yellow should still be near zero, so you're not wasting anything yet. Keep at least 1–2 slots empty on the belt to maintain flexibility. Load a red cup into the newly freed slot immediately after. This opens the tray and starts exposing deeper colors.
Unblocking Plan: Freeing Critical Colors
Once that first red cup cycles through, pour it decisively—red is about 25% of the image, so you need consistent access. As reds start coming up naturally from the tray, load one more green and one more orange. The real unblocking happens here: by rotating through the colors, you're shifting the stacked cups in the tray and exposing the green columns beneath. If you see a white/cream cup about to hit the top, don't load it yet—wait for another green or red to clear first. The tray columns on the left and right show "6/6" slots, meaning they're stacked deep. Patience here prevents a mid-game bottleneck.
Mid-Game Control: Balancing the Meters (40–70% Progress)
By now, your progress bars should show red around 50%, orange around 40%, green around 45%, and yellow still climbing. This is where Sand Loop Level 195 gets tense. Alternate color groups: one pour of red, one pour of green, one pour of orange, then back to red. Check your tray—are greens still accessible? If not, load an orange or white cup to shift the stack. Never load more than three cups of the same color in a row, even if they're all visible. Keep your slot count between 2 and 4 at all times. This gives you room to react if a meter suddenly spikes. If a color hits 80% while another is at 40%, stop pouring the high color immediately and switch to the low one, even if it means leaving an empty spot on the belt.
End-Game Precision: Final 20%
When meters hit 70–80%, slow down dramatically. Load single cups, pour once, check the meter, load the next. Sand Loop Level 195's final stretch is where sloppy play fails—one extra burst of red and you're done. If your red is at 95% and your orange is at 70%, load only white or cream cups and let them pass unused (they won't pour, they'll just clear the belt). This sounds wasteful, but it's the safest way to hit 100% without overflow. Your last few pours should feel surgical: watch the meter hit 95%, 98%, 100% with no panic overpour.
If You Mess Up: Recovery Tactics
If you accidentally overfill red to 105%, you've likely failed that run—but here's what to learn: reload and skip the second red cup next time. If your meter shows red at 90% but you've already loaded two red cups, don't panic. Let one ride the belt unused (just don't tap pour). If you jammed your belt by loading the wrong color stack, reset and adjust your opening rhythm: load one orange, one green, one white instead. This breaks the symmetry and exposes different cups. Recovery is about recognizing the mistake and adjusting next run, not mid-run.
Why This Strategy Works in Sand Loop Level 195
Conveyor Lead Time and Slot Economy
Sand Loop Level 195 has a 5-slot limit, which sounds tight but is actually generous if you respect it. By keeping 1–2 slots empty, you're giving yourself a 1–2 second window to see the next meter spike and react before loading more of that color. The lead time between when you tap and when the cup reaches the pour point means your decision-making window is bigger than it feels—use it.
Preventing the Classic "Background Overfill" Lock
The beige background will fill naturally as you pour all colors. You don't need to force a background pour ever. By focusing on the four main colors (red, green, orange, yellow) and treating white/cream cups as "spacers" rather than primary pours, you sidestep the trap of accidentally saturating the background and boxing yourself out of the fine tuning you need at the end.
Consistency Under Pressure
This strategy reduces decision paralysis. Each phase (opening, unblocking, mid-game, end-game) has a clear color priority, so you're not staring at the tray thinking "which color now?" You're moving with purpose, and that consistency translates to fewer failed runs.
Extra Tips and Adaptations for Levels Like Sand Loop 195
Six Specific Mistakes and Fixes
Mistake 1: Loading all three orange cups in the first minute. Fix: Save the third orange for mid-game; it's your easiest color to top off later. Mistake 2: Ignoring the cream/white cups and letting them jam the belt. Fix: Load them strategically as "spacers" between color changes—pour or not, they clear the tray columns. Mistake 3: Pouring continuously without checking meters. Fix: Tap, watch for 1–2 seconds, then decide on the next color. Mistake 4: Keeping your belt at 0/5 slots by loading cups back-to-back. Fix: Always maintain visible empty space; it's your safety margin. Mistake 5: Waiting too long to load red because it seems "abundant." Fix: Red appears often but is needed in large quantity—don't hoard slots, rotate it through. Mistake 6: Panicking and overfilling one color in the final 10%. Fix: Slow your taps. One pour at a time. Breathe.
Booster Hints
If your version of Sand Loop Level 195 includes boosters, consider an Extra Slot booster only if you find yourself locked at 5/5 frequently. A Slow Belt booster is nice for end-game precision but not essential if you're patient. An Undo Last Pour booster is gold if you accidentally overfill—spend it immediately rather than resetting the whole level. A Color Swap booster can bail you out if the tray is truly stuck, but good planning should avoid this.
Final Encouragement
Sand Loop Level 195 is a turning point in the game—it's not brutally hard, but it demands discipline. You've got the tools; now you've got the plan. Trust the rhythm, respect the slot limit, and don't rush the ending. If you're still struggling after a few runs, visit sand-loop.com for video guides and community tips. You'll beat it, and the next level will feel easier because you've internalized the real skill: restraint and timing. Now get in there and fill that canvas.