Sand Loop Level 230 Solution Walkthrough | Sand Loop 230
How to solve Sand Loop level 230? Get instant solution for Sand Loop 230 with our step by step solution & video walkthrough.

Sand Loop Level 230 Guide: The Cozy Cottage Puzzle
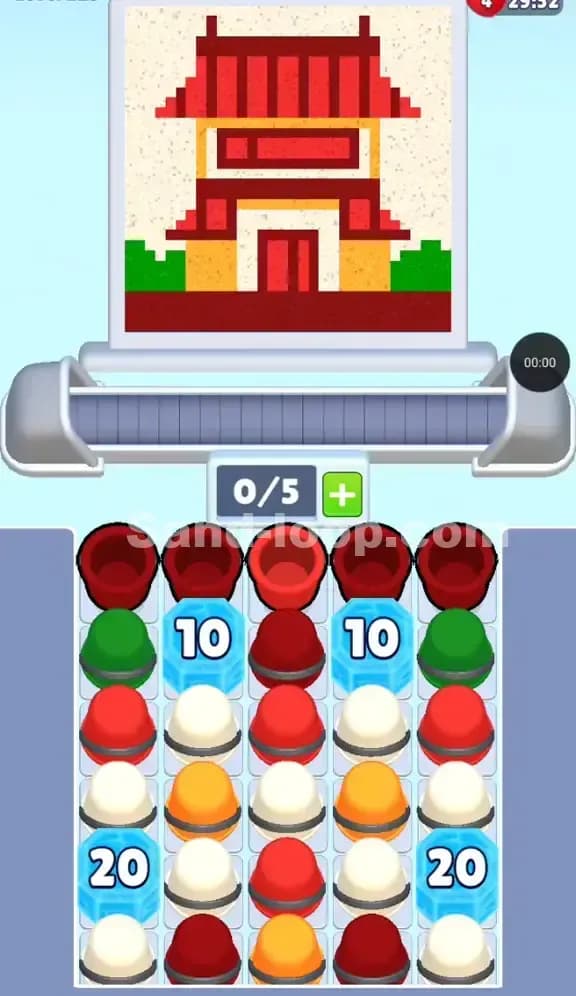
The Art: This level features a pixel art "Cozy Cottage." You’re looking at a bright red house with a white front, a red chimney puffing out white smoke, all sitting on green grass against a massive yellow/orange textured sky.
The Level Type: This is a Digging Level. You aren't racing a fast clock so much as you are trying to excavate the bottom layers of the tray. The colors you need for the detailed center (Red and White) are buried under a mountain of background colors (Green and Orange).
The Hook: The puzzle here is vertical depth. The "Red" needed for the house and fence is almost entirely trapped at the very bottom or hidden inside Mystery Cups. You have to strip away the landscape (Grass/Sky) before you can even think about building the house.
Sand Loop Level 230 Solution: Deconstructing the Cottage
The color palette is simple, but the distribution is lopsided.
- Yellow/Orange: This is your dominant background color (the sky and the path). You will need a ton of this early on.
- Green: The grass flanks the left and right sides.
- Red: Used for the house body, the chimney, and that tricky little fence in the bottom right.
- White: The house’s front wall and the smoke clouds.
The Danger Zones: The Fence is the killer. It requires precise Red pours later in the level, but because the Red cups are buried deep or hidden in Mystery Cups (grey with '?'), you might find yourself with a clogged conveyor belt waiting for a Red that isn't accessible yet. Also, the Smoke requires White cups, which are locked behind the Ice Blocks in the middle rows.
Fill Order Prediction: The tray layout forces a specific order:
- Sky & Grass (Top Layer): You have no choice. The top of the tray is exclusively Green and Orange.
- House Walls (Middle Layer): As you dig, you hit the White cups.
- Roof & Details (Bottom Layer): The Reds and remaining Mystery Cups are at the bottom.
Tackling the Ice Block Sentinels in Sand Loop Level 230
The most obvious obstacle in the screenshot is the pair of Ice Blocks marked with the number "3". These sit on the third row, flanking the center column.
Here is how they behave: Proximity Counts. These blocks don't break just because you stare at them. You must clear or use cups that are physically touching them to lower that number. Every time you successfully pull a cup from an adjacent slot (above, below, or to the side), the counter drops. Once it hits zero, the block shatters, freeing up the cups trapped underneath or behind it.
The problem? They act as a choke point. They effectively split your tray into a "left side" and a "right side" until they are destroyed, limiting your options for creating matches.
Sand Loop Level 230 Step-by-Step Walkthrough
You have 5 slots on your conveyor belt. Don't fill them all at once. Panic is the enemy of efficiency here.
1. The Sky and Grass Opening
Look at the very top row of your tray. It’s symmetrical: Green - Green - Orange - Orange - Green - Green. This is a gift. Tap the two Orange cups in the middle first. They will start filling the vast yellow sky. Immediately follow up with the Green cups on the far left and right. This clears the entire top row and keeps your belt moving cleanly. Do not hesitate here; get that top layer gone to expose the "banded" cups underneath.
2. Cracking the Ice (The "3" Count)
Now you are staring at the second and third rows. You'll see banded Orange and Green cups sitting directly on top of or next to the Ice Blocks. Prioritize these. Every time you clear a cup touching an Ice Block, that "3" becomes a "2". Focus your efforts on the cups sandwiched between the Ice Blocks first (the center Orange ones). Clearing the center opens up more space for new cups to slide down. Ignore the far edges for a second if you have a valid move in the center that lowers an Ice counter.
3. The White Cup Bottleneck
Once the Ice breaks (or you clear the cups directly above them), you will finally get access to the White Cups in the third row. Stop and look at the canvas. The White is used for the house wall and the smoke. The smoke is high up on the canvas, but the wall is lower. Timing matters. If the smoke cloud is currently passing the pour point, grab a White cup. If not, hold off. You don't want a White cup riding the belt all the way to the end and falling off as waste because the house wasn't ready for it.
4. The Mystery Cup Gamble
By the time you reach the bottom half of the tray, you are dealing with Mystery Cups (the grey ones with question marks). This is where runs die. In Sand Loop 230, these Mystery Cups often turn into the Red you desperately need for the roof and fence.
- Strategy: Only tap a Mystery Cup if you have at least 2 open slots on your conveyor belt.
- Why? If the Mystery Cup turns into a color you can't use yet (e.g., Green when the grass is already done), you need a spare slot to let it ride comfortably or to queue up a different color behind it to fix the mistake. If your belt is full and you pop a useless Mystery Cup, you jam the system.
5. Finishing the Fence
The final challenge is the red fence in the bottom right corner. It’s intricate. Ensure you have saved a few Red cups (or Mystery Cups turned Red) for the very end. Do not waste Red pours on the roof if the fence isn't done—prioritize the roof only if the fence is currently out of reach of the pour mechanism. Usually, the fence paints last. Keep a steady rhythm and don't spam-click the final reds.