Sand Loop Level 229 Solution Walkthrough | Sand Loop 229
How to solve Sand Loop level 229? Get instant solution for Sand Loop 229 with our step by step solution & video walkthrough.

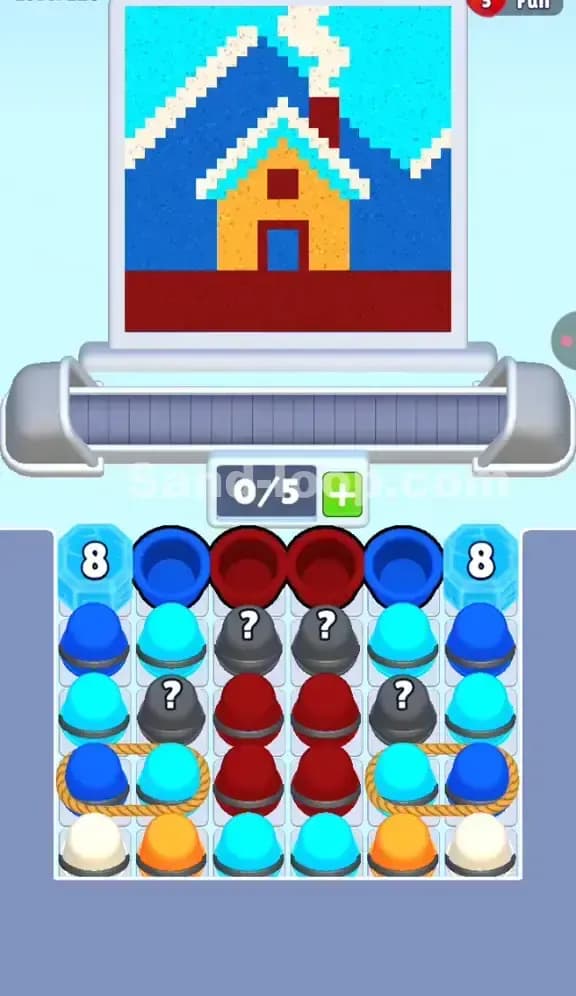
Sand Loop Level 229 Guide: The Red Pagoda Puzzle
This isn't a speed level, but it feels like one because you start boxed in. Sand Loop Level 229 presents a beautiful pixel art of a traditional Asian Pagoda (or Temple). The hook here isn't the painting itself—it's the restrictive Ice Blocks that freeze nearly half your supply at the start. You are forced to paint in a very specific order, and if you waste your limited slots on the wrong shade of red, you’ll jam the conveyor before the ice even melts.
Sand Loop Level 229 Solution: The Pagoda Blueprint
The pixel art is distinct, but the colors can be tricky because the reds are similar.
- Deep Maroon/Dark Red: This is the heavy color for the main roof structure and the base foundation.
- Bright Red: Used for the door frame and the horizontal accent on the second floor.
- Mustard Yellow: The walls of the temple.
- Forest Green: The bushes on the bottom left and right.
- Cream/White: The sky background and some vertical pillar details.
The Danger Zone: The Ice Blocks labeled "10" and "20" are the real puzzle.
- The two "10" blocks freeze columns 2 and 4. These columns hold almost all your Cream (White) and Mustard Yellow cups.
- The two "20" blocks are deeper down in the corners, blocking future supplies.
Fill Order Prediction: Because the Yellow and Cream cups are frozen behind the "10" blocks, you literally cannot paint the background or walls first. You must paint the Dark Red roof and Green bushes first. The game forces this dependency.
Tackling the Ice Counters in Sand Loop 229
The specific obstacle here is the Countdown Ice Block. You see two blocks with "10" on them and two with "20". In Sand Loop 229, these numbers tick down every time you successfully pour a cup from the active columns.
This creates a slot economy crisis. You have a conveyor capacity of 5. To break the "10" blocks, you need to pour 10 cups. But you only have three active columns (1, 3, and 5) to draw from initially. If you pull cups onto the belt that cannot be poured yet (like if you pull a Green cup but the Green bush isn't ready to receive paint), that cup sits on the belt, taking up a slot. If you fill all 5 slots with "un-pourable" cups, you can't pour anything, the ice counters won't go down, and you lose.
Sand Loop Level 229 Step-by-Step Walkthrough
The strategy is aggressive clearing of the available columns to unlock the frozen ones.
1. The Maroon Roof Opener
Your first moves are scripted by the tray layout. You have Deep Maroon cups in the top corners and a Bright Red in the center.
- Tap the Deep Maroon cups (Col 1 and 5) immediately. They will flow to the large roof section.
- Tap the center Bright Red (Col 3).
- Crucial Tip: Do not hesitate. You need these cups to leave the tray and hit the canvas to lower the "10" counters on the ice blocks. The faster you pour, the faster those blocks shatter.
2. Managing the Green Bushes
Once the top layer of Reds is gone, you’ll expose Green cups in columns 1 and 5.
- This is a trap. The Green bushes in the art are small.
- Tap the Green cups only if the red roof is mostly done. If you put Green on the belt too early while the nozzle is still over the roof, it will just loop around and clog your 5-slot capacity.
- Wait for the nozzle to move toward the bottom corners, or ensure there is a gap on the belt, before loading Green.
3. Breaking the "10" Wall
After you clear about 10 cups from the odd-numbered columns (1, 3, 5), the blue "10" Ice Blocks will shatter.
- Immediate Action: As soon as they break, you get access to Cream and Mustard Yellow.
- Stop pulling Reds. Prioritize the Mustard Yellow immediately. The walls are central and need to be filled before the background.
- If you ignore the yellow cups, the nozzle will pass the building and start painting the background, but you'll have empty unpainted walls in the middle of your picture.
4. The Final "20" Block Clean-up
By the time you are painting the Cream background, the "20" blocks in the bottom corners should naturally break.
- These usually hide extra Cream or Deep Maroon for the bottom foundation.
- Keep an eye on the "2/5" or "3/5" capacity indicator. When the "20" blocks break, don't just tap everything. Keep 1 slot open just in case you need to cycle a cup that missed its target.
- The final touches will be the sky. Ensure you don't accidentally waste Cream paint on the red roof details; keep the flow steady but controlled.