Sand Loop Level 241 Solution Walkthrough | Sand Loop 241
How to solve Sand Loop level 241? Get instant solution for Sand Loop 241 with our step by step solution & video walkthrough.
Sand Loop Level 241 Guide: The Pixel Wave Puzzle
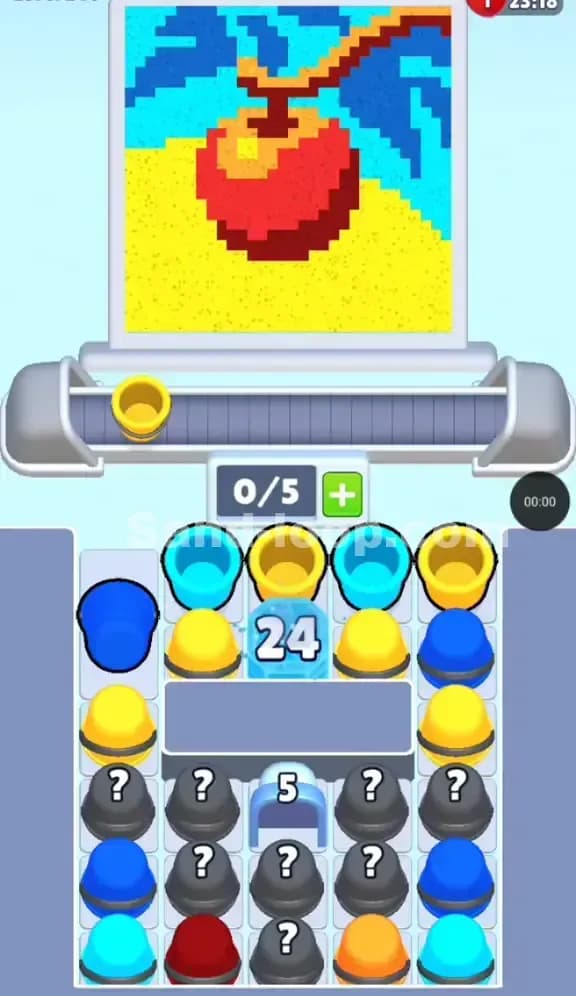
This isn't just a beach scene; it's a test of your patience with hidden information. Sand Loop Level 241 presents the "Pixel Wave"—a stylized crashing wave that looks a bit like the famous Great Wave off Kanagawa. The art is beautiful, but the puzzle underneath is nasty.
This is fundamentally a Blocker Level. You aren't racing a clock immediately, but you are wrestling with a restricted board. The primary hook here is the massive Ice Block (7) sitting dead center in the tray, flanked by Mystery Cups that refuse to show their colors until you clear the mess above them. The pastel Cyan and darker Blue tones are easy to mix up if you play too fast, and the Yellow sand at the bottom requires precise early pours.
Sand Loop Level 241 Solution: The Great Wave
Look at the canvas. You are painting a seascape. Understanding the layers is the only way to beat the supply constraints.
Color Palette Breakdown
- Base Layer (Bottom): A thick strip of Yellow sand with distinct Dark Red/Maroon accents. This is your priority.
- Mid Layer (Water): Bands of Dark Blue (the ocean depths) and Cyan (the wave body).
- Top Layer (Foam): Scattered White pixels representing the sea foam and crashing crests.
- Shading: There are Orange cups in the tray, which likely shade the sand or the transition between water and beach.
The "Danger Zones"
The biggest headache in the art itself is the White Foam. It’s scattered in irregular clumps at the top. Because the white pixels are not in a solid block, you cannot just hold down the "White" cup and let it rip. You have to tap-pour, stop, wait for the gap, and tap again. If you miss, you ruin the Cyan water underneath.
Also, watch out for the Dark Red accents at the bottom. They are small. If you queue up a Red cup but miss the timing, you’ll paint over the Yellow sand you just finished, wasting precious slots.
Tackling the Ice Block (7) in Sand Loop Level 241
The screenshot reveals a stubborn white block with a generic number '7' on it, located in the absolute center of the third row. This is an Adjacency Breaker.
Here is specifically how it works: You cannot move, fill, or destroy this block directly. It only takes damage when you clear a cup that is touching it. Since it is buried in the third row, your first few moves do nothing to it. You have to clear the Yellow (row 1, col 3) and the Yellow (row 2, col 3) just to expose its top edge.
Once exposed, every time you successfully clear a cup to its Left (Dark Blue/Cyan) or Right (Dark Blue/Cyan), the counter drops by one. The problem? It acts as a wall. It splits your tray into a "Left Side" and a "Right Side," preventing you from accessing the Mystery Cups in the center columns until extremely late in the game. You have to work around it.
Sand Loop Level 241 Step-by-Step Walkthrough
The supply tray is tight, and the Mystery Cups (the grey ones with question marks) add a layer of RNG (randomness) that can deadlock you if your conveyor belt is full. You have 5 Slots on your conveyor. Never fill more than 3 unless you are certain of the color match.
1. Clearing the Sand (Yellow & Red)
Your first few moves must focus on the bottom of the canvas.
- Look at your Top Row. You have Yellow on the far left and right. You also have a Dark Red cup.
- Tap the Yellow cups first. Send them to the belt to fill the beach base.
- Crucial Step: Do NOT send the Blue or Cyan cups yet. They will just sit on your belt, occupying slots because the water layer isn't ready to be painted.
- Once the Yellow sand is mostly down, slot in that Dark Red cup to hit the bottom details. This clears the top row and gives you access to the second row.
2. Breaking the Count-Down Logic
Now you are staring at the second row and the top of the '7' Ice Block.
- You need to clear the cups touching the '7'. The Orange and Cyan cups in the second row are your battering rams here.
- Check the canvas. Is there a spot for Orange? Likely near the sand/water border. Send the Orange cups.
- Is there a spot for Cyan? Yes, the main wave. Send the Cyan cup.
- Every time these cups vanish from the tray, the '7' counter ticks down.
- Warning: Do not touch the Mystery Cups on the bottom left/right corners yet if you can avoid it. You need known colors to clear the specific pixels adjacent to the block.
3. The Mystery Cup Gamble
By the time you reach the fourth row, the board is mostly Mystery Cups.
- This is where the 5-slot belt saves you. Tap a Mystery Cup. It reveals itself.
- Scenario A: It’s White. The foam is at the very top of the image. It is useless right now. Let it ride the belt to the end and loop back. Do not clog your belt with 3 White cups while you are still trying to paint the Blue water.
- Scenario B: It’s Dark Blue. Excellent. The horizon line needs this. Paint it immediately to free up the slot.
- You must treat the conveyor belt as a storage buffer. Keep the "useless" colors circling while you dig for the colors you need to finish the current layer.
4. Navigating the Foam Finish
The final phase is the White foam.
- Once the Ice Block breaks, you usually unlock the central column of cups. These are often high-value colors required for the final details.
- The White foam requires Burst Pours. Do not hold the button. Tap-tap-tap.
- The pixel art for the foam is jagged. Watch the preview line on the canvas. If the stream is going to hit a Cyan pixel, stop pouring immediately. It is better to leave a gap and catch it on the second loop than to ruin the wave body.
Final Check
If you are stuck with 1 pixel of Yellow left and no Yellow cups visible, break the remaining Mystery Cups. The game logic usually hides the exact color you need in the last few blind spots. Trust the distribution and keep that belt moving. Good luck.