Sand Loop Level 242 Solution Walkthrough | Sand Loop 242
How to solve Sand Loop level 242? Get instant solution for Sand Loop 242 with our step by step solution & video walkthrough.
Sand Loop Level 242 Guide: The Autumn Tree Puzzle
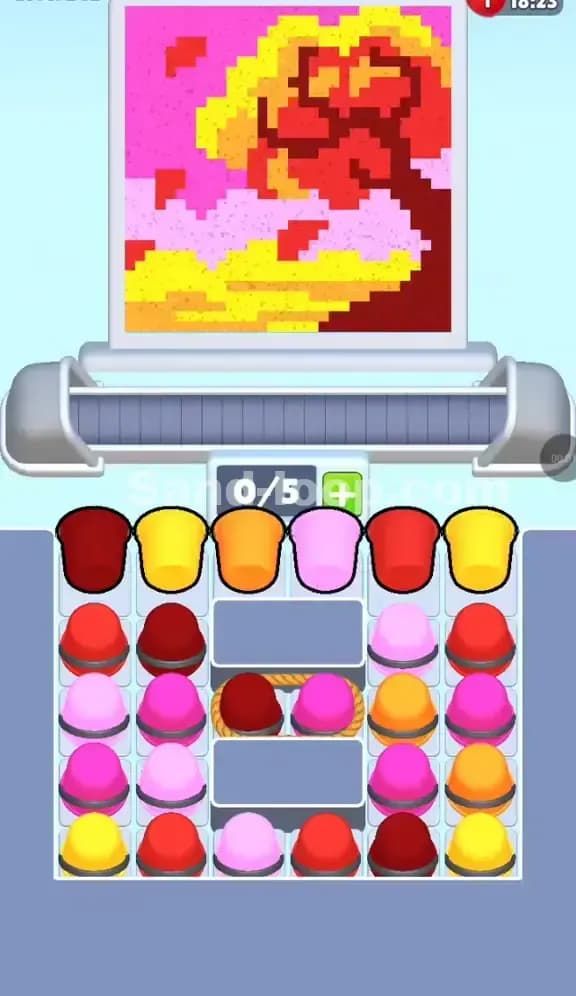
The image for Sand Loop Level 242 is a vibrant landscape, likely an "Autumn Tree" scene. You are looking at a composition dominated by a large tree with red and orange foliage against a split background of pink sky and yellow ground.
This is primarily a Logic Level. While there isn't a strict timer forcing speed, the supply tray is heavily obstructed by "dead zones" (gray blocks) and a rope binding mechanism. The challenge isn't how fast you tap, but navigating a supply tray that is physically split into three awkward columns.
The hook here is the color confusion. The artwork uses a Dark Red for the trunk, a bright Red for leaves, and an Orange for the ground/foliage mix. In the heat of the moment, grabbing a Dark Red cup when you needed bright Red will clog your conveyor belt instantly.
Sand Loop Level 242 Solution: The Fall Landscape
The pixel art canvas at the top dictates your pacing. Here is the palette breakdown you are working with:
- Dark Red/Brown: Used exclusively for the tree trunk and thick branches.
- Bright Red & Orange: These make up the bulk of the tree's "leaves." Note that they are scattered in pixelated clumps, not solid blocks.
- Hot Pink & Light Pink: These form the sky. The Hot Pink is the upper sky, while the Light Pink/Lavender is the horizon line.
- Yellow: The ground and highlights on the tree.
The Danger Zones: The biggest trap is the Tree Trunk. It is thin, irregular, and requires very precise bursts of the Dark Red/Brown sand. If you queue up three Dark Red cups in a row, you will likely overshoot the trunk and spill waste sand onto the yellow background, ruining your "Perfect" rating.
Fill Order Prediction: The nozzle will likely sweep across the sky first (Pinks) or the large ground patches (Yellow) before getting stuck on the detailed tree branches. Watch the nozzle's path. If it's hovering over the top left, prioritize Pink. If it drops to the center, switch gears to Red/Orange.
Tackling the Rope and Split-Tray in Sand Loop Level 242
The screenshot reveals a nasty tray layout. This isn't a solid block of cups; it is a segmented puzzle.
The Obstacle: The Central Chokepoint Notice the gray blocks in the center columns. These are static barriers. They divide your tray into a Left Wing, a Right Wing, and a heavily obstructed Center Column.
- The Rope: In the very center (Row 3), there is a Rope tying a Dark Red cup and a Pink cup together. You cannot move one without the other, or more likely, they are locked in place until the obstructions above them are cleared.
- The Consequence: Because of the gray blocks, the cups in the middle column don't slide down smoothly like the sides. You have to manually clear the top-middle cups (Orange and Pink) to even see the blocks, and then you have to work the sides to trigger any movement that might free the roped section.
Sand Loop Level 242 Step-by-Step Walkthrough
You have 5 slots on your belt (0/5). Do not fill them all at once. This level requires "Just-in-Time" delivery because the tray is so restrictive.
1. Clear the Top-Middle "Cap"
Your first moves should target the Orange and Pink cups sitting at the very top of the center columns (between the side stacks).
- Why? They are blocking the gray stones. Until you clear these two, you can't assess if the game will let cups slide into that space or if it's a permanent dead zone. Get them onto the belt early, provided the nozzle is near an Orange or Pink patch.
2. Work the Left and Right Wings Evenly
Once the middle is exposed as blocked, you are forced to rely on the Left Wing (Dark Red, Red, Pink vertical stack) and Right Wing (Yellow, Red, Pink vertical stack).
- Do not drain one side completely. If you empty the left side, you might bury a necessary color deep in the right stack.
- Alternate between left and right. Peel off the top layer of Dark Red (Left) and Yellow (Right) as soon as the canvas demands those colors.
3. Solving the Rope Trap
Eventually, you will reach the Rope in the center holding the Dark Red and Pink cups.
- Roped cups often act as a single unit or a heavy block. You usually need to tap them when both colors are somewhat useful, or when you have 2 empty slots on the belt to accommodate the burst.
- Critical Tip: Before you free the roped cups, make sure your belt isn't full. If you tap the rope and it releases two cups but you only have 1 slot left, the game might jam or deny the move. Keep your slot count at 3/5 or lower when approaching the rope.
4. The Final Layer (Yellow/Red Mix)
The bottom of the tray (Row 5) is a messy mix of Yellow, Red, and Light Pink. By the time you reach this layer, the painting will be 80% done.
- Slow Down. At this stage, you only need specific pixels filled. Don't spam the Yellow cups just because they are available. Look at the canvas. If the Yellow ground is finished, those yellow cups are now garbage/obstacles. Only queue them if you absolutely must clear them to reach a Red cup behind them. If you have to waste a cup, try to time it so the sand falls into a gap in the belt, minimizing damage.