Sand Loop Level 264 Solution Walkthrough | Sand Loop 264
How to solve Sand Loop level 264? Get instant solution for Sand Loop 264 with our step by step solution & video walkthrough.

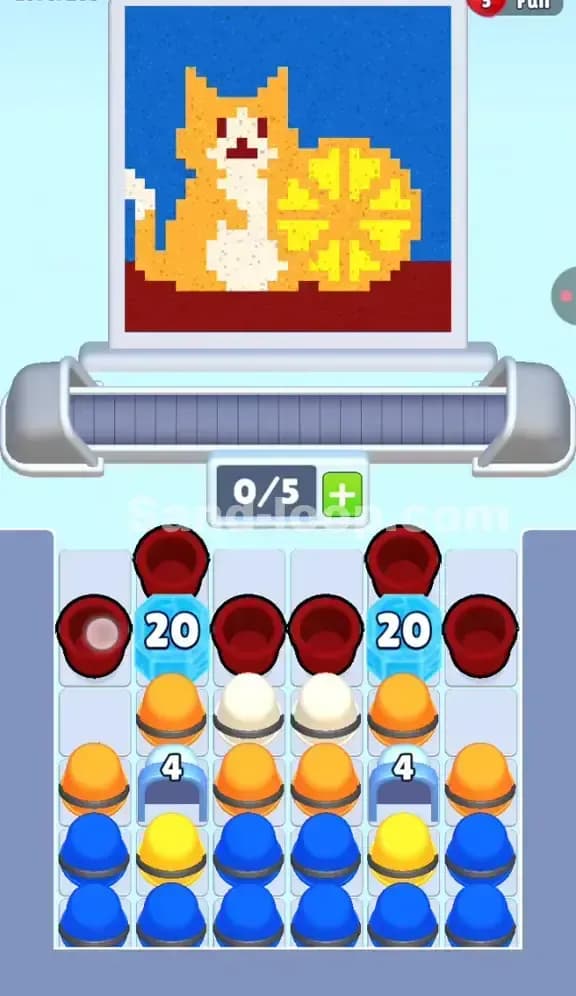
Sand Loop Level 264 Guide: The Red Sailboat Puzzle
This is the Red Sailboat level. If you see a ship with red flags and golden sails floating on a blue strip of ocean, you are in the right place. Sand Loop Level 264 is technically a logic level, heavily disguised as a color-matching test. The primary challenge isn't speed; it's the extremely limited movement caused by Rope constraints and Mystery blocks.
The hook here is the 0/5 Slot Capacity combined with a very dense, blocked-up supply tray. You have almost no wiggle room. The ropes tying the central red and orange cups together mean you cannot just pick colors freely; you have to untie the knot by clearing specific adjacent cups first. Also, the beige background is deceptive—it looks like "empty space," but it requires actual sand (white/beige cups) to fill.
Sand Loop Level 264 Solution: The Sailboat Art
Let's break down the pixel art requirements shown on the top canvas.
- Color Palette Deep Dive:
- Deep Blue: Used exclusively for the water at the very bottom.
- Bright Red: The dominant color. It fills the hull of the ship and the flags.
- Dark Red/Maroon: Used for shading inside the ship's hull.
- Golden Yellow: The main body of the sails.
- White: The crosses on the sails and the background fill (the sky).
- The "Danger Zones": The biggest risk is the shading on the ship. Notice the dark red pixels inside the bright red hull? If you pour bright red too aggressively, you will overwrite those shadow spots. Similarly, the white crosses on the yellow sails are small detail areas. Pouring yellow too early or too long will ruin the cross pattern.
- Fill Order Prediction: The water (Blue) is at the bottom, meaning it's visually separate, but logic dictates you usually fill the background (White/Beige) or the large dominant blocks (Red Hull) first to clear board space. However, in Sand Loop 264, your hand is forced by the tray layout. You have to play the Blues and Reds near the top just to reach anything else.
Tackling the Rope and Mystery Block Obstacle in Sand Loop 264
The tray layout in Sand Loop Level 264 is nasty. Look at the screenshot's supply area:
- The Rope Barrier: There is a literal rope tying a group of central cups together (the Maroon and Red cups in the middle rows). You cannot tap these cups directly. To cut the rope or release them, you usually need to clear the cups immediately adjacent or above them to trigger a slide or break the binding logic.
- Mystery Blocks (Question Marks): Flanking the sides are gray cups with "??". These are wildcards or randomizers. Until you clear the White and Blue cups above them, you don't know what color they will be. They are often "filler" colors like the background beige or extra red.
- The Bottleneck: The top row is blocked by Blue and Red cups. You only have 5 slots on the conveyor. If you pull 3 Blue cups onto the belt but the dispenser is currently pouring Red sand, those cups are uselessly occupying 60% of your belt capacity. This creates a deadlock.
Sand Loop Level 264 Step-by-Step Walkthrough
This level requires a specific "Dependency Chain." You can't reach the yellow sails (bottom of tray) until you clear the hull colors (top of tray).
Clearing the Top Blue and Red Layer
Your first moves must focus on the top-most accessible cups.
- Blue Water First: The top corners have Blue cups. The water at the bottom of the canvas is a separate block, but clearing these cups opens up the side columns. Tap the Blue cups to send them to the belt. Time this so they catch the blue dispenser if active, or just get them out of the way to unclog the tray.
- The Hull Foundation (Bright Red): The immediate center has Bright Red cups. These are needed for the ship's body. Start filling the large red section of the boat. Do not pull the Dark Red (Maroon) cups yet, even if they become available. Focus on the main red volume.
Navigating the Rope Trap
Once the top layer thins out, you reach the roped section.
- Unlock the Center: The ropes usually bind the Dark Red and Bright Red cups in the middle. You need to clear the red cups surrounding this knot. As you clear the free Red cups, the game logic often snaps the rope, or allows the tied cups to slide into playable positions.
- Mystery Reveal: Now is the time to tap the White cups sitting on top of the Mystery Blocks on the far left and right. These White cups are likely for the background sky or the crosses on the sails. Once they are gone, the Mystery Blocks reveal their true colors. If they turn Yellow, save them. If they turn Beige/White, use them immediately to clear space.
Filling the Sails (Yellow & White Detail)
The bottom of the tray holds the Yellow cups needed for the sails.
- Precise Timing: The sails have white crosses. This means you cannot just stream Yellow sand continuously. You must alternate or leave gaps. Send a Yellow cup, then a gap (or a White cup if you have one ready for the cross), then Yellow again.
- The Final flush: By now, the heavy Red hull should be finished. Your belt should be free to handle the bulk Yellow for the rest of the sails and the remaining Beige/White for the sky background. If you have any leftover Blue cups that you didn't use for the water earlier, flush them now—but be careful not to contaminate the sky.
Keep your slot count in mind. Never fill the conveyor to 5/5 unless you are certain the first cup is about to be poured and removed. Keeping it at 3/5 gives you emergency room to maneuver. Good luck with the Sailboat!