Sand Loop Level 162 Solution Walkthrough | Sand Loop 162
How to solve Sand Loop level 162? Get instant solution for Sand Loop 162 with our step by step solution & video walkthrough.


Sand Loop Level 162 Snapshot
The Canvas Goal
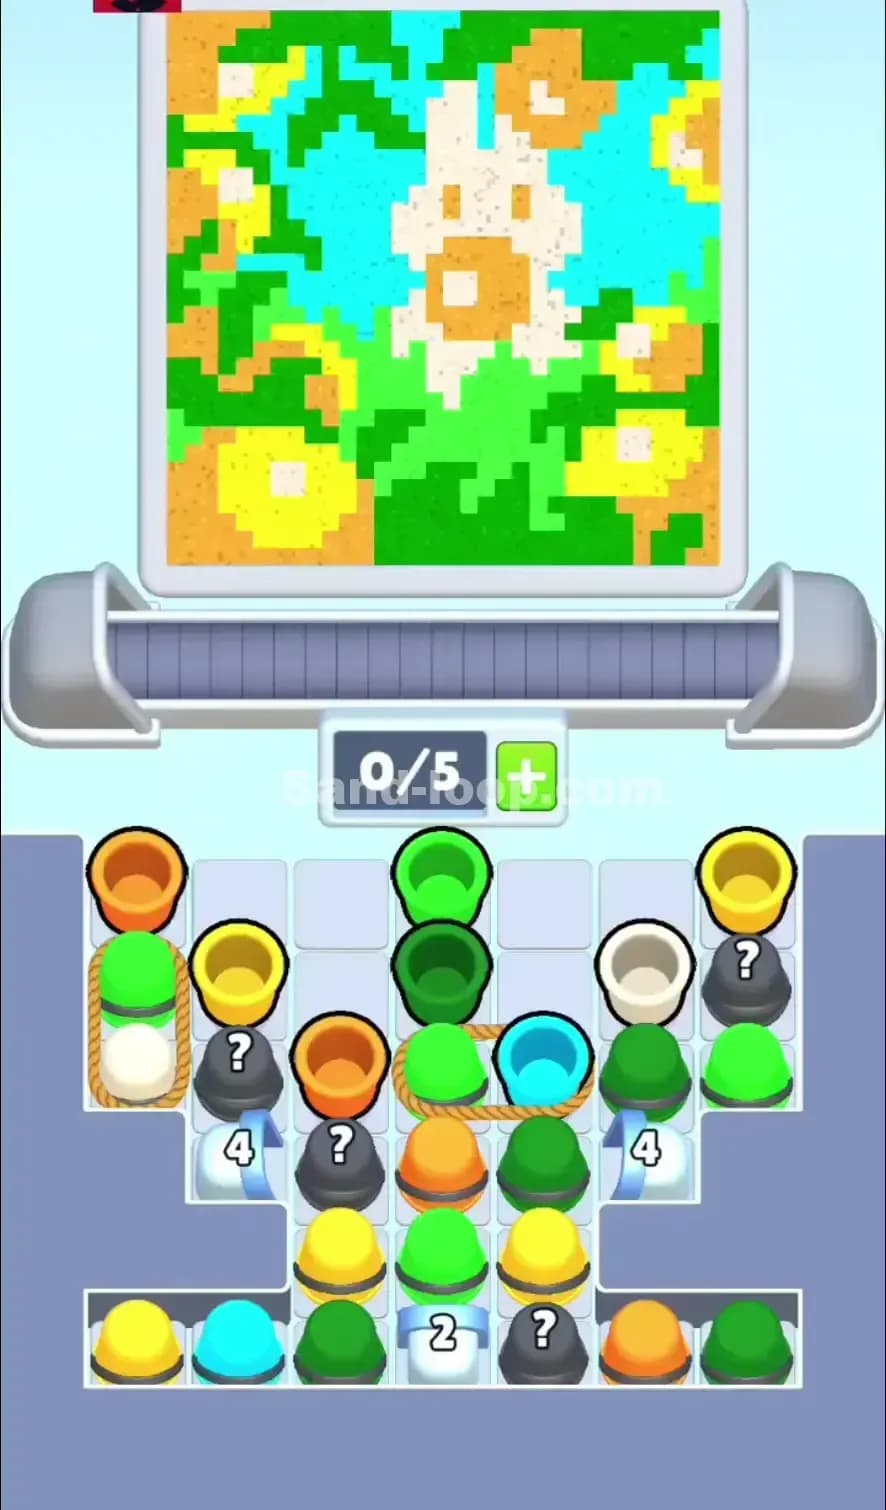
Sand Loop Level 162 presents a vibrant pixel-art landscape you need to fill strategically. The scene features a yellow sky with silhouetted buildings—dark red castles and turrets, bright yellow houses with a magenta roof accent, and a solid green grass base at the bottom. The color progress meters at the top tell you exactly what Sand Loop 162 demands: you've got to balance pours across yellow, red, magenta, and green without overshooting any single color. This isn't a "dump everything" level; it's about precision and restraint.
Your Starting Setup
You're looking at a conveyor belt with 0/5 slots currently filled—meaning you've got breathing room, but not infinite capacity. The cup tray below is stacked deep with multiple colors: bright green, blue, red, yellow, magenta, and orange cups are visible but layered and blocked. Your conveyor will move cups under a single pour point, and you control when to tap and which cups to load. Sand Loop 162 starts locked in a way that forces you to think: which buried colors do I need to access first, and which can wait?
The Win Condition
Fill the canvas to completion by meeting all four color targets (yellow, red, magenta, and green) without wasting pours or accidentally overfeeding one shade while you're distracted. Sand Loop 162 is won when the picture is whole and no color meter has spilled into the red "overflow" zone. You'll know you've succeeded when the level clears and rewards you—but only if you didn't jam your slot economy or contaminate the canvas.
Why Sand Loop 162 Feels Hard (The Actual Bottleneck)
The Real Puzzle: Cup Stacking and Unblocking
Sand Loop 162's core difficulty isn't the conveyor timing—it's the tray. Your key colors are buried under junk stacks. Green and red cups, which dominate the canvas, are locked beneath magenta, yellow, and blue layers. If you load the wrong cups first, you'll jam your belt with useless colors while the cups you actually need sit unreachable at the bottom. I choked this level twice before I realized I was prioritizing the wrong unblocking sequence.
Three Sneaky Traps
Trap 1: Magenta Greed. That magenta roof is small on the canvas, but it's eye-catching. You'll feel tempted to load magenta cups early and pour aggressively. Don't. Magenta needs maybe 2–3 pours total in Sand Loop 162, yet the tray has multiple magenta cups stacked up front. Overfeeding magenta is the fastest way to lock yourself out of the green and red fills you actually need.
Trap 2: The Blue Distraction. Blue cups are abundant and accessible, but there's no blue in the final canvas. If you load and pour blue even once, you've wasted a pour and potentially contaminated the image. Sand Loop 162 will punish casual finger-taps.
Trap 3: Slot Deadlock. With only 5 slots on the belt, it's easy to fill all 5 with marginal colors, then realize you can't fit the critical cup you need next. Keeping 1–2 slots free at all times prevents this nightmare.
Why It Looks Easy but Isn't
The canvas is pretty and simple—just a few big color blocks. But Sand Loop 162 demands you think three steps ahead: Which cup do I load now so that the color I need is exposed next? The delayed timing of the conveyor (your tap happens now, the cup pours later) makes this a rhythm-game mind-bender. One wrong move early ripples through the whole level.
Step-by-Step Walkthrough to Beat Sand Loop 162
Opening Rhythm: Load Smart, Leave Gaps
Start Sand Loop 162 by not loading all 5 slots immediately. Instead, load two cups: grab a green cup and a red cup from the exposed top of the tray. Why? These two colors dominate the canvas and are your throughput anchors. Tap the green cup first; it'll ride the belt and pour into the sand after a 2–3 second delay. While it's in transit, load a red cup into an empty slot. Keep 3 slots empty. This rhythm—load, tap, wait, load next—prevents jams and keeps you in control.
Once green and red are flowing steadily (you should see their meters climbing), then introduce yellow. Yellow is plentiful in the tray and on the canvas. Load a yellow cup into slot 3, tap it, and maintain the gap. Sand Loop 162's first 30 seconds should see your color bars filling slowly and evenly—no one color jumping ahead.
Unblocking Plan: Free Green and Red First
The tray is a tower puzzle. To expose the cups Sand Loop 162 actually needs, you must remove the blockers. Green cups are stacked under magenta and blue; red cups sit at the base under magenta and yellow. Your strategy: load and exhaust the magenta and blue cups that are in your way, even if you don't need their colors. This sounds wasteful, but it's the only way to unlock the buried high-volume colors.
Load a magenta cup (it's right there on top), tap it, and let it pour. You'll overshoot magenta slightly, but that's okay—Sand Loop 162's magenta target is small, and one pour might actually be half of what you need. Next, load a blue cup (it's blocking access to red), tap it, and accept the "waste." Once blue is gone from the top of the tray, red cups fall into reachable position. Now you can load red repeatedly without obstruction.
By the time Sand Loop 162 is 40% complete, your tray should be "unlocked"—green, red, and yellow cups are all accessible at the top, and you're cycling them freely.
Mid-Game Control: The Cycling Rhythm
Once you hit 40–70% completion on Sand Loop 162, you're in the groove. Here's the mechanical loop: tap green, load yellow, tap yellow, load red, tap red, load green. Stagger your taps so that cups pour in a deliberate sequence, not all at once. Watch your color meters climbing. The moment any color gets close to its target (the meter is about 80% full), stop pouring that color entirely. Switch to other colors.
For Sand Loop 162, this means: if green is nearly full, skip green for two cycles. Load red and yellow instead, let them pour, then return to green only when you've caught up the other colors. This even-distribution approach prevents overfill and keeps all four colors in sync.
Maintain at least one empty slot on the belt during this phase. If a color meter is suddenly too high, you can "skip" it by not loading that color for a rotation, letting your existing cups in the queue finish without adding more.
End-Game Precision: The Final 20%
Sand Loop 162's last stretch is nerve-wracking because one extra pour ruins everything. By now, you know exactly which colors are short. Likely candidates: red (it's big but easy to undershoot), yellow (mid-sized), and green (if you hesitated early). Load the color you need most, tap it, and watch the meter. If it fills the bar—great, don't load that color again.
Finish magenta and blue first during the endgame. These colors have tiny targets and overfill easily. Once magenta and blue are complete, you're only juggling red, yellow, and green—three colors are easier to manage than five. Make your final pours deliberate and count them: "One more red… now yellow… done."
Sand Loop 162 wins when all four meters are full and you haven't spilled into overfill. The canvas should look whole and correct.
If You Mess Up: Quick Recovery
If you accidentally pour the wrong color and overfill (say, magenta is at 110%), don't panic. Restart immediately—Sand Loop 162 is short enough that a fresh run is faster than trying to salvage a bad state. However, if you're close (maybe you over-poured by just 5–10%), continue carefully: load only the colors that are still short, and skip the overfilled color entirely for the rest of the level. Sometimes you can limp across the finish line.
If you load the wrong cup order and jam the belt (e.g., five cups in slots but none of them are colors you need), then restart. Jams are unrecoverable because you can't change the queue once it's locked.
Why This Strategy Works in Sand Loop 162
Conveyor Lead Time + Slot Economy
Sand Loop 162 teaches you that the belt is a timing buffer, not a storage box. When you tap a cup, it doesn't pour instantly; it takes 2–3 seconds to reach the pour point. This delay is your friend. You can load cup A, tap it, then immediately load cup B while A is still in transit. By the time A pours, B is already queued. This overlap keeps the sand flowing smoothly without jamming the belt. The strategy of keeping 1–2 slots free ensures that when you need to load a critical cup, there's always space—no "tray is full, can't access the next color" panic.
Controlled Waste Prevention
The classic Sand Loop 162 failure is overshooting one color (usually the biggest or most accessible one) and then being unable to finish because you're locked out. By staggering taps and cycling through colors in sequence, you spread the pours across all targets evenly. Even if you slightly overshoot one color, the others are also nearly complete, so you finish the level before waste becomes catastrophic. The unblocking phase (loading and exhausting the "junk" colors upfront) feels like waste, but it's actually investment—it unlocks the colored cups you need for the rest of the level.
Consistency and Repeatability
This plan removes guesswork. You're not hoping the timing works out; you're following a rhythm that always works if you execute it. Load, tap, wait, repeat. Watch the meters, match your taps to the progress, skip colors that are full. Sand Loop 162 becomes a puzzle you solve once and execute twice—first attempt teaches you the color demands, second attempt wins it clean.
Extra Tips and Adaptations for Levels Like Sand Loop 162
Six Common Mistakes and Fixes
Mistake 1: Loading All Five Slots Immediately.
Fix: Keep 2–3 slots free at all times. Slots are your control lever. The moment you fill all 5, you're at the tray's mercy.
Mistake 2: Pouring the Same Color Multiple Times in a Row.
Fix: Alternate. Tap green, load yellow while green pours, tap yellow. This staggers pours and prevents color spikes.
Mistake 3: Ignoring Buried Colors Until You Need Them.
Fix: Unblock early. Load and tap the "junk" colors (magenta, blue) that are blocking access to high-volume colors (green, red) before you desperately need those high-volume colors. Sand Loop 162 rewards foresight.
Mistake 4: Treating the Pour Point as Instant.
Fix: Account for delay. Your tap happens now, but the cup pours 2–3 seconds later. Plan your loads with this lag in mind. If you need red to pour next, load red now, not when red is already overdue.
Mistake 5: Tapping Frantically to "Speed Things Up."
Fix: Tap deliberately. Each tap is a commitment. Rapid, nervous tapping just fills your belt with the same color twice and ruins pacing.
Mistake 6: Chasing Overshoot.
Fix: Once a color meter is full or nearly full, don't load that color again. It's done. Move on. Sand Loop 162 doesn't reward last-second top-ups; it punishes them.
Booster Considerations
If your version of Sand Loop 162 includes boosters, here's when they matter: Extra Slots are genuinely useful if you're struggling with deadlocks—they give you breathing room when the tray is awkwardly arranged. However, they're not essential if you follow the slot-management discipline above. Undo is a safety net if you misload a color—use it only if you've just loaded the wrong cup and haven't tapped yet. Slow Belt is helpful if timing is your weakness, but it slows progress; skip it unless you're genuinely panicking. Sand Loop 162 doesn't require boosters on a second or third attempt once you've internalized the rhythm.
Final Encouragement
Sand Loop 162 is tricky, but it's not unfair. The level teaches you one lesson: planning and patience beat luck. Load thoughtfully, tap deliberately, and trust the rhythm. Your first run might feel chaotic, but your second run will be clean. Once you crack Sand Loop 162, you'll carry this unblocking and cycle strategy to harder levels ahead. If you're still stuck, visit sand-loop.com for video walkthroughs, community tips, and more guides. You've got this—now go fill that canvas.