Sand Loop Level 163 Solution Walkthrough | Sand Loop 163
How to solve Sand Loop level 163? Get instant solution for Sand Loop 163 with our step by step solution & video walkthrough.


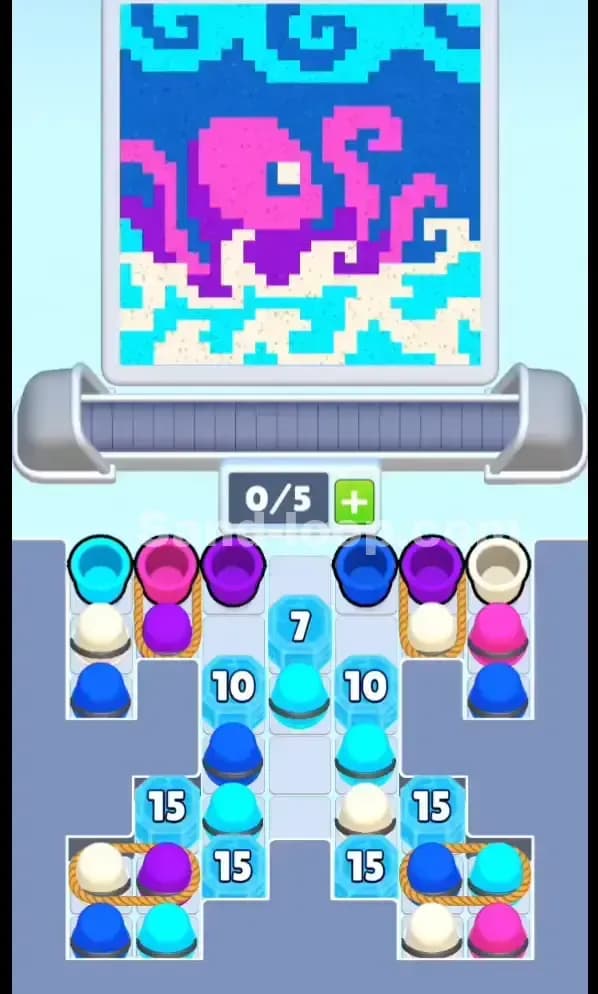
Sand Loop Level 163 Snapshot
Canvas and Color Goals
Sand Loop Level 163 throws you a vibrant, fractured mosaic: bright greens dominate the center and lower half, with cyan, yellow, and orange scattered around the edges and filling small precision zones. There's also a cream-colored "house" or building shape right in the middle that demands careful color blocking. The canvas is roughly balanced across five colors—green being the heavyweight, but cyan, yellow, orange, and cream all need meaningful fills to avoid getting locked out late.
Starting Setup and Tray Layout
You're starting with a 0/5 conveyor capacity, meaning the belt is empty and you have room for five cups before hitting the jam line. The supply tray is packed: you've got multiple greens (both bright and dark shades), yellows, oranges, cyans, and a few wildcards (mystery cups). Several cups are stacked and blocked—notably, some key yellows and cyans are buried under oranges or other colors, and you'll need to clear the right cups first to access them without creating a deadlock.
Win Condition
Beat Sand Loop Level 163 by filling the canvas to match the color requirements—each color meter must reach its target without overshooting into waste. The tricky part? Your supply is physically constrained and stacked. You can't just grab any cup whenever you want; you have to unblock the right ones in the right order while keeping the conveyor belt from jamming. One wrong move (loading a blocked cup, or letting five cups pile up without pouring) and you'll stall.
Why Sand Loop Level 163 Feels Hard (The Actual Bottleneck)
The Real Problem: Stacked Supply Tray
The main bottleneck in Sand Loop 163 isn't the color targets—it's that several key cups are physically stacked under others. You can see yellows trapped beneath oranges, and cyans buried deeper in the pile. If you load the orange cups first without a plan, you'll free the cyans too late, forcing you to either waste them or overfill green while waiting. The puzzle is solving the tray geometry, not just the pouring timing.
Common Traps That'll Get You
Trap 1: Greedy green overfill. Green is so abundant in the tray that you'll be tempted to load green cups continuously. But the canvas doesn't need that much green early—if you pour three greens in a row, you'll max out green progress before cyan and yellow are even halfway done, and you'll be stuck with a belt full of useless cups.
Trap 2: Mystery cups blocking access. There are at least two mystery (unknown) cups in the tray. If you load one thinking it's yellow, and it turns out to be brown or another color, you've just wasted a pour and a belt slot. The safest approach is to leave mystery cups alone until the very end, after you've filled the known colors.
Trap 3: The conveyor creep. You'll load a cup, tap pour, and nothing happens immediately because the cup is still traveling. Three seconds later it arrives at the pour point and you realize you've miscounted the colors. By then, you've already loaded the next cup. Suddenly you're at 5/5 capacity with four pours in flight, and one wrong color locked you in a corner.
Why It "Looks Easy But Isn't"
Sand Loop Level 163 looks straightforward on paper—the colors are obvious, the canvas isn't tiny, and you've got a decent supply. But the stacked tray and the delayed timing between your tap and the actual pour create a deceptive difficulty curve. I choked this level twice trying to "speed-run" the early greens and yellows, only to discover I'd freed the cyans too late and had no belt space left for them. It's a rhythm game disguised as a color puzzle.
Step-by-Step Walkthrough to Beat Sand Loop Level 163
Opening Rhythm: Load Strategically, Not Greedily
Start by loading your first cup: bright green (easily accessible from the top left of the tray). Tap pour immediately. Don't double-load yet—give the conveyor one beat to breathe.
Next, load yellow. There's a bright yellow cup accessible without moving anything; grab it. Tap pour.
Then load cyan. You'll see it's slightly blocked, but not trapped. Load it and pour. At this point you're at roughly 3/5 capacity with one pour each of green, yellow, and cyan in flight or recently poured.
Now, here's the critical rule: keep 1–2 empty slots free at all times. This prevents you from accidentally loading a cup you didn't mean to and gives you room to react if a pour goes wrong.
Unblocking Plan: Free the Secondary Colors Without Jamming
Once you've done the opening three pours, look at the tray. You'll notice orange cups are sitting on top of more cyans. Don't load the oranges yet. Instead, load the remaining accessible green (there are dark greens you can grab), then load one orange to start unlocking the cyan beneath it. This keeps your meter diversity high without full committing to orange.
The key insight: unlock colors in layers, not in columns. Load one orange, pour it, then load the cyan that was trapped below. This maintains color balance and prevents the "stuck with five greens and no cyan" scenario.
By the time you've done 5–6 pours (greens, yellows, oranges in a mixed pattern), the tray will have opened up and you'll have clear access to all the remaining cups. That's when you can afford to load multiple greens or yellows in sequence without fear of trapping yourself.
Mid-Game Control: Cycle, Breathe, and Monitor Progress
Once you've cleared the first 30–40% of the level, the pours start flying. This is where discipline matters. After each pour, look at the color progress bars. If green is at 60% and cyan is at 30%, load a cyan cup next—not another green, no matter how convenient it is.
Maintain your gap rule: never fill all 5 slots. If you've loaded four cups and two pours are still in transit, stop and wait. Load the fifth cup only after one of the in-transit pours completes.
Watch for the "contamination creep." If you accidentally pour a yellow into a green zone (because you misjudged timing), that zone becomes yellow-green and wastes both colors. To avoid this, always load a cup, count to two (giving it lead time to move), then verify the canvas before loading the next one.
End-Game Precision: Finish the Last 10–20% Safely
As you approach 80–90% completion, the meter margins shrink. You're no longer pouring handfuls of color; you're pouring drops. At this stage, load one cup, pour it, wait for the canvas to update, then load the next. Speed doesn't win anymore—accuracy does.
If you're at, say, green 88%, cyan 85%, yellow 90%, and orange 80%, you need one more orange pour and one more cyan pour to win. Load orange, pour it, check the canvas. If orange hits 95% and you're safe, load cyan next. If orange overshoots to 101%, you've lost (wasted the pour). The best way to avoid this is to wait and visually confirm after each pour.
If You Mess Up: Recovery Tactics
Overfilled a color? It's not an automatic loss if you catch it early. If you've poured green four times and green is now at 105% waste, stop pouring green immediately. Load only other colors (cyan, yellow, orange, cream) until they catch up. If the overfilled color is green and the others are way behind, you're in a tight spot—but you can still win if you pour efficiently and don't waste any more slots on that color.
Loaded the wrong cup by accident? If it hasn't poured yet (still in transit), quickly load the correct color next and be ready to ignore the wrong pour when it arrives. You'll have one wasted pour, but you'll stay on track if you recover fast.
Why This Strategy Works in Sand Loop Level 163
Conveyor Lead Time and Slot Economy
The reason we load one cup, pour, then pause is that Sand Loop Level 163's conveyor has a 2–3 second travel time from load to pour point. If you load five cups rapid-fire, the first one is at the pour point, the second is halfway, and the third and fourth haven't even started moving. This creates a "lag window" where you don't see the result until later. By loading-pour-waiting-loading, you align your brain's decision-making with the actual timing of the machine. No surprises, no jams.
The 1–2 free slot rule prevents deadlock. If all five slots are full and four cups are in transit, you're stuck—you can't load anything until a pour completes. Keeping a buffer means you always have a "move available" and never hit that jam state. In Sand Loop Level 163, this is the difference between a 3-minute run and a 15-minute grind of waiting for the belt to clear.
Preventing the Classic Overfill Trap
The biggest loss condition in Sand Loop Level 163 is when you overfill green (the dominant color) before cyan and yellow are done, because then you're stuck with a tray full of greens, a belt that can't use them, and a canvas that rejects them. By mixing your loads—one green, one yellow, one cyan, repeat—you keep all meters rising at roughly the same pace. You'll never have a situation where green is at 100% and yellow is at 50% with no way to pour yellow.
This strategy also teaches you to read the canvas in real time. After each pour, you look at the progress bars. If one meter is visibly ahead, you avoid loading that color next. It's active, responsive decision-making, not a pre-planned "pour green, green, green" sequence.
Consistency Across Runs
If you follow the opening rhythm (green, yellow, cyan, then unlock pattern, then mixed load cycle), you'll hit roughly the same game state by turn 8–10 every time. This consistency means you can reliably reach the end-game phase with balanced meters, so the final 10% is a simple matter of closing out each color one or two pours at a time. No surprises, no panics, no restarts.
Extra Tips and Adaptations for Levels Like Sand Loop Level 163
Six Mistakes and Their Fixes
-
Mistake: Loading all greens first. Fix: Load green, yellow, cyan, orange in rotation for the first six cups, even if it feels inefficient. This establishes meter balance early.
-
Mistake: Ignoring blocked cups and creating a supply dead zone. Fix: If a cup is stacked under two others, don't assume you can't reach it yet. Check the geometry. Often you can load from the side or bottom. If truly blocked, move on and come back after freeing the obstruction.
-
Mistake: Tapping pour multiple times in quick succession. Fix: Tap once per cup. The pour happens automatically once the cup reaches the dispenser. Tapping twice locks in two pours for one cup, wasting a belt slot.
-
Mistake: Loading a mystery cup early. Fix: Leave mystery cups for the final 1–2 pours when you can afford an unknown. If it's the wrong color, you'll have already met the known color targets and can absorb the waste.
-
Mistake: Letting the belt sit idle. Fix: Always have a cup loaded and queued. Even a "filler" pour (one more green when green is nearly done) is better than an empty slot, because it moves the meter forward and clears space for the next batch.
-
Mistake: Panicking and rapid-tapping when behind. Fix: Rapid-fire pours often mean rapid-fire mistakes. Slow down, load one cup, confirm its pour visually, then load the next. A 2-minute careful run beats a 1-minute crash.
Boosters and When to Use Them
If your version of Sand Loop Level 163 offers a +1 slot booster and you find yourself constantly hitting 4/5 capacity with more cups to load, it's worth using before turn 5. This gives you breathing room and prevents the "can't load cyan because green is hogging the belt" trap.
A slow belt booster (speeds up the conveyor) can actually hurt you in Sand Loop Level 163, because it amplifies timing mistakes. Skip it unless you're expert-level comfortable with the rhythm.
An undo or swap-order booster is gold if you've loaded the wrong cup and haven't poured it yet. Use it without hesitation—it's literally designed for this moment.
Final Encouragement
Sand Loop Level 163 is a skill-check level, not a luck level. You've got the tools, the supply, and the canvas size to win. The obstacle is your own pacing and spatial planning. Once you nail the opening rhythm and commit to the mixed-load cycle, you'll beat Sand Loop 163 more often than you fail. And each run teaches you something about the tray layout that'll make the next run faster.
For more detailed strategies, walkthroughs, and community tips on Sand Loop Level 163 and similar puzzles, visit sand-loop.com. You've got this—now go fill that canvas!