Sand Loop Level 166 Solution Walkthrough | Sand Loop 166

How to solve Sand Loop level 166? Get instant solution for Sand Loop 166 with our step by step solution & video walkthrough.
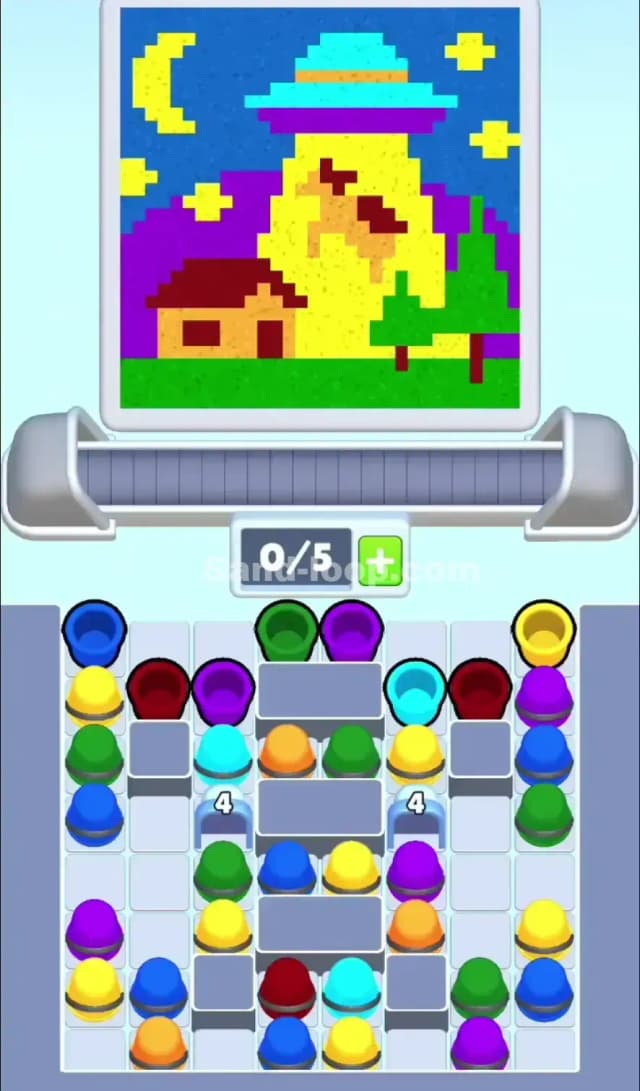
Share Sand Loop Level 166 Guide:
Sand Loop Level 166 Gameplay
Sand Loop Level 166 Solution 1
Sand Loop Level 166 Solution 2
Sand Loop Level 166 Solution 3

Sand Loop Level 166 Snapshot

Canvas and Goal Overview

Sand Loop Level 166 presents a charming pixel-art scene: a cozy nighttime house nestled in a landscape under a starry blue sky. The dominant background is blue (upper two-thirds), with large blocks of yellow, green, purple, and magenta forming the house, landscape, and decorative elements. You'll notice small precision regions too—like the dark red/maroon details on the roof and door, the cyan accents in the sky, and the orange highlights scattered throughout. The color progress meters at the top show you're aiming to fill multiple colors in balance; none should balloon ahead, or you'll lock yourself out of completing the finer details near the end.

Starting Setup

You begin with a 0/5 conveyor capacity—meaning your belt is currently empty, but you can queue up to five cups before hitting a jam. Below the conveyor, your supply tray is densely packed with cups of every color: blue, yellow, green, purple, magenta, cyan, dark red, and orange. Several cups are blocked by others stacked on top, and some slots are empty (gray placeholders), which you'll need to strategically fill as you pull cups up. The bottom rows contain the deepest reserves; the middle and upper rows hold the more immediately accessible pieces.

Win Condition

Fill the entire canvas by pouring the correct sequence and volume of colors into the cups that ride the conveyor. You must hit every color target without overshooting the blues and yellows (which dominate the scene) before you've finished the small cyan, orange, and maroon regions. Overflow wastes sand, clogs your slots, and tanks your score. The goal is surgical precision: each pour timed to arrive at the canvas when you want it, each color dosage measured to the last pixel.


Why Sand Loop 166 Feels Hard (The Actual Bottleneck)

The Real Puzzle: Slot Economy Under Color Demand

Sand Loop 166 isn't tricky because the colors are rare—it's tricky because you have only five conveyor slots and a massive color palette. The blue background alone will consume many pours, and by the time you realize you need more cyan or orange for the final touches, your tray is half-blocked and you've wasted moves cycling the wrong cups. The bottleneck is deciding which colors to commit to early and which to defer, all while keeping 1–2 free slots so you never jam up.

Three Classic Traps in Sand Loop 166

Trap 1: Overloading Blue and Yellow Too Early. These colors dominate the background and are tempting to pour in bulk. But if you fill them greedily in your first 10 moves, you'll run out of conveyor space before you've even queued the precision colors (cyan, orange, maroon). You'll be forced to dump completed cups and waste time reshuffling.

Trap 2: Buried Precision Colors. The cyan, orange, and darker accent cups are often stacked at the bottom or in tight clusters. If you don't unblock them by rotating other cups out early, you'll find yourself stuck with only blue and yellow available when you need variety. By then, it's too late.

Trap 3: Continuous Pouring Panic. When a cup reaches the dispenser, you might instinctively hold the pour button, thinking "more sand = faster progress." Nope. Overflowing a single cup wastes sand, locks up a slot, and contaminating the canvas with the wrong color in a cramped region forces a restart.

Why It "Looks Easy But Isn't"

I choked the timing here twice before I figured out the rhythm. The scene is charming and compact—you think, "How hard can filling a little house be?" But the moment you realize there are eight colors and only five belt slots, suddenly you're juggling priorities like a dishwasher on a tight budget. The pixel-art style makes each region feel small and quick to fill, but the delay between your tap and the cup reaching the pour point means you're always one move behind your instinct. One mistimed pour, and boom—your yellow meter spikes, the canvas rejects the overfill, and you restart.


Step-by-Step Walkthrough to Beat Sand Loop 166

Opening Rhythm: Load the Foundation

Start by tapping blue to load the first cup onto the conveyor. As it glides forward, immediately load a yellow cup. These two colors form your foundation; the canvas is about 40–50% blue and another 20% yellow, so get them moving. Don't load a third cup yet—keep an eye on the meter. As the blue cup approaches the pour zone, watch the blue progress bar; when it's about 15–20% filled, you know your timing is working.

Now here's the key: keep one free slot open at all times. Once blue and yellow are queued, pause. Look at the supply tray and identify which precision colors are closest to the top and easiest to unblock. You'll want cyan, orange, and maroon available within the next five moves, so mentally plan which cups to rotate out first.

Unblocking Plan: Free the Accent Colors

Around move 3–5, load a green cup (it's prominent in the landscape and not as heavy-handed as yellow). This is your "rhythm breaker"—a color that's visually different enough to reset your pour momentum. As green cycles through, study your tray. You should see a cyan cup somewhere in the accessible zone. Load it next. Cyan is small in the final image, but it's in a precision region (the sky accents), so you'll need it available when you're at 75–80% completion.

If orange is still buried, load purple or magenta (both appear in the house walls). This isn't wasting a slot—it's unblocking the layer beneath. As you cycle these mid-tone colors, the orange and maroon cups will rise into accessibility. Don't force them early; the tray will naturally reveal them as you pull cups upward.

Mid-Game Control: The Balancing Act (Moves 6–20)

By move 6, you should have blue, yellow, green, and cyan queued or recently poured. Your conveyor is at about 2/5 capacity. Now comes the delicate part: monitoring all four color meters simultaneously while steadily making progress on the big colors without overshooting.

Load a purple cup. As it queues, watch the yellow meter—if it's crept above 40%, hold off on another yellow pour and instead load magenta or a second green to balance the meter visually. The goal is to keep no single color more than 10–15% ahead of the others in progress.

Critical timing tip: The conveyor has a delay. Your tap happens now, but the cup reaches the dispenser 2–3 seconds later (in game time). So if you load a blue cup, count to two, then start thinking about the next color. This prevents accidental double-taps or out-of-order pours.

Around move 12–15, make sure dark red/maroon is loaded or queued. This color is essential for the roof details and will be needed by move 18–22. If it's still stuck in the lower tray, swap out a less critical color (maybe a second green or second cyan) to free up the layer.

End-Game Precision: The Final 10–20%

As you cross the 70% mark on the dominant colors, slow down and be surgical. Load one cup per pour at this stage. The blue and yellow meters should be nearly full, so avoid them entirely now. Cycle through cyan, orange, maroon, and any remaining accent colors. Pour each for only 2–3 seconds—just enough to hit the fine details without spilling over.

Watch the canvas closely. If you see a small region of unfilled cyan near the sky accents, load cyan, pour for two seconds, and stop. Don't assume you need three seconds; in Sand Loop 166, the precision regions are often smaller than they appear. One short burst will fill them completely.

In the last 5–10% of progress, you may have only 1–2 cups left to fill. Load them, pour each color until its meter hits 100%, and you're done. The hardest part is resisting the urge to pour "just a bit more" when a meter is at 95%. Stop at 100% exactly—overflow is wasted.

If You Mess Up: Quick Recovery

Scenario A: You overloaded blue and now the meter is at 85% but you're only 40% complete. Don't panic. You have spare slots. Load a different color (green, purple, anything but blue) and cycle through two or three non-blue pours to balance the visual progress. Then resume blue carefully, pouring in short bursts.

Scenario B: You can't find a precision color (cyan, orange, maroon) because the tray is jammed. Stop loading the dominant colors immediately. Load purple, green, or magenta purely to unblock the lower layers. This might cost you one or two moves, but it prevents a complete restart. As soon as your needed color rises, queue it.

Scenario C: You poured into the wrong region and contaminated the canvas. If it's a small spill (one wrong pixel), you can continue—the game is forgiving for single pixels. If it's a large mess, restart. Sand Loop 166 doesn't have a penalty for attempts in most versions, so don't waste moves trying to undo a bad spill by pouring over it.


Why This Strategy Works in Sand Loop 166

Conveyor Lead Time and Slot Economy

By loading colors in a staggered, rhythmic pattern—blue, yellow, green, cyan, purple, orange, maroon—you're always three or four moves ahead of the actual pour. This means you control which color is in the dispenser by deciding which color to load now. If you've just queued maroon and the meter shows it's about 80% full, you know maroon will pour in a few seconds, and by then the meter should be closer to 100%. You've essentially "timed" the meter by planning ahead.

The one free slot rule is critical. If your conveyor is ever 5/5 (completely full), you can't load a new color, and you're forced to wait for a cup to pour before continuing. In Sand Loop 166, where color variety matters, a full belt is a dead belt. Keeping one slot free ensures you can always respond to meter changes and tray opportunities without delay.

Waste Prevention and the Overfill Lock

Sand Loop 166 has a sneaky difficulty: its precision regions are small, and its dominant regions are large. It's easy to think "the blue meter is at 60%, so I can afford three more blue pours." Wrong—two pours might overshoot to 110%, overflow, and lock you out of finishing the maroon roof details because sand is wasted.

By pausing and checking meters between pours, you respect the 1–2 second delay and avoid accidental overshoot. By pouring in short bursts during the final 20%, you treat the last details like they matter (they do). This strategy prevents the classic "background overfill locks you out" disaster, where 80% of your canvas is done but you can't finish the last 20% because you've wasted 30% of your sand budget on blue.

Consistency and Attempt Pressure

If you're playing Sand Loop 166 with a move limit or attempt penalty, this strategy keeps your runs predictable. You're not improvising or gambling on "one more pour"—you're following a structured sequence that respects meter balance, unblocks precision colors on schedule, and saves short bursts for the end. Even if you take 22 moves instead of 18, you'll finish, and a finish beats a restart every time.


Extra Tips and Adaptations for Levels Like Sand Loop 166

Six Common Mistakes and Fixes

  1. Mistake: Pouring continuously instead of in short taps. Fix: Tap-and-release. Hold for 2–3 seconds, let go, check the meter. If it's not full, tap again. Continuous pouring is the enemy of precision.

  2. Mistake: Loading all cups of the same color in a row. Fix: Interleave colors. After one blue, load yellow. After yellow, load green. This spreads the burden and keeps meters balanced.

  3. Mistake: Ignoring the tray layout and assuming all colors will eventually surface. Fix: Every 5–7 moves, glance at the tray. If a color you'll need is still buried, plan a "sacrificial load" to unblock it, even if it feels inefficient.

  4. Mistake: Panicking and restarting at 70% because a meter is "stuck." Fix: Meters aren't stuck—you just haven't loaded the right color yet. If blue is at 65% and you're at 60% overall, load cyan, orange, or maroon. As you pour these, the blue meter will seem less urgent, and you'll finish naturally.

  5. Mistake: Pouring maroon or orange as if they're major colors. Fix: Maroon and orange are accents. A 1–2 second pour is usually enough. If you pour for 5 seconds, you'll overfill them and waste sand that could've gone to blue or yellow.

  6. Mistake: Assuming the house roof is all one color. Fix: The roof has dark red/maroon details and yellow highlights. Don't rely on a single pour; check the progress meter to see if you've covered the entire roof region before moving on.

Booster Considerations

If your version of Sand Loop 166 includes boosters, use them sparingly:

  • Extra Slot Booster: Grab this only if you're at move 15 with four or more colors still needed and your tray is severely blocked. One extra slot (6/6) can save a restart, but it's not a substitute for planning.

  • Slow Belt Booster: Useful if your timing is off and you keep pouring into the wrong regions. A slower belt gives you more reaction time between taps. Use it on your second or third attempt if you've identified a timing issue.

  • Undo / Swap Booster: These are lifesavers for accidental overfills or out-of-order loads, but they cost coins. Save them for move 18+ when you're in the precision phase and a single mistake would tank the run.

Honestly, Sand Loop 166 doesn't require boosters if you follow the strategy above. The level is designed to be solvable with patience and rhythm. Boosters are a shortcut, not a necessity.

Closing Encouragement

Sand Loop 166 might feel frustrating at first, but once you nail the timing and the rhythm, it's genuinely satisfying. You'll feel the difference between a sloppy "pour and pray" approach and a planned, deliberate sequence. Stick with the opening rhythm, respect the meter balance, and treat the end-game precision like it matters—because it does.

For more strategies, video walkthroughs, and community tips on Sand Loop 166 and other levels, check out sand-loop.com. You've got this!